Last Updated on June 27, 2026
If you love coffee, you know that perfectly frothed milk can turn an ordinary cup into a café-quality treat. But how do you get that smooth, creamy foam right at home?
You might think it’s complicated or requires fancy machines, but the truth is, anyone can learn to foam milk like a pro. In this guide, you’ll discover simple techniques that will help you create rich, velvety foam every time. Ready to impress yourself and your guests with barista-style drinks?
Keep reading, because your coffee game is about to change forever.
Credit: www.smithbrothersfarms.com
Choosing The Right Milk
Choosing the right milk is key to creating smooth and creamy foam. Different types of milk affect foam texture and taste. Some milks foam better and create richer bubbles. Others may be lighter or less stable. Understanding milk options helps you pick what works best for your drink.
Whole Milk Vs. Alternatives
Whole milk produces thick and creamy foam. Its fat content adds richness and smoothness. This milk is easy to foam and holds bubbles well.
Milk alternatives like almond, oat, or soy have less fat. They can foam but often create lighter, airier foam. Some plant milks may need extra care to foam nicely.
Choose milk based on taste and foam quality you want. Whole milk is best for classic, creamy foam. Alternatives suit those who want dairy-free or lower fat options.
Milk Temperature Tips
Cold milk foams better than warm milk. Start with milk straight from the fridge for the best bubbles.
Heating milk too much breaks down proteins. This stops foam from forming and makes milk taste burnt.
Warm milk to about 140°F (60°C). This temperature keeps milk smooth and perfect for frothing.
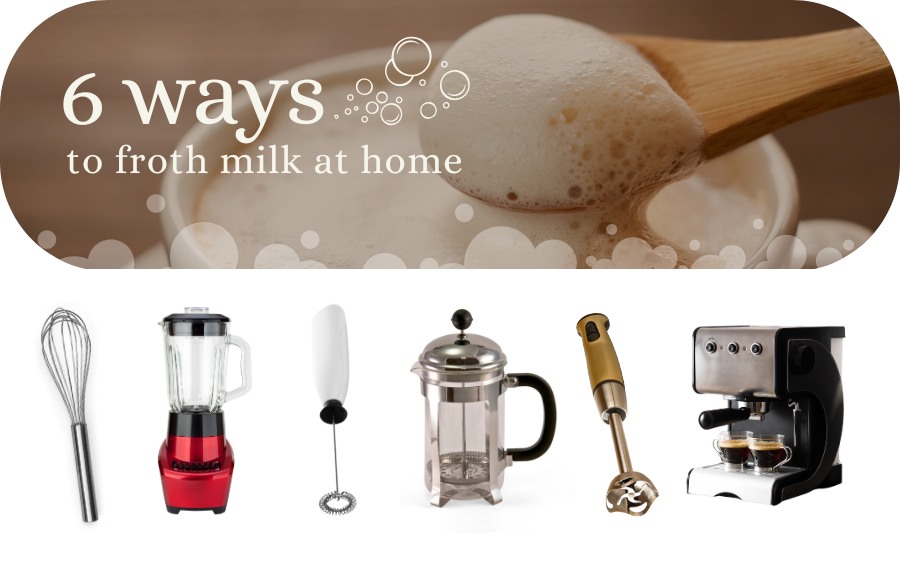
Essential Tools For Frothing
Frothing milk creates creamy, light foam for coffee drinks. The right tools make this process easier and more fun. Choose a tool that fits your style and budget. Each tool offers different ways to create foam. Understanding these options helps you pick the best one.
Manual Frothers
Manual frothers use a simple plunger and mesh screen. Pumping the plunger mixes air into the milk. They are affordable and easy to clean. No electricity needed. Great for small amounts of milk. Perfect for beginners or travelers.
Electric Frothers
Electric frothers heat and froth milk automatically. Just add milk and press a button. They produce thick, consistent foam quickly. Some models have different settings for hot or cold foam. Ideal for daily coffee lovers. Easy to use and clean.
Steam Wands
Steam wands attach to espresso machines. They use steam to heat and froth milk. Skilled users control texture and temperature easily. Steam wands create rich, velvety foam. Found in coffee shops and home machines. Best for those who want barista-style foam.
Step-by-step Frothing Process
Frothing milk is an easy skill that improves your coffee experience. Follow these simple steps to create creamy, smooth foam. Each step matters to get the best texture and flavor. Let’s break down the process clearly for you.
Preparing The Milk
Start with fresh, cold milk. Use whole milk for thick foam or skim milk for lighter foam. Pour the milk into a clean pitcher. Fill it halfway to leave space for frothing. This helps the milk expand without spilling.
Frothing Techniques
Use a steam wand or a handheld frother. Place the wand just below the milk surface. Turn on the steam and lower the pitcher slowly. Move the pitcher in small circles to mix air evenly. Stop when the milk doubles in size.
Achieving Ideal Foam Texture
Good foam is smooth and creamy, not bubbly or dry. Tap the pitcher on the counter to remove large bubbles. Swirl the milk gently to blend foam and liquid. The foam should feel velvety and stick to your spoon.
Common Frothing Mistakes
Foaming milk can be tricky for beginners. Many make simple mistakes that affect the foam quality. Knowing these common errors helps improve your frothing skills fast.
Overheating Milk
Heating milk too much kills its natural sweetness. It also breaks down proteins needed for good foam. Keep milk temperature under 150°F (65°C) for best results. Use a thermometer or test by touch.
Insufficient Frothing
Not frothing long enough leads to thin, weak foam. Foam needs air to become thick and creamy. Froth milk until it doubles in size and feels warm. Stop once the foam is smooth and stable.
Using Wrong Milk Type
Some milks foam better than others. Whole milk makes creamy, rich foam. Skim milk creates more foam but less flavor. Plant-based milks vary; oat and almond milk froth well. Try different types to find your favorite.
Tips For Latte Art
Latte art makes your coffee more fun and special. It shows care and skill in every cup. Learning a few tips can help you create beautiful designs. Start with smooth, creamy foam and steady hands. Practice helps improve your technique quickly. Here are key tips to shape your latte art.
Pouring Techniques
Hold the cup at a slight angle. Pour the milk slowly at first. This mixes foam with espresso evenly. Raise the pitcher higher to pour faster. Lower the pitcher close to the cup surface. This helps foam float on top. Keep your wrist steady and pour in a smooth motion. Stop pouring just before finishing the cup. This prevents spills and keeps the design clear.
Creating Basic Designs
Start with simple shapes like hearts or leaves. Pour steady foam into the center of the cup. Move the pitcher gently side to side for a leaf. For a heart, pour in one spot then pull through the foam. Practice these shapes until they look smooth. Small, slow movements help the design appear clean. Use fresh milk and warm espresso for best results.

Credit: www.youtube.com
Storing And Reusing Frothed Milk
Frothed milk is a delicious addition to coffee and other drinks. Sometimes, you may have extra frothed milk left. Storing and reusing it saves time and reduces waste. But froth can lose texture and flavor if not handled properly.
Knowing how to store and reheat frothed milk keeps its creamy texture. It also helps maintain the taste you enjoy. Here are some tips on short-term storage and reheating.
Short-term Storage
Keep frothed milk in a clean container with a tight lid. Store it in the refrigerator to slow bacterial growth. Use it within 24 hours for best flavor and texture. Avoid leaving froth at room temperature for long.
Reheating Frothed Milk
Warm the frothed milk gently to keep the foam light. Use a microwave at low power for 10-15 seconds or warm it in a small pan over low heat. Stir gently to mix the foam back in. Avoid overheating, which can burn milk and break the foam.

Credit: majestycoffee.com
Frequently Asked Questions
What Type Of Milk Is Best For Foaming?
Whole milk creates the creamiest foam, while skim milk produces larger, lighter bubbles. Use fresh, cold milk for best results.
How Long Should I Steam Milk For Perfect Foam?
Steam milk for about 15-30 seconds until it reaches 150°F. Avoid overheating, which can ruin flavor and texture.
Can I Foam Milk Without An Espresso Machine?
Yes, use a handheld frother, French press, or whisk. Heat milk first for better foam consistency.
Why Is My Milk Foam Too Bubbly Or Weak?
Milk that’s too warm or old foams poorly. Use cold, fresh milk and avoid overheating for smooth microfoam.
Conclusion
Foaming milk adds a creamy touch to your coffee drinks. Practice helps you get smooth, rich foam every time. Use fresh, cold milk for the best results. Warm the milk just right, not too hot. Try different tools like steam wands or frothers.
Enjoy the process and have fun experimenting. Great foam makes your coffee taste better and look nice. Keep these tips in mind and enjoy café-style drinks at home.