Last Updated on June 27, 2026
If you want to make your lattes look as good as they taste, mastering how to steam milk for latte art is the key. Perfectly steamed milk creates that smooth, creamy texture you need to pour beautiful designs on your coffee.
But getting it right can be tricky, and a few simple mistakes can ruin your foam or leave your milk too hot. In this guide, you’ll learn step-by-step how to steam milk like a pro, so your lattes not only taste amazing but also impress anyone who sees them.
Ready to turn your coffee into a work of art? Let’s dive in.

Credit: www.home-barista.com
Essentials For Steaming Milk
Steaming milk is key to making beautiful latte art. The right milk texture and temperature create smooth, creamy foam. This foam helps you draw clear shapes on your coffee. Before you start, know the essentials for steaming milk. These basics will improve your results.
Choosing The Right Milk
Whole milk works best for creamy foam. It has the right fat and protein balance. Low-fat or skim milk creates lighter foam but less creamy. Plant-based milks vary a lot. Oat milk and almond milk can foam well. Try different types to find what you like.
Tools You Need
A good steam wand is important. It injects air and heats the milk fast. A stainless steel pitcher helps control the foam. Choose one with a spout for easy pouring. A thermometer can check milk temperature. It helps avoid overheating or underheating.
Milk Temperature Tips
Heat milk to about 140-150°F (60-65°C). This is warm but not too hot. Overheated milk tastes burnt and loses sweetness. Use the thermometer to watch the heat. Stop steaming when the pitcher is too hot to touch. Practice helps you learn the right feel and look.
Preparing Your Equipment
Preparing your equipment is the first step to steaming milk for latte art. Clean tools and correct setup help create smooth, creamy milk. This makes your latte art look clear and sharp. Follow these steps to get your tools ready.
Cleaning The Steam Wand
Wipe the steam wand with a damp cloth before you start. This removes milk residue and prevents burnt taste. Purge the wand by turning on steam for a second. It clears water and leftover milk inside. Clean steam wand keeps milk fresh and textured well.
Setting Up The Pitcher
Use a metal pitcher with a pointed spout. It helps control milk flow for detailed art. Fill the pitcher halfway with cold milk. Cold milk foams better and heats evenly. Hold the pitcher steady for smooth steaming.
Adjusting Steam Pressure
Check your machine’s steam pressure before steaming. Too high pressure creates big bubbles; too low makes weak foam. Aim for steady, strong steam to get silky milk. Adjust the pressure knob or dial until steam flows smoothly.
Step-by-step Steaming Process
Steaming milk for latte art takes practice and care. Follow these clear steps to get smooth, creamy milk every time. This process creates the perfect texture needed for beautiful designs.
Each step builds on the last. Paying attention helps you make better milk foam and improve your latte art skills quickly.
Filling The Pitcher Correctly
Pour cold milk into the pitcher. Fill it to about one-third full. This allows space for milk to expand during steaming. Using fresh, cold milk gives the best results.
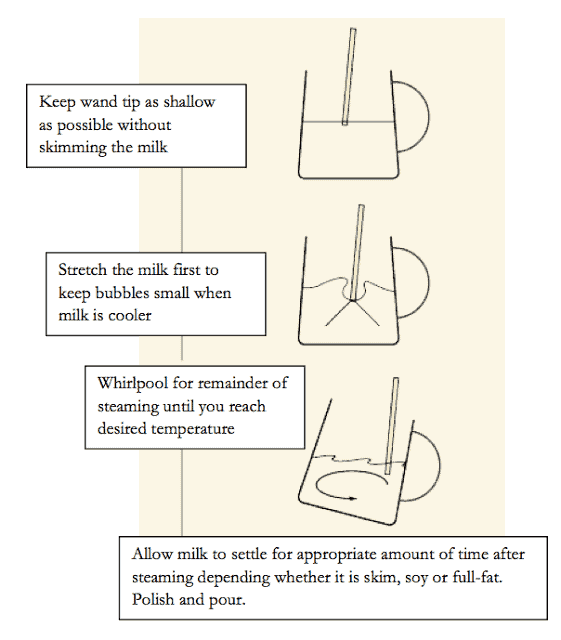
Positioning The Steam Wand
Place the steam wand just below the milk surface. Keep it near the side of the pitcher. This position helps create a whirlpool motion in the milk. The whirlpool mixes air evenly into the milk.
Stretching And Texturing Milk
Turn on the steam and lower the pitcher slightly. Let air enter the milk for a few seconds. This is called stretching. Then raise the pitcher to keep the steam wand deeper inside. This textures the milk, making it smooth and shiny.

Credit: timbertraincoffeeroasters.com
Common Mistakes To Avoid
Steaming milk for latte art looks simple but has common mistakes. These errors can ruin the texture and taste of your drink. Knowing what to avoid helps create smooth, creamy milk perfect for art.
Focus on controlling temperature, bubbles, and wand placement. Small changes make a big difference in your latte art quality.
Overheating Milk
Milk should not get too hot. Overheating breaks down proteins and changes flavor. The milk becomes dry and loses sweetness. Ideal temperature is between 140°F and 155°F (60°C to 68°C). Use a thermometer or feel the pitcher to check heat.
Creating Large Bubbles
Large bubbles damage the smooth texture needed for latte art. They make the milk frothy, not creamy. Keep the steam wand just below the milk surface. This creates tiny, fine bubbles called microfoam. Avoid putting the wand too deep or too shallow.
Incorrect Wand Placement
Wrong wand position stops good milk texture. Place the steam wand near the side of the pitcher. Tilt the pitcher to create a whirlpool motion. This blends air and milk evenly. Avoid straight down or too close to the surface placements.
Techniques For Latte Art
Techniques for latte art require practice and a steady hand. The right method helps you create beautiful patterns on your coffee. Learning these techniques makes your latte look professional and inviting.
Pouring Basics
Start with steamed milk that is smooth and creamy. Hold the cup at a slight angle. Pour the milk slowly into the espresso. Keep the stream steady and close to the surface. Control the flow to avoid breaking the crema. This forms a base for your art.
Creating Hearts And Rosettas
Pour a little milk into the center to create a white circle. Move the pitcher slightly forward to shape a heart. For rosettas, wiggle the pitcher gently side to side. Move backward slowly while pouring. End with a quick pull through the pattern. These shapes are classic and popular.
Advanced Patterns
Try combining multiple pours for complex designs. Use controlled movements for flowers or tulips. Practice timing and speed to perfect each shape. Use a sharp pour to create leaves or swans. Advanced art requires patience and many tries. Keep experimenting to improve your skills.
Credit: www.latteartguide.com
Troubleshooting Tips
Steaming milk can sometimes be tricky. Problems often arise that stop you from getting the perfect foam for your latte art. Troubleshooting these issues helps you improve your skills and enjoy better coffee every time.
Small fixes can make a big difference in your milk texture and foam quality. Below are common problems and easy solutions to keep your milk steaming smooth and consistent.
Milk Not Frothing Properly
Milk may not froth well if it is too warm. Always use cold milk straight from the fridge.
Check the type of milk. Whole milk froths better than skim milk.
Make sure the steam wand tip is just below the milk surface. Too deep or too shallow stops foam from forming.
Try moving the pitcher in a circular motion to create a whirlpool. This helps mix air evenly into the milk.
Wand Clogging Issues
Milk residue can block the steam wand. Clean the wand tip right after each use.
Use a damp cloth to wipe the wand while steaming. This prevents buildup.
If clogged, soak the wand tip in warm water. Then use a pin to clear the holes gently.
Regular cleaning avoids blockages and keeps steam flow steady.
Uneven Texture Fixes
Uneven milk texture comes from poor technique. Keep the steam wand steady during steaming.
Make sure the milk pitcher is angled properly. This helps create smooth, consistent foam.
Stop steaming as soon as the pitcher feels hot to touch. Overheating breaks down the milk proteins.
Practice makes perfect. The more you steam, the better your milk texture will be.
Frequently Asked Questions
How Do You Steam Milk For Latte Art?
Steam milk by introducing air and heating it to 140-150°F. Use a steam wand to create microfoam, swirling the milk for smooth texture. Perfect microfoam helps pour detailed latte art designs.
What Milk Type Works Best For Latte Art?
Whole milk is ideal for latte art. It creates creamy, stable microfoam due to its fat and protein content. Fresh, cold milk steams evenly, producing better texture and taste.
How Long Should You Steam Milk For Latte Art?
Steam milk for about 20-30 seconds until it reaches 140-150°F. Avoid overheating to keep milk sweet and silky. Proper timing ensures smooth, glossy microfoam perfect for pouring.
Why Is Milk Temperature Important In Latte Art?
Milk temperature affects texture and taste. Heating above 160°F causes milk to scald and lose sweetness. Optimal temperature (140-150°F) creates creamy microfoam and enhances latte art quality.
Conclusion
Steaming milk well makes a big difference in latte art. Use fresh, cold milk for best results. Keep the steam wand just below the surface to create smooth foam. Practice helps you pour patterns clearly. Enjoy the process and be patient with your progress.
Soon, you will create beautiful designs with ease. Every cup becomes a small work of art. Keep trying, and your lattes will impress friends and family. Simple steps lead to great coffee moments.