Last Updated on July 17, 2026
Are you ready to make delicious homemade yogurt but unsure how much yogurt starter to add to your milk? Getting this right is key to creamy, tangy yogurt every time.
Too little starter, and your yogurt might not set properly. Too much, and the taste could be off. You’ll discover the perfect amount of yogurt starter per gallon of milk to achieve the best results. Keep reading, and you’ll soon be enjoying fresh, homemade yogurt with confidence.
Credit: saladinajar.com
Choosing The Right Yogurt Starter
Choosing the right yogurt starter is key to making creamy, tasty yogurt. The starter contains live bacteria that turn milk into yogurt. These bacteria help create the right texture and flavor.
Using a good starter ensures the yogurt sets well and tastes fresh. Different starters can change the final yogurt’s thickness and tanginess. Picking the right one helps you make yogurt you enjoy eating every time.
Types Of Starters
There are several types of yogurt starters available. Some starters come as powders with specific bacteria strains. Others are liquid cultures taken from live yogurt. Each type has its own benefits.
Powder starters offer consistent results and long shelf life. Liquid starters provide natural flavors and can be easier to use. Some people use a small amount of plain yogurt as a starter too.
Fresh Vs. Store-bought Cultures
Fresh starters come from homemade or local yogurt. These have live bacteria but may vary in strength. Store-bought cultures are made in labs to be reliable and strong.
Fresh starters give a natural taste but may not always work perfectly. Store-bought cultures provide steady results and are easy to measure. Both types can make good yogurt if handled properly.
Milk Selection For Yogurt Making
Choosing the right milk is key to making good yogurt. Milk affects yogurt’s taste, texture, and thickness. Different types of milk change how the yogurt turns out. Knowing the differences helps you pick what works best for your yogurt recipe.
Milk type also influences how much yogurt starter you need per gallon. Let’s explore the main milk options and how they impact yogurt making.
Whole Milk Vs. Skim Milk
Whole milk has more fat than skim milk. Fat adds creaminess and richness to yogurt. It makes yogurt thicker and smoother. Skim milk has little to no fat. Yogurt made with skim milk is thinner and less creamy.
Whole milk yogurt tastes richer and feels fuller. Skim milk yogurt is lighter but can be watery. Pick whole milk for a thicker, creamier yogurt. Use skim milk for lower fat yogurt with a lighter texture.
Pasteurized Vs. Raw Milk
Pasteurized milk is heated to kill bacteria. It is safe and easy to find in stores. Pasteurization can change milk’s natural proteins. This may affect how yogurt sets and tastes.
Raw milk is not heated and has natural bacteria. It can make yogurt with more complex flavors. Raw milk yogurt may be thicker and tangier. It needs careful handling to avoid harmful germs.
Use pasteurized milk for safe, consistent yogurt. Choose raw milk if you want stronger flavor and can handle safety steps.
Ideal Starter To Milk Ratios
Finding the right balance between yogurt starter and milk is key to making great yogurt. The starter contains live bacteria that turn milk into yogurt. Use too little, and the yogurt may not set well. Use too much, and the flavor can become too strong or sour. The ideal ratio helps achieve creamy texture and just the right tang.
Standard Proportions Per Gallon
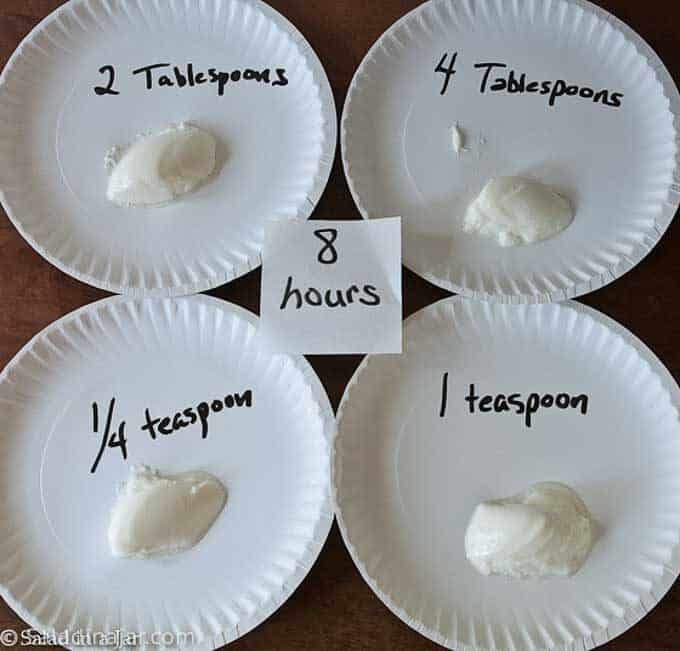
The common amount of yogurt starter is about 2 to 4 tablespoons per gallon of milk. This range works well for most types of milk and starter cultures. It gives a good balance of bacteria to milk, allowing the yogurt to thicken properly. Using 3 tablespoons is a safe, easy choice for beginners.
Adjusting For Texture And Tang
Use less starter for milder flavor and softer texture. Try 2 tablespoons per gallon if you want gentle tang and creamier yogurt. Use more starter, up to 4 tablespoons, for tangier taste and thicker body. Adjust slowly by small amounts to find your perfect yogurt style.

Credit: www.honokage.com
Step-by-step Yogurt Preparation
Making yogurt at home is simple and rewarding. Knowing the right steps ensures thick, creamy yogurt every time. This guide breaks down the process into clear, easy parts. Follow these steps carefully for the best results.
Heating And Cooling Milk
Start by pouring one gallon of milk into a large pot. Heat the milk slowly until it reaches 180°F (82°C). Stir often to avoid burning. This step kills unwanted bacteria and helps the yogurt set well. After heating, cool the milk to 110°F (43°C). Use a thermometer to check the temperature. Cooling too fast or slow can affect the texture.
Adding The Starter
Use about 2 to 3 tablespoons of yogurt starter per gallon of milk. The starter contains good bacteria needed for fermentation. Mix the starter with a small amount of the cooled milk until smooth. Stir this mix back into the pot gently. Avoid stirring too much to keep the milk smooth and creamy. The starter must be fresh and active for best results.
Incubation Tips
Keep the mixture warm at 110°F (43°C) for 6 to 12 hours. Use a yogurt maker or wrap the pot in towels to hold heat. Do not disturb the pot during incubation. Check after 6 hours; longer time makes thicker yogurt. After incubation, chill the yogurt in the fridge for at least 4 hours. Cold helps the yogurt firm up and taste better.
Common Mistakes To Avoid
Making yogurt at home is simple, but some common mistakes can spoil the batch. These errors often come from the wrong amount of starter or poor temperature control. Avoiding these issues helps you get smooth, creamy yogurt every time.
Using Too Much Or Too Little Starter
Adding too much starter can make the yogurt sour and thick too fast. Too little starter slows down fermentation and may not set the yogurt well. The ideal amount is about 2 tablespoons of starter per gallon of milk. This balance ensures good texture and taste without overpowering the milk.
Temperature Control Errors
Temperature is key to yogurt making. Milk should cool to about 110°F before adding the starter. Too hot milk kills the live cultures. Too cold milk slows or stops fermentation. After mixing, keep the yogurt at 105°F to 115°F while it sets. Check the heat with a thermometer. This careful control leads to perfect yogurt texture and flavor.
:max_bytes(150000):strip_icc()/__opt__aboutcom__coeus__resources__content_migration__serious_eats__seriouseats.com__2019__06__20180517-homemade-yogurt-vicky-wasik-1-1500x1125-cfe1142bd5d74cf5906596f7eed89763.jpg)
Credit: www.seriouseats.com
Enhancing Yogurt Flavor And Texture
Enhancing yogurt flavor and texture is key to enjoying homemade yogurt. The right starter amount helps, but other steps improve taste and feel. Small changes make yogurt creamier and more flavorful.
Extended Fermentation
Let the yogurt ferment longer for stronger flavor. The bacteria grow more and produce more acid. This makes the yogurt tangier and thicker. Keep the temperature steady between 110°F and 115°F. Check the taste every hour to avoid sourness. Longer fermentation improves texture and depth of flavor.
Adding Mix-ins After Culturing
Add fruits, honey, or nuts after fermentation. Mixing these in before can stop bacteria from working well. Fresh berries give natural sweetness without extra sugar. Nuts add crunch and healthy fats. Stir gently to keep yogurt smooth and creamy. These additions make yogurt tastier and more exciting.
Storing And Using Homemade Yogurt
Storing and using homemade yogurt properly keeps it fresh and tasty longer. After making yogurt, cool it quickly and store it in clean containers. Use airtight jars or plastic containers to avoid contamination. Keep the yogurt in the refrigerator to slow bacterial growth. Proper storage helps maintain flavor and texture.
Shelf Life Expectations
Homemade yogurt usually lasts 1 to 2 weeks in the fridge. It may stay safe longer but might lose flavor or thicken too much. Watch for mold, off smell, or sour taste as signs of spoilage. Use a clean spoon every time to avoid introducing germs. Label containers with the date to track freshness easily.
Repurposing Yogurt Starters
Yogurt starter can be reused several times to make new batches. Use about 2 to 4 tablespoons of starter per gallon of milk. Store leftover starter in the fridge for up to 2 weeks. Refresh the starter by making new yogurt before it loses strength. Avoid using old starter as it weakens the fermentation process.
Frequently Asked Questions
How Much Yogurt Starter Per Gallon Of Milk Is Needed?
Typically, use 2 tablespoons of yogurt starter per gallon of milk. This amount ensures proper fermentation and thick yogurt consistency.
Can I Use Less Yogurt Starter For A Gallon Of Milk?
Using less starter slows fermentation and results in thinner yogurt. Stick to 2 tablespoons for the best texture and taste.
Does More Yogurt Starter Make Thicker Yogurt?
More starter can speed fermentation but may not increase thickness. Proper incubation time and milk quality affect yogurt thickness more.
What Type Of Yogurt Starter Suits A Gallon Of Milk?
Choose plain, active-culture yogurt as a starter. It contains live bacteria essential for fermenting one gallon of milk effectively.
Conclusion
Using the right amount of yogurt starter ensures good flavor and texture. One to two tablespoons per gallon of milk works well for most. Too little starter slows the process, while too much may make the yogurt sour. Keep the milk warm and let the culture grow for several hours.
Patience brings creamy, tasty yogurt at home. Now, you can enjoy fresh yogurt with confidence and ease. Try it yourself and see the difference!