Last Updated on May 12, 2026
Are your gas stove burners looking dirty or clogged? Cleaning them might seem like a hassle, but it’s easier than you think—and it can make a big difference in how well your stove works.
When your burners are clean, your food cooks evenly, and your kitchen stays safer and fresher. In this guide, you’ll discover simple, effective steps to get your burners sparkling again. Keep reading, and you’ll have your stove shining and ready to cook up a storm in no time.
Credit: www.maytag.com
Gather Cleaning Supplies
Before cleaning your gas stove burners, gather all necessary supplies. Having the right tools and cleaning agents makes the process easier. It also helps you clean more effectively. Prepare everything on your kitchen counter or nearby table. This way, you won’t waste time searching for items while cleaning.
Essential Tools
Collect a few basic tools for burner cleaning. Use a soft brush or an old toothbrush to scrub dirt. Keep a sponge or cloth to wipe surfaces. A toothpick or needle helps clear clogged burner holes. Also, have a bowl or bucket for soaking burner parts. Gloves protect your hands from harsh cleaners and dirt.
Safe Cleaning Agents
Choose safe cleaning agents for your stove burners. Mild dish soap works well for regular dirt. Baking soda helps remove tough stains without damage. White vinegar cuts grease and kills germs naturally. Avoid harsh chemicals that can harm your stove or health. Use water to rinse parts after cleaning to remove residue.
:max_bytes(150000):strip_icc()/cleaning-gas-burners-1900625_06-1-45fc0ebf3d1c4fcf9c11ba23f6c629c4.jpg)
Credit: www.thespruce.com
Prepare The Stove
Cleaning gas stove burners starts with proper preparation. This step keeps you safe and makes cleaning easier. Take time to get the stove ready before you begin scrubbing.
Proper preparation helps prevent damage to the stove parts. It also ensures you clean every corner of the burners.
Turn Off And Cool Down
First, turn off the gas supply and the stove knobs. Make sure all flames are completely out. Let the stove cool down fully before touching any parts. Hot burners can cause burns and damage cleaning tools.
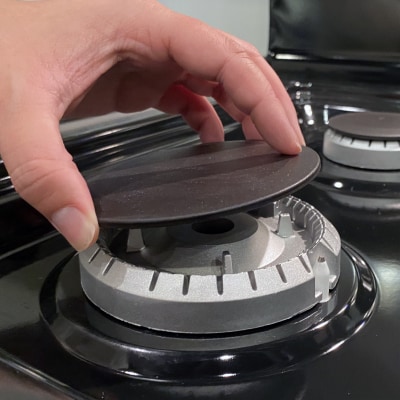
Remove Burner Parts
Carefully take off the burner caps and grates. Place them on a clean surface. Removing these parts allows you to reach hidden dirt and grease. Handle parts gently to avoid breaking or bending them.
Soak Burner Components
Soaking gas stove burner components is a key step in cleaning. It loosens tough grime and grease. This makes scrubbing easier and more effective. Removing burners and soaking them saves time and effort. It also helps keep the burners in good shape.
Follow simple tips to soak burners safely and well. Proper soaking helps avoid damage and improves cleaning results.
Choosing The Right Solution
Pick a cleaning solution that removes grease well. Warm water with dish soap works for light dirt. For tough stains, use a mix of baking soda and water. Vinegar is good for breaking down grime. Avoid harsh chemicals that can damage burner parts. Use gentle, safe cleaners to protect your stove.
Soaking Time Tips
Soak burners for at least 30 minutes. This softens dried food and grease. For heavy buildup, soak up to an hour. Do not soak for too long to avoid damage. Check burners occasionally during soaking. After soaking, scrub with a soft brush or cloth. Rinse and dry fully before reassembling the stove.
:max_bytes(150000):strip_icc()/cleaning-gas-burners-1900625_07-d5adee6d6821466da0b339850d6f28a0.jpg)
Credit: www.thespruce.com
Scrub Burners Thoroughly
Scrubbing gas stove burners thoroughly is key to keeping them clean and working well. Dirt and food particles build up quickly. A deep clean stops blockages and keeps flames steady. Take your time and clean every part of the burner. This helps your stove last longer and cook better.
Using Brushes And Scrubbers
Choose brushes with firm bristles to reach small holes and edges. A toothbrush works great for tight spots. Use a sponge or scrubber for flat surfaces. Dip them in warm, soapy water for easier cleaning. Scrub gently but firmly to remove grime. Rinse the burners well after scrubbing to remove soap.
Handling Stubborn Residue
Stubborn residue needs extra effort. Soak burners in a mixture of vinegar and water for 15-20 minutes. This softens baked-on grease. Use a plastic scraper or old credit card to lift tough spots. Avoid metal tools that can scratch the surface. Repeat scrubbing if needed until the residue is gone. Rinse and dry the burners fully before reassembling.
Clean The Stove Surface
Cleaning the stove surface is a key step in keeping your gas stove burners in good shape. Dirt, grease, and food bits can build up around the burners and grates. This buildup affects how your stove looks and works. A clean surface also helps stop fires and makes cooking safer.
Focus on removing crumbs, spills, and stains every time you clean. Use the right tools and cleaners to avoid damage. A regular cleaning routine keeps your stove fresh and ready to use.
Wiping Down Grates And Surroundings
Start by removing the grates from the stove. Use a soft cloth or sponge to wipe off loose dirt. Warm soapy water helps break down food residue. Scrub gently to avoid scratching the surface. Rinse with clean water and dry completely before placing them back.
Clean the area around the burners carefully. Use a damp cloth to wipe spills and crumbs. Avoid letting water seep into burner holes. This step prevents clogs and keeps flames steady.
Dealing With Grease Spots
Grease spots can be tough to remove but do not let them sit. Spray a little dish soap or a mild cleaner on the spots. Let it sit for a few minutes to soften the grease. Use a soft brush or cloth to scrub the area gently. Wipe with a clean damp cloth to remove any cleaner residue.
For stubborn grease, mix baking soda and water into a paste. Apply the paste to the spots and let it rest for 15 minutes. Scrub softly and wipe clean with a damp cloth. This natural method works well without harsh chemicals.
Rinse And Dry Parts
Cleaning gas stove burners involves careful rinsing and drying. This step removes soap and dirt, ensuring burners work well. Proper rinsing stops residue that can block gas flow. Thorough drying prevents rust and keeps burners safe to use.
Proper Rinsing Techniques
Use warm water to rinse burner parts. Avoid very hot water that may warp plastic pieces. Hold each part under running water. Gently rub with fingers to clear soap and grime. For tough spots, use a soft brush. Make sure all holes and edges are clean. Check that no soap remains before drying.
Ensuring Complete Drying
Dry each burner part fully before reassembling. Use a clean towel to wipe off water. Let parts air dry on a dish rack. Avoid putting wet parts back on the stove. Moisture can cause rust and poor ignition. Wait until parts feel dry to touch. This keeps burners safe and working well.
Reassemble The Stove
After cleaning your gas stove burners, putting everything back correctly is key. Reassembling the stove carefully helps it work safely and well. This process is simple but needs attention to detail.
Placing Burners Correctly
Start by placing each burner in its original spot. Make sure the burner fits snugly on the base. Align the holes on the burner with the gas outlets. This ensures the gas flows properly for even flames. Press down gently but firmly to lock the burner in place. Avoid forcing parts, which can cause damage.
Testing For Functionality
Once all parts are in place, test the stove. Turn the burner knob and listen for the clicking sound. This means the igniter is working. Watch the flame; it should be blue and steady. A yellow or flickering flame means cleaning or adjustment is needed. Check each burner to confirm they all work well. This step guarantees your stove is ready for cooking safely.
Maintenance Tips
Keeping gas stove burners clean helps them work better and last longer. Simple maintenance saves time and effort later. Follow easy steps to avoid tough stains and damage.
Regular Cleaning Schedule
Clean burners after every use or at least once a week. Remove burner grates and caps for thorough cleaning. Use warm soapy water and a soft brush to scrub away food particles. Dry parts completely before putting them back. Regular cleaning stops grease build-up and clogs.
Preventing Future Build-up
Wipe spills immediately with a damp cloth. Avoid letting food dry on burners. Use stove covers or liners to catch drips and crumbs. Check burner holes for blockages and clear them gently with a toothpick. Proper care keeps burners efficient and safe.
Frequently Asked Questions
How Often Should I Clean Gas Stove Burners?
Clean gas stove burners every 1-2 weeks to prevent buildup. Regular cleaning ensures efficient flame and safety. Wipe spills immediately to avoid clogging burner holes. Deep clean monthly for best performance and longevity.
What Household Items Clean Gas Stove Burners Effectively?
Use warm soapy water, baking soda, and vinegar for cleaning. These items remove grease and grime safely. Avoid harsh chemicals that can damage burners. A soft brush helps reach tight spots for thorough cleaning.
Can I Soak Gas Stove Burners In Water?
Yes, soak burners in warm soapy water for 20-30 minutes. Soaking loosens stubborn grease and food debris. Ensure burners dry completely before reassembling to avoid gas issues. Do not soak electrical components or ignition parts.
How Do I Unclog Blocked Gas Stove Burner Holes?
Use a toothpick or needle to gently clear burner holes. Avoid using metal tools that may damage the burner. Clean holes after soaking to remove debris fully. Properly cleared holes ensure even flame distribution and safe cooking.
Conclusion
Cleaning gas stove burners keeps your kitchen safe and smells fresh. Regular cleaning stops food buildup and clogs. Use simple tools like brushes and soap for best results. Always let burners dry fully before use. Clean burners cook food evenly and save energy.
A clean stove looks nice and works well every day. Try to clean burners once a week or after heavy cooking. Small steps make a big difference in your kitchen’s health. Keep your stove shining and enjoy cooking safely.