Last Updated on June 7, 2026
A crepe skillet is a specialized pan used for making thin, delicate crepes. It ensures even heating and easy flipping.
Crepe skillets are essential for perfect crepes. These pans have low sides and non-stick surfaces, making cooking and flipping crepes simple. They come in various sizes, typically with a diameter ranging from 8 to 12 inches. A good crepe skillet distributes heat evenly, preventing burning and ensuring consistent browning.
Using a crepe skillet can significantly improve your crepe-making experience, delivering professional results at home. These pans are versatile and can also be used for making pancakes, tortillas, and other flatbreads. Investing in a quality crepe skillet can elevate your culinary skills and enhance your kitchen repertoire.
Selecting The Right Skillet
Choosing the right crepe skillet is essential for perfect crepes. The skillet must distribute heat evenly. It should be easy to handle. This section will guide you through key considerations.
Material Matters
The material of your skillet affects crepe quality. Cast iron skillets offer even heat distribution. They are durable but heavy. Non-stick skillets are lighter. They prevent crepes from sticking. Stainless steel skillets are versatile. They require more oil to prevent sticking.
| Material | Pros | Cons |
|---|---|---|
| Cast Iron | Even heat, durable | Heavy, needs seasoning |
| Non-Stick | Light, easy to clean | Can scratch easily, needs replacing |
| Stainless Steel | Versatile, long-lasting | Needs oil, can stick |
Size And Shape Considerations
The size and shape of the skillet affect your crepes. Large skillets can make bigger crepes. They are perfect for family meals. Smaller skillets are easier to handle. They are suitable for individual portions.
- Round skillets create traditional round crepes.
- Square skillets can be used for unique shapes.
Flat skillets allow easy flipping. They ensure even cooking. Deep skillets can be used for other dishes too.
Essential Crepe Batter Basics
Creating perfect crepes starts with a great batter. This guide will help you master the essentials. You’ll learn about the right ingredients and the importance of consistency. Let’s dive into the basics!
Ingredients For Success
Choosing the right ingredients is crucial for tasty crepes. Here’s a simple list to get you started:
- Flour: Use all-purpose flour for smooth batter.
- Milk: Whole milk adds richness to the crepes.
- Eggs: Eggs give structure and flavor.
- Butter: Melted butter adds a delicious taste.
- Salt: A pinch of salt enhances the flavor.
These ingredients are easy to find and essential for a basic crepe batter.
Consistency Is Key
The consistency of your batter is very important. It should be smooth and slightly runny. This ensures even cooking and thin crepes. Here’s a simple way to check:
- Mix all ingredients until smooth.
- Use a ladle to pour batter back into the bowl.
- It should flow like heavy cream.
If the batter is too thick, add a little more milk. If too thin, add a bit more flour. Achieving the right consistency takes practice but is worth the effort.
| Ingredient | Amount |
|---|---|
| Flour | 1 cup |
| Milk | 1 1/2 cups |
| Eggs | 2 large |
| Butter | 2 tablespoons, melted |
| Salt | 1/4 teaspoon |
Master these basics and you’ll be making delicious crepes in no time!
Mixing Techniques
Creating the perfect crepe involves mastering a few key mixing techniques. These steps ensure your crepe batter is smooth, lump-free, and ready for cooking.
Avoiding Lumps
Lumps can ruin your crepe batter. To prevent them, follow these steps:
- Sift your flour before adding it to the mix.
- Combine the wet ingredients first, then gradually add the flour.
- Use a whisk to mix the batter smoothly.
If lumps still appear, use a blender to smoothen the batter. A few pulses will do the trick.
Resting The Batter
Resting the batter is crucial. It allows the gluten to relax. This step leads to tender crepes.
After mixing, cover the bowl with plastic wrap. Let it sit for at least 30 minutes. You can even refrigerate it for up to 24 hours.
This resting period improves the batter’s texture. It also makes it easier to spread in the skillet.
| Step | Time |
|---|---|
| Resting at room temperature | 30 minutes |
| Resting in the refrigerator | Up to 24 hours |
Follow these mixing techniques for the best crepe results. Your crepes will be smooth and delicious.

Credit: www.williams-sonoma.com
Skillet Temperature Mastery
Mastering the temperature of your crepe skillet is key to perfect crepes. Temperature control ensures even cooking and prevents burning. Let’s dive into the art of managing your skillet’s heat.
Finding The Sweet Spot
Finding the right temperature is crucial. Too hot, and your crepes will burn. Too cold, and they will be undercooked. Aim for medium heat.
| Heat Level | Skillet Behavior | Result |
|---|---|---|
| Low | Slow Cooking | Undercooked Crepes |
| Medium | Even Cooking | Perfect Crepes |
| High | Quick Cooking | Burnt Crepes |
Adjusting Heat While Cooking
Adjusting heat is essential for consistent results. Start with medium heat. Pour a small amount of batter and observe.
- If the edges brown too quickly, lower the heat.
- If the batter takes too long to set, increase the heat.
Keep an eye on each crepe. Adjust as needed. Consistent adjustments lead to evenly cooked crepes.
Greasing The Skillet
Greasing your crepe skillet is crucial for perfect crepes. Without proper greasing, crepes can stick and tear. This section will help you choose the best oils and butters. You’ll also learn how to apply them evenly.
Best Oils And Butters To Use
Choosing the right oil or butter is essential. Here are some good options:
- Butter: Adds rich flavor, ideal for sweet crepes.
- Olive Oil: Great for savory crepes, adds a mild taste.
- Canola Oil: Neutral flavor, perfect for any crepe type.
- Coconut Oil: Adds a hint of coconut, good for tropical flavors.
The table below summarizes the best uses for each option:
| Grease | Best For | Flavor |
|---|---|---|
| Butter | Sweet Crepes | Rich |
| Olive Oil | Savory Crepes | Mild |
| Canola Oil | Any Crepe | Neutral |
| Coconut Oil | Tropical Flavors | Hint of Coconut |
Application Tips For Even Coating
Evenly coating the skillet is important. Here are some tips:
- Heat the Skillet: Warm it on medium heat for a few minutes.
- Use a Brush: A silicone brush helps spread the grease evenly.
- Paper Towel: Dip a paper towel in oil or butter. Wipe the skillet surface.
- Don’t Overdo It: Too much grease can make crepes oily. A thin layer works best.
Remember these tips for perfect crepes every time. Happy cooking!

Credit: www.lecreuset.com
Pouring And Spreading The Batter
Creating the perfect crepe starts with pouring and spreading the batter. This step is crucial for achieving a thin, even layer. Learn the best techniques to master this essential skill.
The Perfect Pour
Pouring the batter correctly ensures a smooth and even crepe. Hold the skillet in one hand and the batter in the other. Pour the batter into the center of the skillet.
Use a ladle or measuring cup for consistent portions. A good rule of thumb is to use about 1/4 cup of batter for each crepe. This amount helps to create a uniform thickness.
Achieving Thin, Even Layers
Spreading the batter quickly is key to thin crepes. As soon as the batter hits the skillet, tilt the pan in a circular motion. This spreads the batter evenly across the surface.
For best results, use a crepe spreader or the back of a spoon. These tools help to achieve an even layer. Work fast to prevent the batter from cooking before it’s spread.
| Steps | Details |
|---|---|
| 1. Pour | Pour 1/4 cup batter into the center of the skillet. |
| 2. Tilt | Tilt the skillet to spread the batter evenly. |
| 3. Spread | Use a crepe spreader or spoon for a thin layer. |
Follow these steps for perfect crepes every time. Practice makes perfect, so don’t be discouraged if your first few attempts aren’t perfect.
Flipping And Folding Techniques
Creating the perfect crepe involves mastering various flipping and folding techniques. These techniques ensure your crepes are not just delicious but also visually appealing. Let’s dive into the art and science of flipping and folding crepes.
The Art Of The Flip
Flipping a crepe might seem daunting, but practice makes perfect. Start by ensuring your crepe skillet is well-seasoned and at the right temperature. A non-stick skillet helps prevent sticking.
- Use a thin spatula to lift the edges.
- Gently shake the skillet to loosen the crepe.
- Flip the crepe with a quick wrist motion.
Timing is crucial. Flip the crepe once the edges start to brown. This usually takes about 1-2 minutes. Practice flipping with confidence to achieve even cooking.
Folding For Presentation And Filling
Folding crepes can enhance their presentation and make them easier to eat. There are several popular folding techniques you can try.
| Technique | Steps |
|---|---|
| Simple Fold |
|
| Envelope Fold |
|
| Triangle Fold |
|
Experiment with different folding techniques. Each method offers a unique way to present and enjoy your crepes.
Savory And Sweet Fillings
Crepes are versatile. They can be filled with savory or sweet fillings. This makes them perfect for any meal. Below are some innovative ideas for both types.
Innovative Savory Ideas
Savory crepes can be a delicious meal. Here are some creative options:
- Spinach and Feta: Fresh spinach, crumbled feta, and a hint of garlic.
- Chicken and Pesto: Grilled chicken, basil pesto, and sun-dried tomatoes.
- Mushroom and Swiss: Sautéed mushrooms, melted Swiss cheese, and caramelized onions.
- Ham and Cheese: Thinly sliced ham and your favorite cheese.
- Smoked Salmon: Smoked salmon, cream cheese, and fresh dill.
Decadent Sweet Creations
Sweet crepes are a treat. They can be filled with delightful ingredients. Here are some options:
- Nutella and Strawberries: Spread Nutella and add fresh strawberries.
- Banana and Caramel: Sliced bananas and a drizzle of caramel sauce.
- Blueberries and Cream: Fresh blueberries and whipped cream.
- Lemon and Sugar: A squeeze of lemon juice and a sprinkle of sugar.
- Apple Cinnamon: Cooked apples with cinnamon and a bit of sugar.
| Filling | Ingredients |
|---|---|
| Spinach and Feta | Spinach, Feta, Garlic |
| Chicken and Pesto | Chicken, Basil Pesto, Sun-dried Tomatoes |
| Nutella and Strawberries | Nutella, Strawberries |
| Banana and Caramel | Banana, Caramel Sauce |
Troubleshooting Common Crepe Problems
Crepes are delightful, but they can be tricky to perfect. Many face issues like tears, stickiness, or improper cooking. Here, we will address these common problems and offer solutions.
Preventing Tears And Stickiness
Tears in crepes often occur due to the wrong batter consistency. Ensure your batter is smooth and free of lumps. Use a blender for best results.
If your crepes are sticking to the skillet, it may be due to insufficient oil or butter. Always preheat the skillet well and coat it lightly with oil or butter.
Here’s a quick checklist for preventing tears and stickiness:
- Blend the batter until smooth.
- Preheat the skillet for a few minutes.
- Use a non-stick skillet for best results.
- Lightly coat the skillet with oil or butter.
Fixing Undercooked Or Overcooked Crepes
Undercooked crepes are usually a result of too high heat. Lower the heat and cook for an extra minute. Ensure the edges start to lift before flipping.
Overcooked crepes happen when the heat is too low or they are left too long. Increase the heat slightly and watch closely. Flip them once the edges are golden.
Follow this table for cooking times and temperatures:
| Crepe Issue | Solution |
|---|---|
| Undercooked | Lower heat, cook 1 more minute |
| Overcooked | Increase heat, watch closely |
Remember, practice makes perfect. Adjust heat and timing for your specific skillet and stove.
Advanced Crepe Making Tips
Once you master the basics of crepe making, you may want to elevate your skills. Here are some advanced tips to help you create the perfect crepes. From adding herbs and spices to presenting them creatively, these tips will take your crepes to the next level.
Herbs And Spices In Your Batter
Adding herbs and spices to your crepe batter can change the flavor profile. Here are some ideas:
| Herb/Spice | Flavor Profile | Best Paired With |
|---|---|---|
| Cinnamon | Sweet and warm | Apple or pear fillings |
| Basil | Fresh and peppery | Tomato or cheese |
| Nutmeg | Sweet and nutty | Pumpkin or cream fillings |
| Dill | Fresh and grassy | Fish or seafood |
Mix these herbs and spices directly into your batter. This will evenly distribute the flavors throughout the crepe.
Creative Presentation Styles
Presentation is key to making your crepes look as good as they taste. Consider these creative styles:
- Rolled Crepes: Roll your crepes with fillings inside. Cut them into bite-sized pieces.
- Layered Crepes: Stack crepes with layers of filling in between. Cut like a cake.
- Folded Crepes: Fold crepes into triangles. Drizzle with sauce for an elegant look.
- Crepe Cones: Roll crepes into cone shapes. Fill them with fruits or creams.
Use toppings like fresh fruit, whipped cream, or powdered sugar. This adds a finishing touch that makes your crepes irresistible.
Cleaning And Maintaining Your Skillet
Proper care is essential for your crepe skillet. Regular cleaning keeps it in great shape. This guide helps you maintain your skillet effectively.
Post-cooking Care
After cooking, let your skillet cool. Never submerge a hot skillet in water. This can warp or damage it.
- Use warm, soapy water and a soft sponge.
- Gently scrub the skillet to remove food residue.
- Rinse thoroughly with clean water.
- Dry the skillet completely with a soft cloth.
Avoid using abrasive sponges or harsh chemicals. These can scratch the surface.
Long-term Maintenance For Non-stick Surfaces
Long-term care ensures your skillet’s non-stick surface stays effective. Follow these simple tips to maintain it:
- Avoid metal utensils. Use wooden or silicone ones instead.
- Store the skillet properly. Avoid stacking heavy items on top.
- Season your skillet every few months. Apply a thin layer of oil and heat it.
Regular seasoning helps maintain the non-stick surface. Clean the skillet gently to avoid damaging the coating.
| Task | Frequency | Tools Needed |
|---|---|---|
| Post-Cooking Cleaning | After each use | Soft sponge, warm soapy water |
| Seasoning | Every few months | Cooking oil |
| Long-term Storage | As needed | Protective cloth |
Follow these steps to keep your crepe skillet in top condition. Happy cooking!
Inspiring Crepe Recipes To Try
Crepes are a versatile dish enjoyed worldwide. Their delicate texture and taste make them perfect for any meal. Whether you love sweet or savory, there’s a crepe recipe for you. Here, we’ll explore some inspiring crepe recipes to try.
Classic French Crepes
Classic French crepes are simple and elegant. They serve as a blank canvas for various fillings. Here’s a basic recipe to get you started:
| Ingredient | Quantity |
|---|---|
| Flour | 1 cup |
| Milk | 1 cup |
| Eggs | 2 |
| Butter | 2 tbsp |
| Salt | Pinch |
Instructions:
- Mix flour, milk, eggs, melted butter, and salt in a bowl.
- Whisk until the batter is smooth.
- Heat a crepe skillet over medium heat.
- Pour a ladle of batter, swirling to coat the pan evenly.
- Cook until the edges turn golden, then flip and cook the other side.
Fill your crepes with jam, Nutella, or fresh fruits. Enjoy the authentic taste of France at home!
Innovative Twists On Traditional Recipes
Explore new flavors by experimenting with crepe recipes. Here are some unique ideas:
- Matcha Crepes: Add 1 tbsp of matcha powder to the batter.
- Spinach Crepes: Blend fresh spinach into the batter for a vibrant green color.
- Gluten-Free Crepes: Use almond flour or coconut flour instead of wheat flour.
Stuffing Ideas:
- Ricotta and honey with a sprinkle of nuts.
- Smoked salmon, cream cheese, and dill.
- Banana slices with peanut butter and a drizzle of honey.
These innovative twists bring a fresh take on traditional crepes. Experiment with different flavors and fillings to find your favorite combination.

Credit: www.amazon.com
Frequently Asked Questions
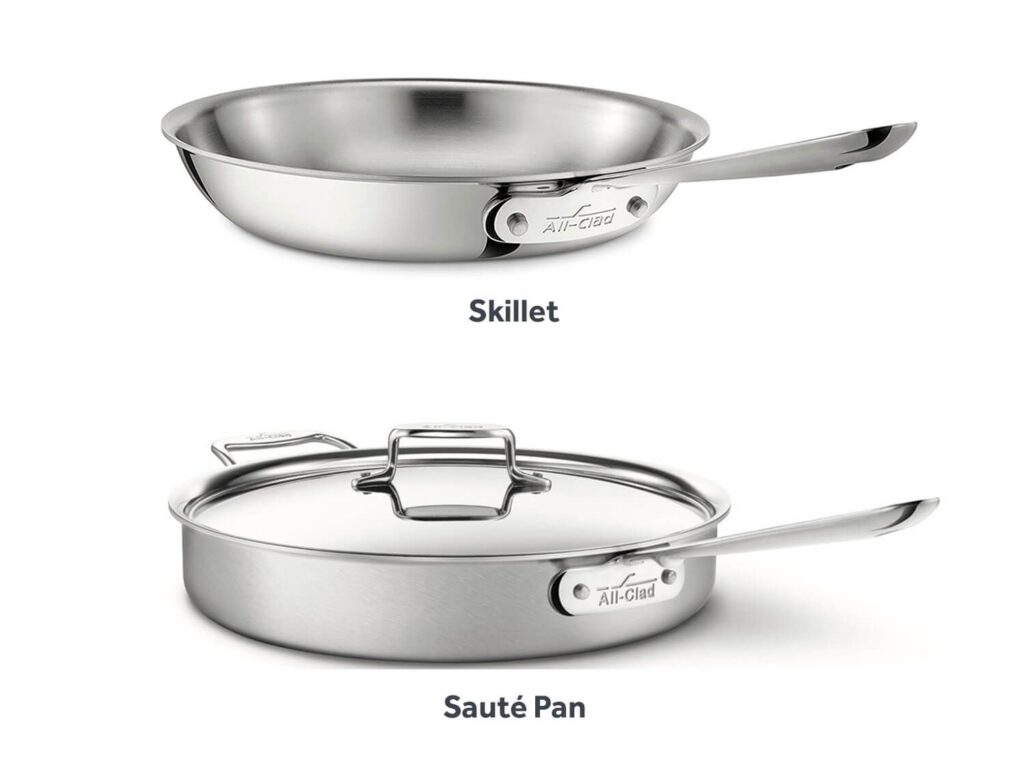
What’s The Difference Between A Crepe Pan And A Skillet?
A crepe pan has low sides for easy flipping, while a skillet has higher sides for versatile cooking.
What Is The Best Pan To Cook Crepes In?
The best pan for cooking crepes is a non-stick skillet. It ensures even cooking and easy flipping. Choose one with a flat, shallow surface for optimal results.
What Is The Purpose Of A Crepe Pan?
A crepe pan is designed to cook thin, even crepes. Its flat, non-stick surface ensures easy flipping and removal.
Can You Make Crepes In A Cast Iron Skillet?
Yes, you can make crepes in a cast iron skillet. Preheat the skillet and grease lightly for best results.
Conclusion
A crepe skillet is an essential tool for any kitchen. It makes creating delicious, thin crepes easy and fun. With the right skillet, your crepes will always turn out perfect. Invest in a quality crepe skillet today and elevate your breakfast game.
Enjoy the art of crepe making and impress your family and friends.