Last Updated on April 15, 2026
If you love fresh homemade bread, your bread maker is probably one of your favorite kitchen gadgets. But have you ever stopped to think about how clean your bread maker really is?
Keeping it spotless not only ensures your bread tastes great every time but also helps your machine last longer. In this guide, you’ll discover simple and effective ways to clean your bread maker quickly and safely. Ready to make your bread maker shine and bake better?
Let’s dive in.
Preparing The Bread Maker
Preparing your bread maker for cleaning is the first step to keep it working well. Proper preparation makes cleaning easier and safer. It also helps avoid damage to the machine or injury to yourself.
Unplugging The Machine
Always unplug the bread maker before cleaning. This stops any electrical accidents. Unplugging also protects the machine from short circuits. Make sure your hands are dry when unplugging.
Wait for the bread maker to cool down. Cleaning a hot machine can cause burns. Let it sit for at least 30 minutes after use.
Removing Removable Parts
Take out all removable parts next. These include the bread pan and kneading paddle. Removing these parts helps clean hard-to-reach areas. Check your manual for specific instructions.
Be gentle when removing parts to avoid breaking them. Place the parts on a clean surface before washing. This keeps your workspace tidy and parts safe.
Cleaning The Bread Pan
The bread pan is a key part of your bread maker. Keeping it clean helps your machine work well. It also stops old crumbs from spoiling new bread. Clean the bread pan after each use to keep it fresh and ready.
Soaking And Washing
Fill the bread pan with warm water. Let it soak for about 10 minutes. This softens crumbs and dough stuck inside. Use a soft sponge or cloth to wash the pan. Avoid harsh scrubbers that can damage the non-stick surface. Rinse the pan well with clean water. Dry it with a soft towel or air dry completely.
Dealing With Stubborn Residue
Some crumbs or dough might stick hard. Make a paste with baking soda and water. Apply the paste on the stuck parts. Let it sit for 15 minutes. Use a soft brush or sponge to scrub gently. Rinse the pan thoroughly after scrubbing. Avoid strong chemicals to protect the pan surface. Repeat if needed, but be gentle.
Cleaning The Kneading Paddle
The kneading paddle is an important part of your bread maker. It mixes the dough and helps create the perfect texture. Cleaning it well keeps your bread fresh and your machine working properly. Dirt and dough can stick to the paddle, so regular cleaning is necessary.
Detaching The Paddle
Start by unplugging the bread maker. Let the machine cool down before touching the paddle. Open the lid and find the kneading paddle inside the pan. Gently pull the paddle straight up to remove it. Some paddles may need a slight twist before pulling. Avoid using force to prevent damage.
Removing Dough Build-up
Check the paddle for any dough stuck on its surface. Use warm water and mild dish soap to soak it for a few minutes. This softens the dough and makes it easier to remove. Use a soft brush or cloth to scrub the paddle gently. Rinse thoroughly with clean water. Dry the paddle completely before placing it back in the machine.
Credit: delishably.com
Wiping The Interior
Wiping the interior of your bread maker is a key step in keeping it clean. It removes crumbs and dough bits that can stick inside. Clean surfaces help your machine work well and last longer.
Using A Damp Cloth
Take a soft cloth and dampen it with warm water. Wipe the inside walls gently to remove crumbs and residue. Avoid scrubbing hard to prevent damage. Focus on corners where dough might hide. Use a dry cloth afterward to remove moisture.
Avoiding Water Damage
Never pour water directly inside the bread maker. Water can harm the electrical parts. Avoid soaking the cloth too much. Keep moisture away from the heating element and motor. Let the interior dry fully before using the machine again.
Cleaning The Exterior
Cleaning the exterior of your bread maker keeps it looking fresh and new. Dirt, fingerprints, and spills can build up over time. Regular cleaning prevents stains and keeps the machine hygienic. Use gentle methods to avoid damage to the surface.
Removing Fingerprints And Spills
Use a soft, damp cloth to wipe the surface gently. For stubborn spots, add a small drop of mild dish soap to the cloth. Avoid abrasive cleaners that can scratch the finish. Wipe in smooth, circular motions to lift dirt and oils. Dry the surface with a clean, dry cloth to prevent streaks and water marks.
Polishing For Shine
Choose a polish designed for your bread maker’s surface material. Apply a small amount to a soft cloth. Rub the polish in gentle, circular motions to restore shine. Buff the surface with a clean cloth until it gleams. Polishing creates a protective layer that repels dust and fingerprints.

Credit: www.mumsnet.com
Maintaining The Bread Maker
Maintaining the bread maker is essential for its long life and best performance. A clean bread maker bakes better bread and stays safe to use. Dirt and crumbs can cause problems or bad smells over time. Keeping the machine clean is easy with simple habits.
Regular Cleaning Schedule
Clean the bread maker after every use. Remove the baking pan and kneading blade to wash them with warm, soapy water. Wipe the inside and outside with a damp cloth. Avoid using harsh chemicals or soaking the machine. Check the manual for parts that are dishwasher safe. Regular cleaning stops build-up and keeps the machine fresh.
Tips To Prevent Build-up
Use fresh ingredients to avoid sticky residues. Avoid overfilling the pan to stop spills. Cover the machine during baking to prevent flour dust from escaping. Clean small crumbs after each use with a soft brush or cloth. Store the bread maker in a dry place. These small steps reduce cleaning time and keep the bread maker working well.
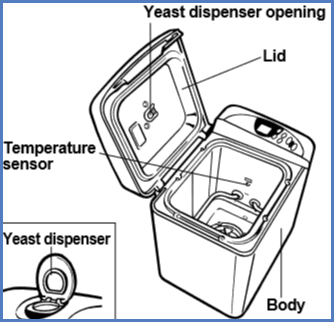
Credit: help.na.panasonic.com
Frequently Asked Questions
How Often Should I Clean My Bread Maker?
Clean your bread maker after every use to prevent residue buildup. Regular cleaning ensures better bread quality and extends the machine’s lifespan.
What Cleaning Tools Are Best For Bread Makers?
Use a soft cloth, mild detergent, and a non-abrasive sponge. Avoid harsh chemicals or metal scrubbers to protect the bread pan’s coating.
Can I Wash Bread Maker Parts In A Dishwasher?
Check your bread maker’s manual first. Some removable parts are dishwasher safe, but hand washing is usually recommended to maintain quality.
How Do I Clean Stuck Dough Inside The Bread Pan?
Soak the bread pan in warm, soapy water for 15 minutes. Then gently scrub with a soft sponge to remove dough residues.
Conclusion
Cleaning a bread maker keeps it working well and lasts longer. Regular care stops old dough and crumbs from building up. Use gentle tools and mild soap for safety. Dry all parts fully before putting them back. A clean bread maker bakes better bread every time.
Simple steps make cleaning quick and easy. Keep your machine fresh and ready for your next loaf. Good habits save time and help avoid problems later. Give your bread maker a little care today. Enjoy fresh bread from a clean machine tomorrow.