Last Updated on September 14, 2026
If you love the rich, bold flavor of coffee brewed in a percolator, keeping it clean is key to enjoying every cup. But cleaning a coffee percolator can seem tricky if you’re not sure where to start.
Don’t worry—you’re about to discover simple, effective steps that will make your percolator shine and taste great every time. Ready to unlock the secret to better coffee and a longer-lasting percolator? Let’s dive in.
Why Clean Your Percolator
Cleaning your coffee percolator is important for many reasons. It keeps your coffee tasting fresh and your machine working well. Dirt, oils, and old coffee bits can build up inside. This buildup affects how your coffee tastes and how long your percolator lasts.
Effects Of Residue On Flavor
Residue from old coffee can make new coffee taste bitter or stale. Oils left behind grow rancid over time. This changes the rich, fresh flavor you want. Cleaning removes these old flavors. It helps your coffee taste clean and smooth every time.
Maintaining Equipment Longevity
Regular cleaning stops clogs and rust inside the percolator. It prevents parts from wearing out too fast. Dirt and mineral buildup cause damage over time. Keeping the machine clean means it will last longer. You avoid costly repairs or needing a new percolator.
Tools And Supplies Needed
Cleaning a coffee percolator is simple with the right tools and supplies. Using common ingredients and basic tools can keep your percolator fresh and working well. Gather everything before starting to make the process smooth and quick.
Common Cleaning Ingredients
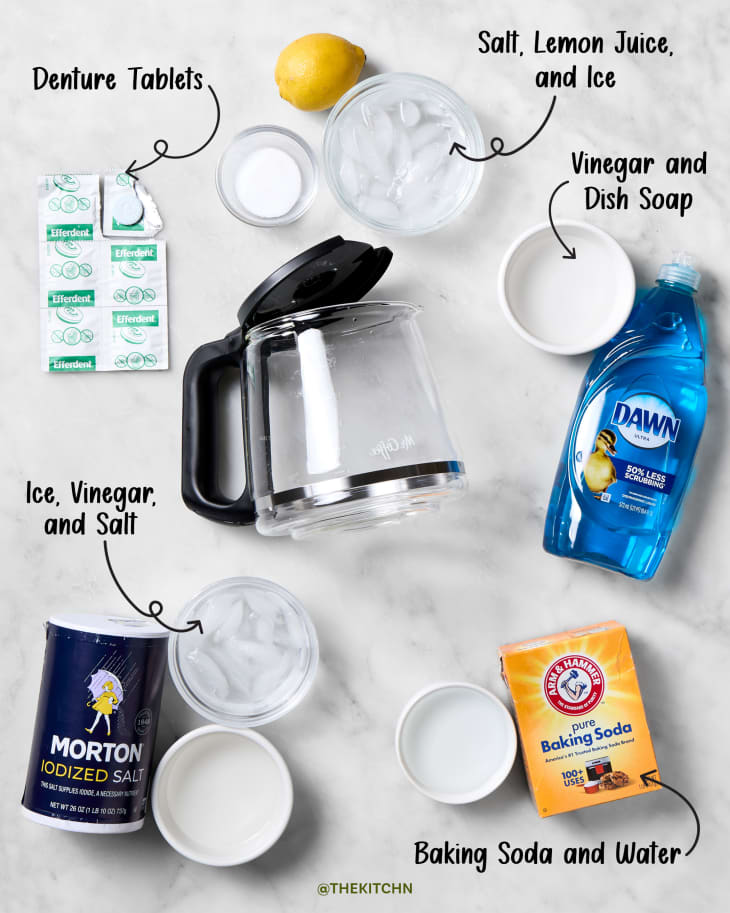
White vinegar is a natural cleaner that removes coffee stains and buildup. Baking soda helps scrub away stubborn residue without scratching. Mild dish soap cleans grease and leftover coffee oils. Warm water is needed to rinse and mix ingredients. These items are safe and easy to find in most kitchens.
Recommended Cleaning Tools
Use a soft sponge or cloth to avoid damage. A small brush or old toothbrush cleans hard-to-reach spots. A measuring cup helps mix cleaning solutions correctly. A bowl or sink space is needed for soaking parts. Have a clean towel ready for drying after cleaning.
Disassembling The Percolator
Disassembling the coffee percolator is the first step in cleaning it properly. Taking apart the parts allows you to clean every corner. This helps remove old coffee oils and residue. Clean parts make your coffee taste fresh and pure.
Removing The Lid And Basket
Start by lifting the lid off the top. The lid usually fits snugly but comes off easily. Next, take out the coffee basket. The basket holds the coffee grounds during brewing. Pull it straight up to avoid spilling grounds. Set these parts aside for washing.
Separating The Stem And Pot
Look inside the pot to find the stem. The stem is a long tube in the center. Twist or pull it gently to remove it from the base. Be careful not to bend the stem. Once removed, clean the stem and the pot separately. This step helps clear any stuck coffee deposits.
Basic Cleaning Steps
Cleaning your coffee percolator regularly keeps it working well and ensures fresh taste. Basic cleaning steps remove leftover coffee oils and grounds. These steps help prevent bad flavors and clogs.
Follow simple routines to clean parts carefully. Start by rinsing, then wash with soap and water. This routine keeps your percolator clean and ready for the next brew.
Rinsing Components
Take apart your percolator before rinsing. Remove the basket, stem, and pot. Rinse each piece under warm running water. This step clears loose coffee grounds and residue.
Use your fingers or a soft brush to remove stuck bits. Rinsing prevents buildup and prepares parts for washing. Make sure water flows through all small holes.
Washing With Soap And Water
Fill a basin with warm water and mild dish soap. Submerge all parts in the soapy water. Use a soft sponge or cloth to scrub gently.
Clean inside the pot and basket thoroughly. Avoid abrasive cleaners that can damage surfaces. Rinse all parts well to remove soap residue.
Dry each piece with a clean towel or air dry. Proper drying stops mold and rust from forming. Your percolator is ready for the next use.
Deep Cleaning Techniques
Deep cleaning a coffee percolator keeps it working well and tasting great. Regular cleaning removes coffee oils, but deep cleaning tackles tough buildup. Mineral deposits and stains can affect flavor and machine life. Use simple household items to clean deeply and safely. This section shows easy ways to do it.
Using Vinegar For Mineral Buildup
White vinegar breaks down mineral deposits inside your percolator. Fill the water chamber with equal parts vinegar and water. Run a full brewing cycle without coffee grounds. Let the vinegar solution sit inside for 15 minutes after brewing. Then, run two cycles with clean water to rinse well. Vinegar removes scale and keeps water flow smooth. It also stops clogs and corrosion. Use this method once a month for best results.
Baking Soda For Stubborn Stains
Baking soda gently scrubs away tough stains and coffee residue. Make a paste with baking soda and a little water. Apply the paste to stained parts using a soft cloth or sponge. Rub gently to lift stains without scratching the metal. Rinse all parts thoroughly with warm water afterward. Baking soda also neutralizes odors and refreshes your percolator. Repeat this cleaning as needed to keep it bright and clean.
:max_bytes(150000):strip_icc()/6-coffee-maker-components-washed-separately-045ca3f7a9b14ec29aa07f32b3c9555f.jpg)
Credit: www.foodandwine.com
Drying And Reassembling
Drying and reassembling your coffee percolator is a key step after cleaning. Proper drying stops water spots and prevents rust. Careful reassembly keeps your percolator ready for the next brew. Follow these steps to make sure your device lasts long and works well.
Proper Drying Methods
Start by drying each part with a clean towel. Use a soft cloth to avoid scratches. Leave parts in a dry area with good air flow. Avoid putting parts away while damp. This helps stop mold and bad smells. Let the basket and stem dry fully before assembly. Make sure no water pools inside the pot. Drying well keeps your coffee tasting fresh.
Reassembling For Next Use
Put the stem back into the pot first. Fit the basket on top of the stem. Check that all parts fit snugly and align properly. Tighten the lid firmly but do not over-tighten. Confirm the spout is clear and clean. Make sure no parts are loose or missing. Your percolator is now ready to brew fresh coffee again.
Tips For Daily Maintenance
Keeping your coffee percolator clean helps it last longer and taste better. Daily care is simple and quick. Small efforts every day stop big problems later.
Follow these tips to keep your percolator fresh and ready for the next brew.
Quick Rinses After Brewing
Right after you finish brewing, take a moment to rinse the percolator. Use warm water to wash the basket, stem, and pot. This removes leftover coffee grounds and oils. Avoid soap here. Soap can leave a smell that changes the coffee taste. Let the parts air dry before putting them back together.
Regular Deep Cleaning Schedule
Once a week, do a deeper clean. Use a mix of water and white vinegar to remove any build-up inside. Fill the percolator halfway with this mix. Run a brewing cycle without coffee grounds. After that, rinse everything with clean water. This keeps your percolator free from stains and odors. Deep cleaning prevents clogs and keeps your coffee tasting fresh.
Credit: www.thekitchn.com
Credit: www.youtube.com
Frequently Asked Questions
How Often Should I Clean My Coffee Percolator?
Clean your coffee percolator after every use to prevent buildup. Regular cleaning ensures better taste and extends the percolator’s life. Deep clean it weekly with vinegar or baking soda to remove stubborn stains and odors.
What Is The Best Method To Clean A Coffee Percolator?
Use a mixture of equal parts water and white vinegar. Run a full brewing cycle with this solution, then rinse thoroughly. This method effectively removes mineral deposits and coffee oils, keeping your percolator fresh and functioning well.
Can I Use Dishwasher To Clean Coffee Percolator Parts?
Most removable parts are dishwasher safe but check your percolator’s manual first. Hand wash the main body to avoid damage. Regular hand cleaning prevents wear and prolongs the appliance’s durability.
How Do I Remove Stubborn Coffee Stains From Percolator?
Use a paste of baking soda and water to scrub stains gently. Let it sit for 15 minutes before rinsing. This natural solution cleans without harsh chemicals, maintaining the percolator’s finish.
Conclusion
Cleaning your coffee percolator keeps your coffee fresh and tasty. Regular cleaning stops old coffee oils from building up. Use simple tools and safe cleaners for best results. Rinse well to avoid strange tastes in your drink. A clean percolator works better and lasts longer.
Small efforts make your coffee moments more enjoyable. Try cleaning after every few uses to keep it in top shape. Enjoy every cup with a fresh, clean machine.