Last Updated on December 29, 2025
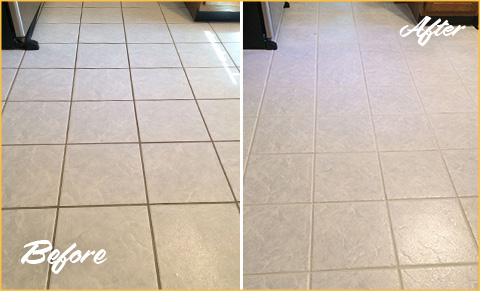
Your grout can make or break the look of your tiles. Dirty, stained grout not only looks bad but can also lead to mold and damage over time.
If you want your floors, walls, or countertops to stay fresh and clean, knowing how to clean and seal grout is key. You’ll discover simple, effective steps that anyone can follow—no special skills needed. By the end, you’ll have the confidence to restore your grout to its original brightness and keep it protected for years to come.
Ready to transform your space? Let’s dive in.
Choosing The Right Tools
Choosing the right tools is the first step to clean and seal grout effectively. The right supplies make the job easier and improve results. Using poor tools wastes time and effort. Select items designed for grout cleaning and sealing. This section helps you find what you need.
Essential Cleaning Supplies
Start with a stiff-bristle brush. It scrubs grout lines without damage. Avoid metal brushes that can scratch tiles. Use a grout cleaner or a mild detergent. Strong chemicals can harm grout or tiles. A spray bottle helps apply the cleaner evenly. Microfiber cloths or sponges work well for wiping. Gloves protect your hands from irritants. A bucket of warm water is useful for rinsing.
Selecting Effective Sealants
Choose a sealant made for grout protection. Penetrating sealants soak into the grout and block moisture. Surface sealants create a protective layer on top. Look for sealants that resist mold and stains. Water-based sealants are easy to apply and clean. Oil-based sealants last longer but take more time to dry. Check if the sealant works with your grout type. Follow product instructions for the best seal.

Credit: mapeihome.com
Preparing The Surface
Preparing the surface is the first step to clean and seal grout properly. A clean surface helps the sealant stick well. It also makes the grout last longer. Take time to clear and clean the area before starting the job. This part is important for a smooth and lasting finish.
Clearing The Area
Start by removing items near the grout lines. Move rugs, furniture, and decorations away. This creates space to work comfortably. It also stops dirt from spreading onto the cleaned grout. A clear area keeps the job neat and easy.
Removing Loose Debris
Use a soft brush or vacuum to remove loose dirt and dust. Pay close attention to grout lines and corners. Removing debris prevents it from mixing with cleaning products. This step ensures a deep clean and better seal. A clean surface means better results.
Cleaning Grout Effectively
Cleaning grout is key to keeping tiles fresh and bright. Dirt and stains can build up fast. Proper cleaning removes grime and restores the grout’s look. Use safe, effective methods for best results.
Choose the right cleaner and technique to avoid damage. Regular cleaning keeps grout strong and helps prevent mold and mildew. Let’s explore simple ways to clean grout well.
Homemade Cleaning Solutions
Many homemade cleaners use common kitchen ingredients. Baking soda and vinegar mix to lift dirt and stains. Make a paste with baking soda and water. Apply it to grout lines and spray with vinegar. Let it bubble for a few minutes. Then scrub gently and rinse with warm water.
Lemon juice also helps remove stains. Its natural acid breaks down grime. Combine lemon juice with baking soda for a fresh cleaner. These solutions are safe and cheap. They avoid harsh chemicals and work well on light to medium stains.
Using Commercial Cleaners
Commercial grout cleaners offer strong cleaning power. They target tough stains and mold. Choose a cleaner made for grout to avoid damage. Follow label instructions carefully. Use gloves and ensure good ventilation.
Test the cleaner on a small area first. This prevents discoloration or damage. Rinse grout thoroughly after cleaning. Some products need time to work before scrubbing. These cleaners save time and effort on heavy stains.
Scrubbing Techniques
Scrubbing is essential to remove dirt and grime. Use a stiff brush or an old toothbrush. Avoid wire brushes that can harm grout. Apply cleaner and scrub in circular motions. Focus on grout lines, not tiles.
Use gentle pressure to protect grout. Rinse often to see progress. For stubborn stains, repeat cleaning and scrubbing. Dry grout with a clean cloth to prevent new dirt buildup. Proper scrubbing helps grout look fresh and clean.
Drying And Inspecting Grout
Drying and inspecting grout is a crucial step after cleaning or sealing. It helps ensure the grout stays strong and looks good for a long time. Taking time to let grout dry fully prevents damage and prepares it for sealing.
Careful inspection finds cracks or weak spots early. Fixing these issues improves the grout’s durability. This section explains how to dry grout properly and check it for any damage.
Ensuring Complete Dryness
Grout needs time to dry fully before sealing. Moisture trapped inside can cause problems later. Wait at least 24 to 48 hours after cleaning or applying grout. Avoid walking or placing objects on the grout during this time.
Use fans or open windows to speed up drying. Check if grout feels dry by touch. It should be hard, not soft or damp. Proper drying ensures the sealant will stick well and last longer.
Checking For Damage
Look closely at the grout lines for cracks or chips. Small cracks can let water seep in and cause mold. Use a flashlight to see grout clearly. Tap gently with a tool to check for loose areas.
Mark any damaged spots to repair later. Repairing grout early stops further damage. Good grout keeps tiles secure and protects your floor or wall.
Applying Grout Sealer
Applying grout sealer protects grout from stains and moisture. It keeps grout looking clean and fresh for a long time. Sealing grout is a simple step that improves the durability of tiled surfaces.
Sealers form a protective layer on the grout. This layer stops water and dirt from soaking in. The right sealer and correct application make a big difference in grout care.
Types Of Sealers
There are two main types of grout sealers: penetrating and membrane-forming. Penetrating sealers soak into grout and repel water and stains. They keep grout breathable and are good for most tiles.
Membrane-forming sealers create a surface coating. This coating blocks moisture and dirt but may peel over time. They work well in areas with heavy use or moisture.
Step-by-step Sealing Process
First, clean grout thoroughly and let it dry completely. Any moisture will reduce sealer effectiveness. Use a small brush or applicator to apply sealer evenly.
Coat all grout lines with a thin layer. Avoid puddles or thick spots. Let the sealer sit for 5 to 10 minutes to absorb.
Wipe off excess sealer with a clean cloth. Buff grout gently to remove residue. Allow the sealer to cure for 24 to 48 hours before use.
Avoiding Common Mistakes
Do not seal dirty or wet grout. This traps dirt and moisture inside. Avoid applying too much sealer; it can leave a sticky film.
Skip rushing the drying time. Sealer needs full curing to protect grout. Do not use harsh cleaners on sealed grout; they can break down the sealer.
Maintaining Grout Shine
Maintaining grout shine keeps your tiled surfaces looking fresh and clean. Proper care prevents grout from turning dull or stained. Simple steps help preserve the seal and brightness of grout. Consistent attention makes grout last longer and look great.
Regular Cleaning Tips
Clean grout regularly with a mild cleaner and warm water. Use a soft brush to scrub gently without damaging the grout. Avoid harsh chemicals that can wear down the grout or sealer. Dry the grout area after cleaning to stop mold and mildew growth. Small spills should be wiped immediately to prevent stains. Keep grout free from dirt and soap build-up for lasting shine.
Reapplying Sealer Schedule
Reapply grout sealer every six to twelve months for best results. Sealing protects grout from moisture and stains. Test the grout by sprinkling water; if it absorbs quickly, reseal it. Clean the grout fully before applying a new sealer layer. Follow the sealer instructions carefully for even coverage. Regular sealing keeps grout looking bright and prevents damage over time.
Troubleshooting Common Issues
Troubleshooting common grout issues helps keep your tiled surfaces clean and fresh. Regular cleaning and sealing extend grout life. Still, stains and cracks may appear over time. Quick fixes prevent bigger problems later.
Dealing With Stains
Stains on grout are common. Dirt, spills, and mold cause discoloration. Start by scrubbing grout with a soft brush and warm water. For tough stains, use a baking soda paste. Apply paste on grout, let sit 10 minutes, then scrub gently. Rinse well with water. Avoid harsh chemicals that can damage grout or tiles.
White vinegar works on mildew stains. Spray diluted vinegar, wait 5 minutes, then scrub and rinse. Test any cleaner on a small area first. Repeat treatments may be needed for deep stains.
Repairing Cracked Grout
Cracks in grout allow water to seep under tiles. This causes damage and mold growth. Remove loose or broken grout with a grout removal tool. Clean the area well before applying new grout. Use a grout mix matching your existing grout color. Press grout into cracks with a rubber float. Wipe excess grout with a damp sponge before it dries. Let the new grout cure fully. Seal the repaired area to protect it from future damage.
Regular inspection helps catch cracks early. Fix cracks quickly to maintain tile strength and appearance.
Credit: www.sirgrout.com

Credit: www.youtube.com
Frequently Asked Questions
How Often Should Grout Be Cleaned?
Grout should be cleaned every 1 to 3 months. Regular cleaning prevents dirt buildup and mold growth. High-traffic areas may require more frequent cleaning. Proper maintenance extends grout life and keeps tiles looking fresh and new.
What Is The Best Way To Clean Grout?
Use a mixture of baking soda and water for effective cleaning. Apply with a brush and scrub gently. For tough stains, use a commercial grout cleaner. Always rinse thoroughly and dry to prevent mold and mildew.
How Do You Seal Grout Properly?
Apply grout sealer after cleaning and drying the grout. Use a small brush or applicator to cover grout lines evenly. Allow the sealer to penetrate for 5-10 minutes, then wipe off excess. Reseal grout every 1-2 years for protection and durability.
Can Sealing Grout Prevent Mold Growth?
Yes, sealing grout creates a protective barrier against moisture. This barrier reduces mold and mildew growth. Sealed grout is easier to clean and maintain. Regular sealing keeps grout looking fresh and hygienic longer.
Conclusion
Cleaning and sealing grout keeps your floors and walls fresh. It stops dirt and stains from settling in. Regular care makes grout last longer and look better. Use gentle cleaners and sealant for best results. Small efforts now save big repairs later.
A clean grout line brightens any room instantly. Take time for this simple task. Your home will thank you with a cleaner, fresher feel every day.