Last Updated on March 10, 2026
If you love coffee, you know that creamy, frothy milk can turn an ordinary cup into something special. But how do you get that perfect foam right at home?
You’re just a few simple steps away from making café-quality drinks with your steam wand. In this guide, you’ll learn exactly how to foam milk like a pro, impress your friends, and enjoy richer, smoother coffee every time. Ready to master this essential skill and elevate your coffee game?
Keep reading—you’ll be surprised how easy it is!
Choosing The Right Milk
Choosing the right milk is key to creating smooth, creamy foam with a steam wand. Different types of milk foam differently because of their fat and protein content. The milk you pick changes the taste and texture of your drink.
Whole Vs. Skim Milk
Whole milk has more fat, which makes foam rich and creamy. It feels smooth on your tongue and lasts longer. Skim milk has less fat but more protein. This creates lighter, airier foam with bigger bubbles. Skim milk foam is less creamy but froths quickly.
Non-dairy Alternatives
Non-dairy milks like almond, oat, and soy are popular choices. They foam well but each tastes different. Oat milk is creamy and sweet, making it great for coffee. Almond milk has a nutty flavor and lighter foam. Soy milk creates thick foam but can taste beany. Try different types to find your favorite.
Freshness And Temperature
Fresh milk froths better and tastes sweeter. Old milk loses its ability to foam well. Cold milk steams easier and creates better foam. Keep milk in the fridge until you steam it. Warm milk won’t foam as much and can taste flat.
Preparing Your Steam Wand
Preparing your steam wand is the first step in making smooth, creamy milk foam. Proper care and setup ensure better texture and flavor. Small actions here make a big difference in your coffee experience.
Cleaning And Purging
Start by wiping the steam wand with a clean, damp cloth. This removes any leftover milk or dirt. Next, purge the wand by turning on the steam for a few seconds. This clears out water and old milk inside the wand. Clean and purge the wand before every use to avoid bad taste and clogs.
Positioning The Wand
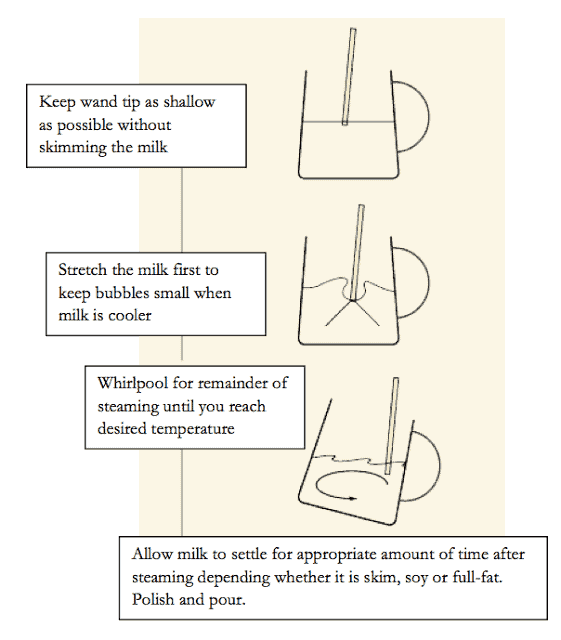
Place the steam wand just below the milk surface. Keep it near the side of the pitcher. Tilt the pitcher slightly to create a whirlpool motion. This helps mix air and milk evenly. Avoid placing the wand too deep or too shallow. Good positioning creates smooth, velvety foam.
Steaming Techniques
Steaming milk with a steam wand is an art that needs practice. The right steaming techniques help create smooth, creamy milk. These techniques ensure your coffee tastes rich and looks appealing. Focus on the steps below to improve your steaming skills.
Creating Microfoam
Microfoam is tiny, fine bubbles in the milk. Start with cold milk for better control. Insert the steam wand just below the milk surface. Turn on the steam to introduce air slowly. Listen for a gentle hissing sound. This means air is mixing well. Lower the wand deeper to heat the milk evenly. Keep the milk swirling to mix air and heat. The result is glossy, silky milk foam.
Achieving The Right Texture
The texture of your milk is key for good coffee. It should be smooth, not frothy or bubbly. Aim for a creamy feel with no big bubbles. Heat the milk to about 150°F (65°C). Use a thermometer or feel the pitcher. Stop steaming before it gets too hot. Tap the pitcher on the counter to remove bubbles. Swirl the milk to blend foam and liquid perfectly.
Avoiding Common Mistakes
Many make simple errors while steaming milk. Avoid placing the wand too deep at first. This stops air from mixing in. Don’t overheat the milk; it ruins the taste. Watch for loud screeching sounds—this means wrong wand position. Avoid large bubbles by tapping and swirling milk. Clean the steam wand before and after use. This prevents blockages and keeps milk fresh.

Credit: coffeegeek.com
Frothing Process Step-by-step
Foaming milk with a steam wand is simple with clear steps. Each step helps create smooth, creamy foam. Follow the process carefully to get great results every time. Patience and practice improve your skill quickly.
Here is the frothing process step-by-step for perfect milk foam.
Pouring Milk Into The Pitcher
Start with cold milk for best foam. Pour milk into the pitcher up to the bottom of the spout. Do not overfill. Leave space for milk to expand. Use whole or 2% milk for creamy texture.
Introducing Air Into The Milk
Place the steam wand just below the milk surface. Turn on the steam to start frothing. Keep the wand near the surface to add air. You will hear a gentle hissing sound. Move the pitcher slightly to create whirlpool motion.
Heating And Texturing
Lower the steam wand deeper into the milk. Heat the milk evenly without adding more air. Keep the whirlpool going for smooth texture. Stop steaming when the pitcher feels warm, about 140°F (60°C). Avoid overheating to keep milk sweet.
Finishing Touches
Turn off the steam and remove the wand. Wipe the wand with a clean cloth immediately. Tap the pitcher gently on the counter. Swirl the milk to mix foam and liquid. Pour foam slowly into your coffee for a perfect finish.
Troubleshooting Foam Issues
Foaming milk with a steam wand can sometimes be tricky. Problems may arise that affect the foam’s quality and texture. Knowing how to fix these issues helps create better foam every time. Here are common problems and simple solutions to try.
Foam Too Thick Or Dry
Foam that feels thick or dry means too much air entered the milk. The bubbles become large and break easily. Try lowering the steam wand just below the milk surface. Move the pitcher slowly to mix air evenly. Use fresh, cold milk for better texture.
No Foam Production
No foam usually means not enough air is added. Make sure the steam wand tip is near the surface but not deep. Check if the steam wand is clean and not clogged. Try lowering the milk temperature before steaming. Cold milk creates more foam.
Milk Overheating
Milk that gets too hot tastes burnt and loses foam quality. Stop steaming once the pitcher feels warm to the touch. Use a thermometer to keep milk below 150°F (65°C). Overheating breaks down proteins needed for good foam.
:max_bytes(150000):strip_icc()/froth-milk-with-steam-wand-766136-Step_4-5ba3cde64cedfd0050b2c47f.jpg)
Credit: www.thespruceeats.com
Cleaning And Maintenance Tips
Cleaning and maintaining your steam wand is key to making great frothed milk every time. Proper care keeps the wand working well and stops milk residue from building up. This section covers easy steps to keep your equipment clean and safe.
Post-steaming Cleaning
Right after steaming milk, wipe the steam wand with a damp cloth. This removes fresh milk from the surface. Next, purge the wand by turning it on briefly to blow out any milk inside. Doing this after every use stops clogs and keeps the wand hygienic.
Preventing Buildup
Milk can harden and block the steam nozzle over time. Soak the wand in warm water with a small amount of mild detergent regularly. Use a soft brush to clean tiny holes gently. Avoid harsh chemicals that might damage the metal or seals.
Regular Equipment Checks
Check the steam wand for leaks, cracks, or damage weekly. Test the steam pressure and flow to ensure it is steady. Replace worn-out parts promptly to avoid poor performance. Regular checks extend your machine’s life and keep your milk foam perfect.
Advanced Barista Tips
Advanced barista tips help improve your milk frothing skills. They focus on details that make your coffee better. These tips guide you to create smooth, creamy foam and beautiful designs. Practice these techniques to enhance your coffee experience.
Pouring Latte Art
Pour milk slowly and steadily for clear latte art. Start from high above, then move closer to the cup. Use wrist movements to create shapes like hearts or leaves. Practice is key to making neat, sharp designs.
Experimenting With Foam Density
Adjust your steam wand to change foam thickness. For thicker foam, add more air at the start. For thinner foam, focus on heating milk evenly. Different drinks need different foam types. Try various densities to find what you like best.
Optimizing Steam Pressure
Check your machine’s steam pressure before frothing milk. High pressure creates finer, creamier foam quickly. Low pressure makes bigger bubbles and rougher foam. Keep pressure steady for consistent results. Clean your steam wand to keep pressure stable.
Credit: www.latteartguide.com
Frequently Asked Questions
How Do You Foam Milk Using A Steam Wand?
To foam milk, insert the steam wand just below the surface. Turn on steam and lower the pitcher slightly. Create a whirlpool to mix air and milk evenly. Heat until the pitcher feels warm. Stop steaming and tap the pitcher to remove bubbles.
What Type Of Milk Works Best For Foaming?
Whole milk works best for foaming due to its fat content. It produces creamy, stable foam. However, skim and plant-based milks can also foam, but the texture varies. Experiment with different types to find your preferred foam quality.
How Do You Avoid Large Bubbles In Milk Foam?
To avoid large bubbles, position the steam wand tip just below the milk’s surface. Keep the pitcher steady to create a smooth whirlpool. Tap the pitcher gently on a counter to break any large bubbles after steaming.
How Hot Should Milk Be For Perfect Foam?
Milk should be steamed to around 140°F to 150°F (60°C to 65°C). This temperature creates creamy foam without scalding the milk. Use a thermometer or feel the pitcher; it should be hot but comfortable to hold.
Conclusion
Foaming milk with a steam wand takes practice and patience. Start with cold milk and a clean wand for best results. Pay attention to the texture as you heat and froth the milk. Aim for smooth, creamy foam without big bubbles.
Keep trying different techniques to find what works for you. Enjoy making coffee drinks with your perfectly frothed milk. Small steps lead to better foam every time. Your skills will improve with each cup you make.