Last Updated on May 21, 2026
Measuring flour might seem simple, but it can be tricky. Too much or too little can affect your recipe.
Correct flour measurement is key to baking success. It’s not just about scooping and pouring. Different methods can give you different results. Baking is a science, and precision matters. Using the right technique ensures your baked goods turn out perfect.
Whether you’re a beginner or a seasoned baker, understanding how to measure flour accurately is essential. This skill will make your cookies soft and your cakes fluffy. So, grab your measuring cups, and let’s dive into the art of measuring flour!
Credit: www.sweetandsavorybyshinee.com
Importance Of Flour Measurement
The importance of flour measurement in baking cannot be overstated. Precise measurement is the cornerstone of successful baking, ensuring consistency and quality in your creations. Whether you’re making fluffy bread or delicate pastries, the amount of flour you use can make or break your dish.
Impact On Baking Results
Accurate flour measurement directly impacts your baking results. If you’ve ever had a cake turn out dry or bread lacking structure, incorrect flour measurement might be the culprit. Too much flour can lead to dense, heavy baked goods. Too little, and your dough could be too sticky to handle, resulting in flat cookies or collapsed cakes.
Imagine baking a batch of cookies. You carefully mix your ingredients, but something goes wrong—they spread too much in the oven. This often happens when you add more flour than needed. The result? Flat, crispy cookies instead of the chewy ones you craved.
Have you found yourself questioning why your bread isn’t rising? It might be due to adding less flour than the recipe calls for. The structure of bread depends heavily on the right amount of flour to trap air and give it a good rise.
Common Mistakes
Many home bakers make common mistakes when measuring flour. One major error is scooping flour directly with the measuring cup. This packs the flour, leading to excess and unwanted density in your baked goods.
Another mistake is not leveling the flour properly. A heaping cup of flour can throw off your measurements, causing inconsistent results. Always level your flour with a knife for precision.
Have you ever assumed all flours are the same? They’re not. Each type—such as all-purpose, whole wheat, or cake flour—has a different density. Measuring them correctly is vital for achieving the texture you’re aiming for.
As you bake, consider the balance between precision and creativity. Are you willing to adjust and learn from past mistakes to perfect your technique? Understanding flour measurement is a skill that can elevate your baking from ordinary to extraordinary.
Tools For Measuring Flour
Measuring flour accurately is crucial for baking success. Whether you’re crafting a delicate cake or hearty bread, the right tools make all the difference. With a little precision, you can prevent dry textures or overly dense results. So, let’s explore the essential tools you need to measure flour like a pro.
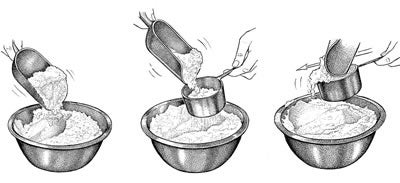
Measuring Cups
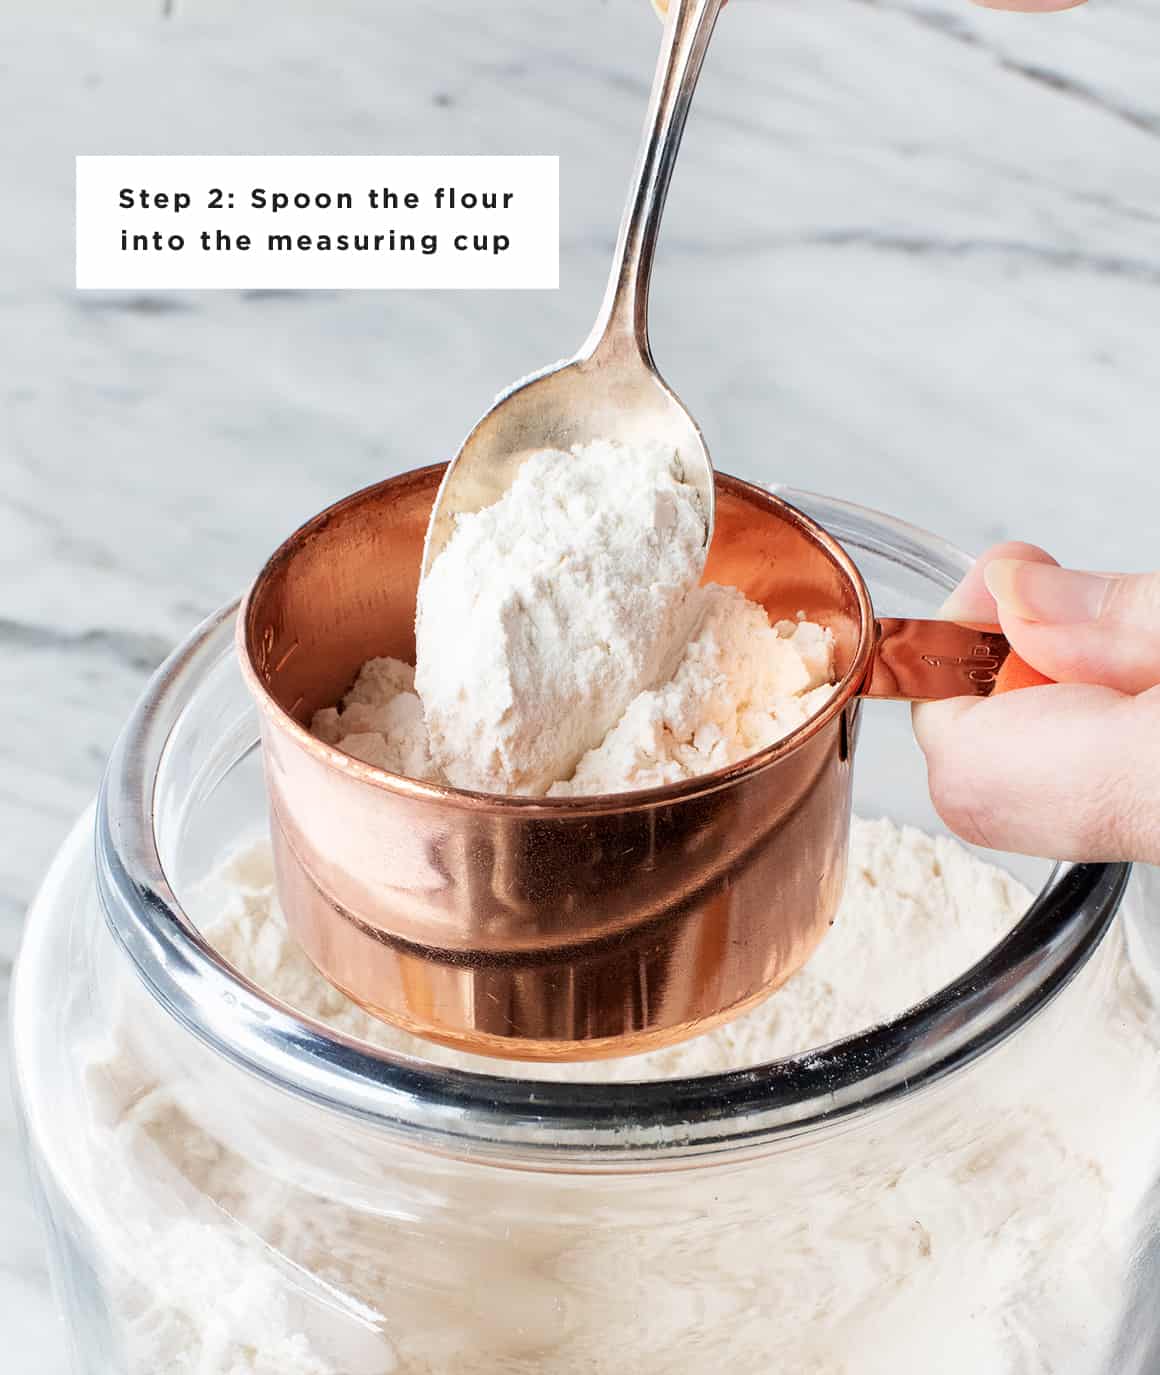
Measuring cups are a staple in every kitchen. They’re simple, straightforward, and usually come in a set with different sizes. When using measuring cups, it’s important to use the spoon-and-sweep method. Spoon the flour into the cup, then use a flat edge to sweep across the top. This avoids packing the flour down, which can lead to too much flour in your recipe.
Ever tried measuring flour directly from the bag? It’s tempting but can lead to inaccurate amounts. I learned this the hard way when my cookies turned out more like bricks than treats. Measuring cups help maintain consistency and are perfect for quick, everyday baking. Just remember to keep them dry for precise measurement.
Digital Scales
Digital scales offer precision that measuring cups can’t match. They measure flour by weight, which eliminates the guesswork. With a digital scale, you can achieve exact amounts, especially for recipes that call for grams or ounces. This is particularly useful for intricate pastries or when scaling recipes up or down.
Have you ever wondered why professional bakers achieve consistent results every time? Digital scales are their secret weapon. Using a scale ensures that your flour measurement is unaffected by humidity or how densely it’s packed. Investing in a digital scale might seem extravagant, but it pays off in the long run with perfect bakes every time.
Which tool do you rely on for measuring flour? Does consistency matter more to you, or is convenience your priority? Understanding your needs can guide your choice and elevate your baking game.
Techniques For Accurate Measurement
Measuring flour accurately is crucial for baking success. A slight misstep can alter the texture and taste of your baked goods. To ensure your recipes turn out just right, consider these effective techniques for measuring flour.
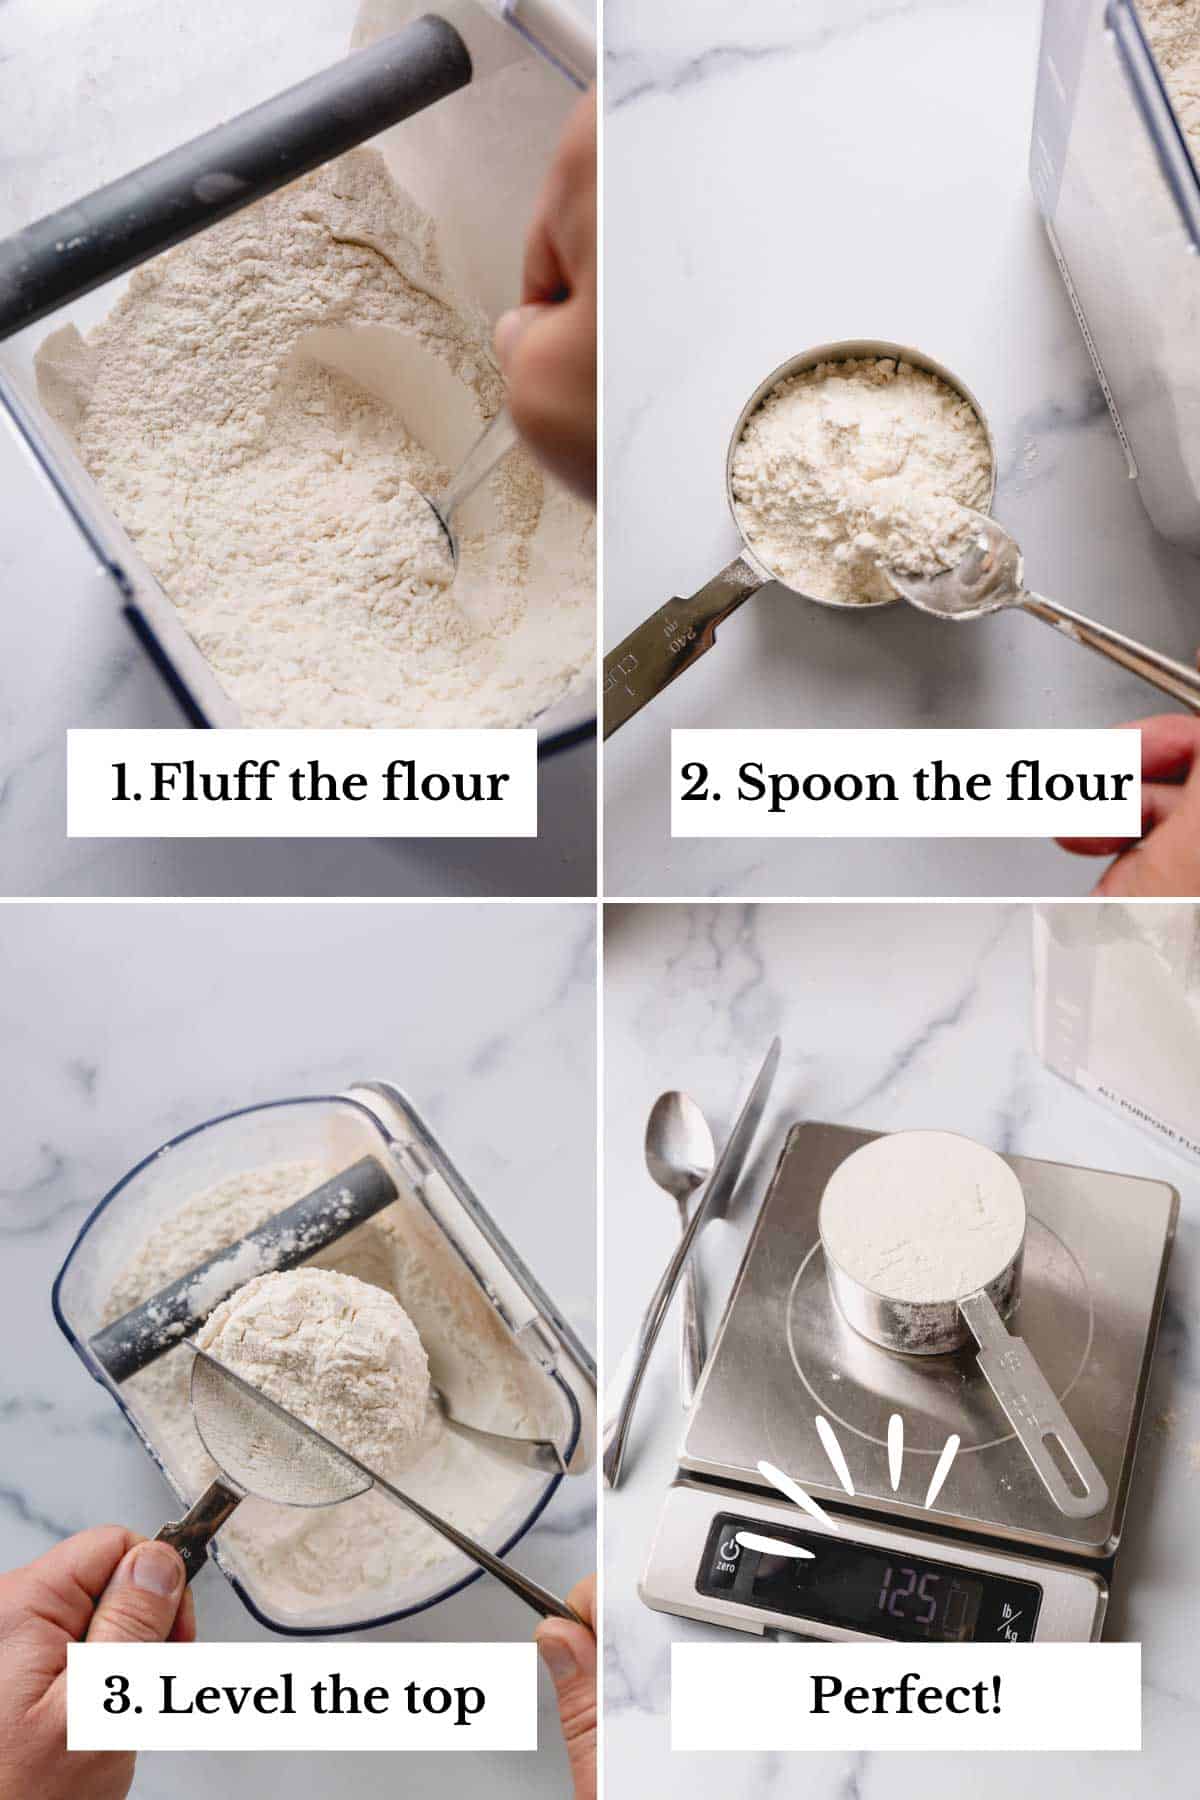
Spoon And Level Method
The spoon and level method is a simple, yet effective way to measure flour. First, fluff the flour in its container. This helps avoid compacting and ensures you don’t scoop out too much.
Next, use a spoon to lightly fill your measuring cup. Once heaped, use the back of a knife to level off the excess flour. This method prevents the flour from being packed down, which could lead to using more than your recipe requires.
Have you ever noticed your cookies turning out denser than expected? This method can help prevent that. It’s a small step, but it makes a big difference in your baking outcomes.
Weight Method
Using a kitchen scale for the weight method is the most accurate way to measure flour. Set your scale to zero with a bowl on it, and gently add flour until you reach the desired weight.
Most recipes provide flour measurements in cups, but converting to grams or ounces offers precision. This is particularly useful for bread-making, where the dough consistency is critical.
Have you ever tried this method and noticed how much easier it was to replicate successful recipes? It’s a game-changer for consistent results.
Isn’t it fascinating how these simple techniques can transform your baking? Which method will you try for your next baking adventure? Give it a go and see the difference in your culinary creations!
Credit: www.loveandlemons.com
Choosing The Right Flour Type
Flour is a kitchen staple, but not all flour is the same. Each type of flour serves different purposes in baking and cooking. Selecting the right flour type can make or break your recipe. Understanding the differences can help you achieve the desired texture and flavor in your dishes.
All-purpose Vs. Specialty Flours
All-purpose flour is the most common choice for many recipes. It’s versatile and can be used for baking bread, cakes, and cookies. It works well for thickening sauces too. Specialty flours include whole wheat, almond, and coconut flour. Each has unique characteristics and uses. Whole wheat flour offers a hearty texture. Almond flour is gluten-free and great for low-carb recipes. Coconut flour is absorbent and adds a subtle sweetness.
Gluten Content Considerations
Gluten content affects the texture of baked goods. All-purpose flour has a moderate gluten level. It provides a balance between strength and tenderness. Bread flour has higher gluten content, making it ideal for chewy bread. Cake flour has low gluten content, resulting in tender cakes. For gluten-free options, consider almond or coconut flour. They provide different textures and flavors.
Adjusting Measurements For Recipes
Properly measuring flour is key for successful baking. Start by fluffing the flour in its container. Use a spoon to fill your measuring cup lightly. Level off with a knife for accuracy.
Measuring flour accurately can make or break your baking experience. Whether you’re scaling a recipe for a crowd or adjusting for high-altitude baking, getting the measurements right is crucial. Understanding how to tweak your flour amounts can ensure your baked goods turn out just right every time.Scaling Recipes
When scaling recipes, it’s essential to adjust the flour measurements accordingly. Doubling a recipe isn’t as simple as just doubling everything. Flour can behave differently in larger batches. For accurate results, weigh your flour instead of using cups. A digital scale can help you achieve precision. If a recipe calls for 200 grams of flour, and you need to double it, use 400 grams. Keep an eye on the texture of your dough or batter. Sometimes, you might need to add a little more or less flour, especially if you’re scaling up significantly. Flour can absorb moisture differently in larger quantities.Adapting For Altitude
Baking at high altitudes presents unique challenges. Flour’s behavior changes due to lower air pressure and humidity. This can affect the rise and moisture content of your baked goods. At higher altitudes, you might need to reduce the amount of flour slightly. This helps prevent your baked goods from becoming too dry. Start by reducing the flour by one tablespoon for every cup used. Have you ever noticed your cakes falling flat or cookies spreading too much? This could be due to the altitude. Adjusting flour measurements can make a significant difference in these outcomes. If you’re unsure, experiment with small changes and note the results. Adjusting flour is more of an art than a science at times, but with practice, you’ll get the hang of it. Remember, every kitchen is different. Your oven, climate, and even the brand of flour can affect your results. Be patient and willing to tweak your process for the best outcome.Storing Flour Correctly
Proper storage is essential for preserving flour’s quality. Incorrectly stored flour can spoil quickly, impacting your baking results. Understanding the optimal conditions for storing flour ensures it remains fresh and safe for use. Knowing the shelf life of flour helps prevent waste and ensures you always have fresh flour at hand.
Optimal Storage Conditions
Keep flour in a cool, dry place to maintain its freshness. Moisture can lead to flour clumping and spoilage. Store flour in airtight containers to protect it from humidity. Glass jars or plastic containers with tight lids work well. Label containers with purchase dates for easy tracking. Avoid storing flour near heat sources like ovens or stoves. Heat can alter flour’s texture and flavor.
Shelf Life Insights
Flour’s shelf life varies by type. White flour lasts longer than whole grain flour. White flour can stay fresh for up to a year. Whole grain flour, due to oils, should be used within six months. Freezing flour extends its shelf life significantly. Seal flour tightly before freezing to prevent freezer burn. Thaw flour at room temperature before use for best results.
Troubleshooting Baking Issues
Baking is an art and science that often requires precision, especially when measuring ingredients like flour. Despite your best efforts, sometimes baking doesn’t go as planned. Troubleshooting baking issues can save you from disappointment and wasted ingredients. Have you ever wondered why your cake didn’t rise or why your cookies turned out too dense? Let’s dive into common baking issues related to flour measurement.
Dense Textures
Ever baked a cake that felt more like a brick than a fluffy delight? Dense textures in baked goods can often be traced back to how you measure your flour. Using a heavy hand can lead to packing too much flour into your measuring cup, resulting in a dense outcome.
Try the spoon and level method. Spoon the flour into your measuring cup and level it off with a knife. This ensures you’re not overpacking and helps maintain that light, airy texture we all love. Consider using a kitchen scale for even more accuracy.
Reflect on past baking experiences. Did you skip sifting the flour because you were in a hurry? Sifting aerates the flour, contributing to the desired fluffiness. How could changing your approach make a difference?
Inconsistent Results
Are your cookies perfect one day and flat the next? Inconsistent results can be frustrating and often stem from fluctuating flour measurements. Measuring flour accurately every time is key to consistency.
Keep your measuring tools consistent. Using a different set of measuring cups or spoons each time can lead to variations. Stick with one set and method for reliable results.
Consider the environment. Humidity can affect flour’s moisture content, impacting your baking results. On humid days, you might need to adjust the amount of flour you use. Have you ever thought about how weather can change your baking outcomes?
Remember, baking is a journey. Experiment, adjust, and learn from each attempt. With practice and attention to detail, you can master the art of measuring flour for perfect results every time. What changes will you make in your next baking adventure?
Credit: www.kingarthurbaking.com
Enhancing Baking Precision
Enhancing baking precision is crucial for creating delicious baked goods. Accurate flour measurement ensures consistent texture and flavor. Many home bakers struggle with precision, often leading to unpredictable results. Using the right techniques helps achieve perfect outcomes every time.
Using Precision Tools
Digital kitchen scales provide accurate flour measurements. They eliminate the guesswork associated with cups and spoons. Scales are easy to use and offer reliable results. Always calibrate scales before use to ensure accuracy. Measuring cups can vary, leading to inconsistent amounts. A level surface is essential for accurate readings. Ensure the flour is not packed tightly when using cups.
Recording Measurements
Keeping a baking journal helps track flour quantities. Note the amount used for each recipe. Documenting flour measurements assists in replicating successful bakes. Adjust measurements based on desired texture and flavor. Consistent records aid in refining techniques over time. Jot down any variations or adjustments made. These notes guide future baking endeavors.
Frequently Asked Questions
How Do You Measure Flour Correctly?
Use a spoon to scoop flour into a measuring cup. Level it with a knife for accuracy. Avoid packing flour tightly. Use dry measuring cups for dry ingredients. Proper measuring ensures baking success.
How Do You Measure The Amount Of Flour?
Use a kitchen scale for precise flour measurement. Spoon flour into the measuring cup, then level it with a knife. Avoid packing flour tightly to ensure accurate measurement. This method helps achieve consistent baking results and prevents density variation. Always use dry measuring cups for flour, not liquid measuring cups.
How Much Is 1 Cup Of Flour?
1 cup of flour typically weighs around 120 grams or 4. 25 ounces. This measurement can vary slightly depending on the type of flour and how it’s measured. For precise baking, use a kitchen scale to weigh your flour. Always fluff flour before scooping to ensure accuracy.
How To Measure Flour Without Scales?
Use a standard measuring cup to measure flour accurately. Spoon flour into the cup, then level with a knife. Avoid packing or shaking the flour to ensure precision. This method provides a reliable measurement for baking.
Conclusion
Accurate flour measurement makes baking success more likely. Take time to measure correctly. Use a kitchen scale for precision. Spoon flour gently into your measuring cup. Level off with a flat edge. Practice these steps regularly. Baking results improve with proper techniques.
Mistakes in measuring can lead to dry or dense results. Remember, flour affects texture and flavor. Consistency is key for delicious baked goods. Enjoy experimenting with different recipes. Share your creations with friends and family. Baking becomes enjoyable with the right techniques.
Keep these tips handy in your kitchen. Happy baking!