Last Updated on May 21, 2026
Pie crust cook time can affect your baking success. It’s crucial for perfect pies.
Understanding the right time is key to achieving a golden, flaky crust. Baking pies is an art, and the crust is its canvas. Cook time can make or break your masterpiece. Too short, and the crust is pale and soft.
Too long, and it’s burnt and brittle. Striking the balance ensures a crust that’s tender yet crispy. The perfect pie crust complements the filling. It enhances the overall taste and texture. Knowing the ideal cook time is essential for pie perfection. Whether baking fruit pies or savory quiches, understanding the timing can elevate your baking. This guide will help you master pie crust cook time. Let’s explore the secrets to achieving that perfect crust.
Choosing The Right Ingredients
Selecting the best ingredients ensures a perfect pie crust. Fresh butter and chilled water lead to a flaky texture. Precise ingredient choices can affect crust cook time, resulting in a golden, delicious pie.
Choosing the right ingredients is crucial when aiming for the perfect pie crust. It’s not just about mixing flour and butter; it’s about understanding how each component can influence the texture and flavor of your crust. By carefully selecting your ingredients, you can enhance your pie crust’s taste and ensure it bakes perfectly.Importance Of Freshness
Freshness matters in pie crusts more than you might think. Using fresh ingredients can make a significant difference in the final outcome. Old flour or stale butter can lead to a crust that lacks flavor and texture. Imagine cutting into a pie with a crisp, flaky crust that melts in your mouth. Now, picture the disappointment of a soggy or tough crust. Fresh ingredients can help you achieve that perfect bite every time. Next time you’re in the kitchen, take a moment to check your supplies. Is your flour new, or has it been sitting in the pantry for months? Fresh butter can be the difference between a crust that’s merely good and one that’s unforgettable.Types Of Flour
The type of flour you choose is a game-changer in pie crust making. All-purpose flour is the most common choice, offering a balance between tenderness and structure. But have you ever considered using pastry flour for an even more delicate crust? Pastry flour has a lower protein content than all-purpose flour, which results in a softer and more tender crust. This is ideal for those who prefer a less chewy bite. Whole wheat flour can also be an interesting option if you’re looking to add a nutty flavor to your crust. However, it can make the crust denser, so you might want to mix it with all-purpose flour for better results. Have you experimented with different flours in your pie crusts? You might discover a new favorite that elevates your baking game.Mastering The Dough
Crafting a perfect pie crust is an art. The dough is the soul of your pie. For a flaky crust, you need finesse. Understanding dough is key to success. Let’s dive into the essentials.
Mixing Techniques
Start by gathering your ingredients. Flour, butter, and water make up the basics. Cold butter is crucial for texture. Cut butter into small cubes. This helps in even mixing.
Use a pastry blender for mixing. It helps incorporate butter with flour. Avoid using your hands directly. They can warm up the butter. Warm butter affects the crust.
Mix until you see pea-sized pieces. This ensures flakiness. Don’t over-mix. Over-mixing leads to tough dough.
Achieving The Ideal Consistency
Consistency matters in pie dough. The dough should not be sticky. A sticky dough won’t roll well. Add water gradually. Too much water makes dough sticky.
Check dough after adding water. It should hold together without crumbling. Pinch a piece between fingers. It should maintain its shape. If it crumbles, add a little more water.
Wrap the dough and chill it. Chilling helps relax the gluten. Relaxed gluten prevents shrinking. Let it rest for at least 30 minutes. This step is crucial for rolling.
Rolling Out The Dough
Rolling out the dough is a key step in pie making. For a perfect pie crust, bake at 375°F for 20-30 minutes. This ensures a golden-brown finish. Adjust the time based on your oven and crust thickness.
Rolling out the dough is a crucial step in pie-making. It’s where the magic begins, transforming your chilled dough into a perfect canvas for your pie. But it’s not just about rolling; it’s about understanding the nuances that can make or break your pie crust. With the right techniques, you can achieve a crust that’s both flaky and tender, setting the stage for a delicious pie.Tools For Rolling
Using the right tools can make rolling out dough a breeze. A good rolling pin is essential. Some prefer a traditional wooden pin, while others swear by marble or stainless steel for their cooling properties. A silicone mat or parchment paper can prevent sticking and help you roll the dough evenly. Do you have a favorite rolling pin that you swear by? A bench scraper can be a lifesaver, helping you lift and turn the dough without tearing it. It’s also handy for cleaning up any flour spills. Investing in quality tools can make your pie-making experience more enjoyable and efficient.Thickness Matters
The thickness of your dough can significantly impact the final pie. Aim for about 1/8 inch thick for most pies. Too thin, and your crust may burn or become too fragile. Too thick, and it could overwhelm the filling and turn chewy. Rolling out to the right thickness ensures a balanced pie with a delightful crust and filling harmony. Use a ruler or a guide to measure your dough’s thickness. It might seem excessive, but precision here can make all the difference in achieving the perfect pie crust. Have you ever found yourself with a crust that’s too thick or too thin? How did it affect your pie? By paying attention to these details, you can elevate your pie-making skills and impress friends and family with your baking prowess.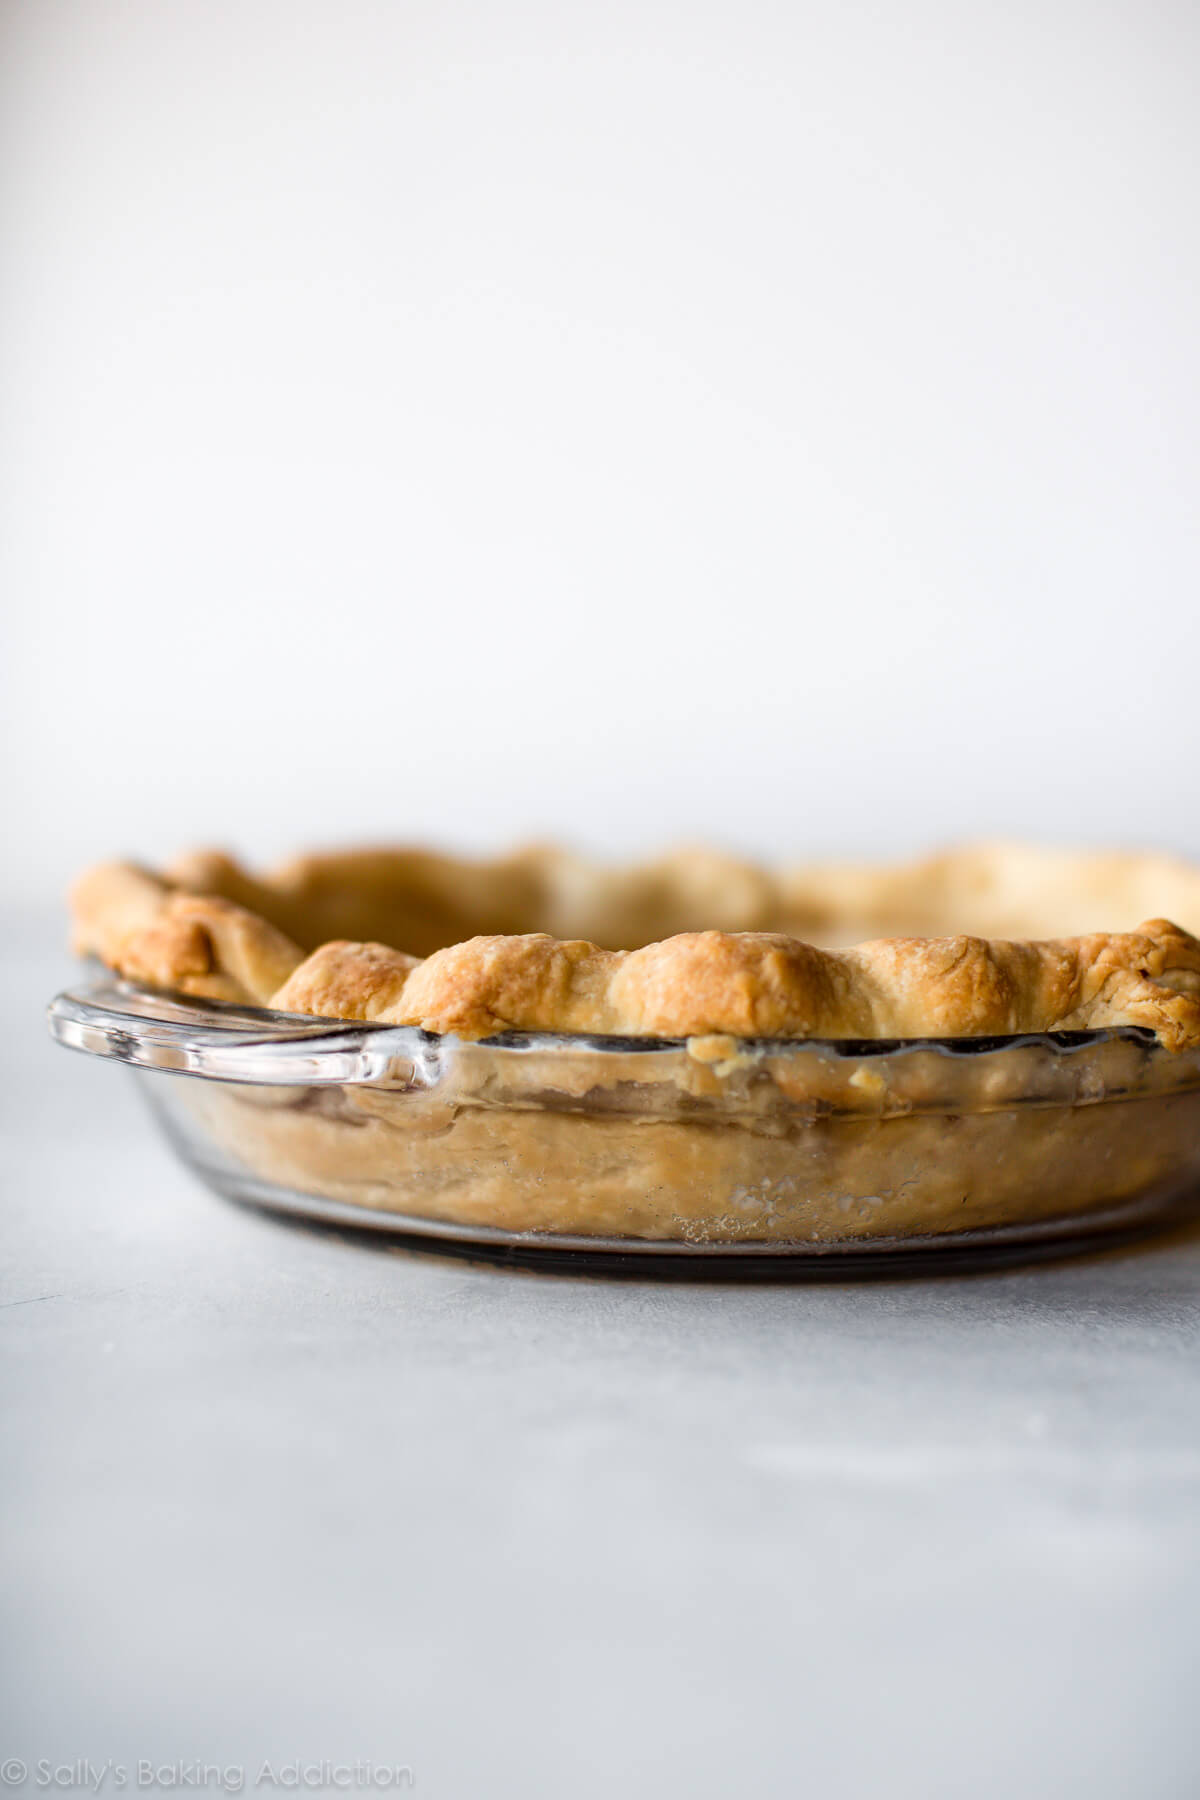
Credit: sallysbakingaddiction.com
Pre-baking Preparations
Preparing for baking involves understanding the correct pie crust cook time. A well-timed bake ensures a flaky, golden crust. Begin by preheating the oven, then place your crust to bake. Check for light browning to achieve perfect texture and flavor.
Preparing your pie crust for baking is a crucial step that can make or break your dessert. It involves more than just mixing flour and butter. The secret lies in the pre-baking preparations. Properly preparing your crust ensures it bakes evenly, holds its shape, and has the perfect texture. Whether you’re a seasoned baker or a novice, these simple steps can elevate your pie-making skills.Chilling The Dough
Chilling the dough is an often overlooked step but it’s essential for a flaky crust. After mixing your ingredients, wrap the dough in plastic wrap and refrigerate it for at least 30 minutes. This rest period allows the gluten to relax and the butter to firm up, resulting in a tender crust. Have you ever wondered why some pie crusts taste better than others? Chilling the dough is the answer. It prevents the butter from melting too quickly in the oven, creating those delightful layers. Next time you make a pie, try chilling the dough and notice the difference in texture.Preventing Shrinkage
Preventing shrinkage is crucial for maintaining the shape and size of your pie crust. After rolling out the dough, place it in the pie pan and let it rest in the fridge for another 15 minutes. This additional chilling helps the dough settle, reducing the chance of it shrinking during baking. Have you ever pulled a pie out of the oven only to find the crust has shrunk away from the edges? It’s disappointing, but preventable. Using pie weights or dried beans during blind baking can also help keep the crust in place. The next time you bake, pay attention to these steps and enjoy a beautifully shaped pie crust. These pre-baking preparations may seem simple, but they have a big impact on your final product. Are you ready to try these techniques and improve your pie crust game? With these tips, you can achieve a perfect crust that’s both delicious and visually appealing.Determining The Cook Time
Baking the perfect pie crust requires attention to cook time. Aim for a golden-brown hue, usually 15-20 minutes. This ensures a flaky and delicious texture.
Determining the perfect cook time for a pie crust can make the difference between a flaky delight and a soggy disappointment. Whether you’re a seasoned baker or a kitchen novice, understanding the nuances of pie crust cook time is crucial. Let’s dive into the factors that influence this and how to adjust for different types of pies.Factors Influencing Cook Time
Several elements affect how long your pie crust should bake. The type of pie you’re making—whether it’s a fruit pie, custard pie, or a savory pie—plays a significant role. A fruit pie might require a longer bake time to ensure the filling is perfectly cooked. The thickness of your crust also matters. A thicker crust will need more time to bake through, while a thin crust can burn if left too long. Always keep a close eye on your pie as it bakes to avoid overcooking. Your oven’s performance can vary, even if you follow the recipe to the letter. Ovens can have hot spots or inaccurate temperature settings. It’s always a good idea to use an oven thermometer to ensure accuracy.Adjusting For Different Pies
Each type of pie demands its own baking strategy. When baking a custard pie, consider blind baking the crust first. This technique helps prevent a soggy bottom by partially baking the crust before adding the wet filling. For fruit pies, you may need to adjust the cook time based on the fruit’s moisture content. Juicy fruits like berries might require a longer bake time to reduce the liquid and thicken the filling. Savory pies, such as quiches, can benefit from pre-baking the crust a bit. This ensures the crust stays crispy beneath the heavier fillings. Have you ever baked a pie that looked perfect but tasted underdone? Next time, try adjusting your cooking time based on these factors. This can transform your pie-baking experience and results. By paying attention to these details, you’ll ensure that your next pie crust is the perfect foundation for any filling.:max_bytes(150000):strip_icc()/__opt__aboutcom__coeus__resources__content_migration__simply_recipes__uploads__2018__07__blind-bake-pie-crust-horiz-b-1800-06e5b66e5b6d43249a22e4d7f813a90b.jpg)
Credit: www.simplyrecipes.com
Baking Tips For Perfect Crust
Creating a perfect pie crust can elevate any pie recipe. It’s crucial to get the crust just right. A golden, flaky crust is the hallmark of a great pie. Below are some essential baking tips to help you achieve pie perfection.
Temperature Settings
Start with the right oven temperature. Preheat your oven to 425°F (220°C). This ensures the crust cooks evenly and quickly. A hot oven helps the crust become crisp and flaky. Lower temperatures can make the crust soggy.
Check your oven’s accuracy with an oven thermometer. Oven temperatures can vary, affecting the baking process. Adjust if needed to maintain the correct heat. Consistent heat helps create a perfect crust.
Using Pie Weights
Use pie weights to prevent bubbles in the crust. They keep the dough flat and even. Pie weights can be ceramic balls or dried beans. Place them on parchment paper over the crust.
Blind bake the crust with weights for 15 minutes. Then, remove the weights and paper. Bake for another 10 minutes until golden. This ensures the crust holds its shape.
Common Mistakes To Avoid
Perfecting pie crust requires attention to detail. Mistakes can lead to disappointment. Understanding common errors helps achieve a flaky, delicious crust.
Overworking The Dough
Overworking dough makes it tough. The gluten develops too much. This affects texture. Mix ingredients until just combined. Handle the dough gently. Less is more.
Ignoring Resting Time
Resting the dough is crucial. It relaxes the gluten. This prevents shrinking during baking. Chill the dough for at least 30 minutes. It makes rolling easier.

Credit: bakingathome.com
Enhancing Flavor And Texture
Enhancing the flavor and texture of a pie crust can transform a simple dessert into a memorable culinary experience. While the basic pie crust recipe is a staple in many kitchens, adding unique touches can elevate your creation to new heights. The right blend of ingredients and creative experimentation with textures ensures that your pie crust not only supports your filling but complements it with flavor and character.
Adding Unique Ingredients
Have you ever thought about what a pinch of cinnamon could do to your pie crust? A hint of spice can introduce warmth and depth, creating a delightful surprise with every bite. You might also try incorporating ground nuts like almonds or pecans for a nutty flavor and added crunch.
Consider using vanilla extract or citrus zest. These can brighten the taste and add a subtle aroma that pairs beautifully with various fillings. Does your favorite pie recipe need a little twist? Experiment with these ingredients to add a personal touch that makes your pie uniquely yours.
Experimenting With Textures
Texture is just as crucial as flavor. Achieving the perfect balance between flaky and tender can be challenging but rewarding. Have you tried using different types of flour? Mixing whole wheat or almond flour with all-purpose flour can create interesting textures and flavors.
Another idea is to play with the thickness of your crust. A thicker crust can be more satisfying and robust, while a thinner one might offer a delicate, crispy bite. What texture resonates with your taste buds? Adjusting these elements can make your pie crust standout.
Enhancing your pie crust is about discovering new possibilities and personalizing your baking. What will you add next to elevate your pie’s flavor and texture? The possibilities are endless, and each experiment brings you closer to mastering the art of pie making.
Troubleshooting Pie Crust Issues
Adjusting pie crust cook time can solve common baking issues. Undercooked crust might need extra minutes in the oven. Overbaked crust often results from high temperatures or prolonged cooking.
Troubleshooting pie crust issues can be both a science and an art. It’s frustrating to spend time crafting the perfect pie only to find the crust isn’t cooperating. Whether you’re battling with a soggy bottom or dealing with cracks, understanding these common problems and their solutions can save your pie.Fixing Soggy Bottoms
A soggy bottom can ruin the texture of your pie, making it less enjoyable. Blind baking your crust can help. This involves baking the crust partially before adding your filling. It creates a barrier that prevents moisture from seeping in. Another trick is to place your pie on a preheated baking sheet. The extra heat from below helps the crust cook faster and stay crisp. You might also try using egg wash. Brush it on your crust before adding the filling. This seals the crust and keeps it from getting soggy.Preventing Cracks
Cracks in your pie crust often occur when the dough is too dry or too cold. Ensure your dough is moist and pliable before rolling it out. If it feels dry, sprinkle a few drops of water and knead gently. Consider letting your dough rest at room temperature for a few minutes before rolling. This softens the fats and makes the dough easier to work with. Are you rolling your dough too thin? A slightly thicker crust can be more forgiving and less likely to crack. Do you find pie crusts intimidating? What techniques have you tried to tackle these common issues? Experiment with these tips, and soon, you’ll be crafting crusts worthy of a bakery display.Frequently Asked Questions
How Long To Bake Pie Crust At 350 Degrees?
Bake the pie crust at 350 degrees Fahrenheit for 25 to 30 minutes. Ensure the crust turns golden brown. Use pie weights to prevent bubbling. Adjust time for different ovens or recipes. Always check for desired crispness.
Can You Bake A Pie At 350 Instead Of 400?
Yes, you can bake a pie at 350°F instead of 400°F. Lower temperature requires longer baking time. Check for doneness by ensuring the crust is golden brown and filling is bubbly. Adjust time accordingly to prevent undercooking or burning. Always monitor closely for best results.
What Temperature Is Best For Pie Crust?
The best temperature for baking pie crust is 375°F to 400°F. This ensures a golden, flaky texture. Preheat your oven for consistent results. Use chilled dough to prevent shrinking and maintain shape. Avoid overworking the dough to preserve tenderness.
How Long To Cook Pre-made Crust?
Bake pre-made crust at 375°F for 10-12 minutes until golden brown. Follow package instructions for best results.
Conclusion
Pie crust cook time affects the final taste and texture. Shorter times give a softer crust. Longer times result in a crispier finish. Monitor closely to avoid burning. Remember, oven temperatures can vary. Experiment to find your perfect crust. Practice makes perfect.
Use a timer for accuracy. Trust your instincts while baking. Enjoy the process and have fun. Baking is an art, not just science. Perfect pie crusts are within your reach. Keep trying and learning. Happy baking!