Last Updated on May 20, 2026
Bread is a staple in many homes. Soft white loaf is a favorite choice.
Its fluffy texture and mild taste make it perfect for any meal. Creating a soft white loaf at home is a rewarding experience. You control ingredients, ensuring fresh and wholesome bread. This recipe is simple and beginner-friendly. No special skills are needed.
Just follow the steps, and you’ll have a delightful loaf. Homemade bread adds warmth to your kitchen. The aroma is comforting. It’s a great way to impress friends and family. Enjoy the satisfaction of baking your own bread. Let’s explore this easy recipe. Discover the joy of baking a soft white loaf today.
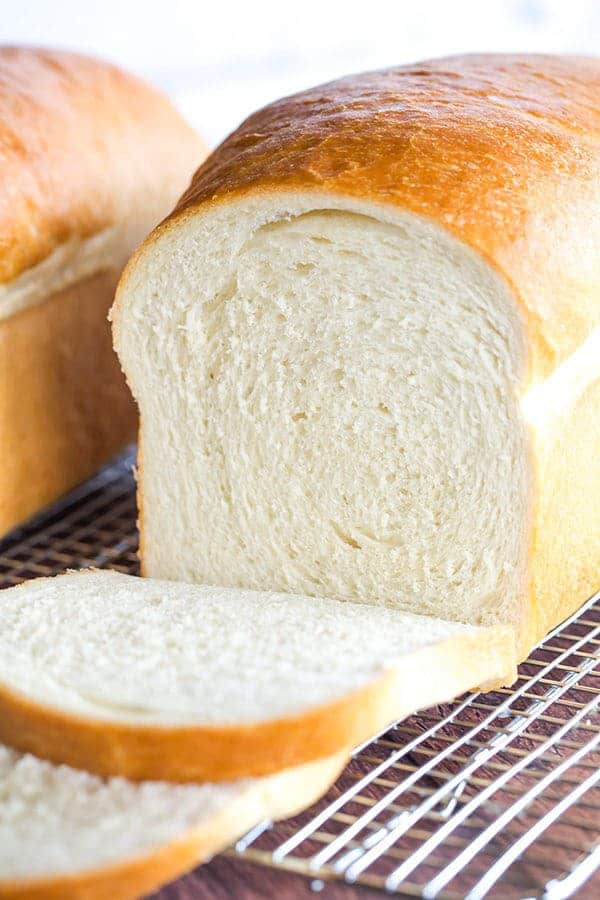
Credit: www.browneyedbaker.com
Ingredients
The secret to a perfect soft white loaf lies in its ingredients. Choosing the right components ensures a fluffy and delicious bread. Let’s explore what you’ll need.
Essential Ingredients
These are the must-have ingredients for your soft white loaf.
- All-purpose flour: The base of your loaf. Provides structure.
- Water: Helps bind the ingredients. Ensures moisture.
- Yeast: The magic behind the rise. Makes your bread fluffy.
- Sugar: Feeds the yeast. Adds a hint of sweetness.
- Salt: Enhances flavor. Balances the sweetness.
- Butter: Adds richness. Creates a tender crumb.
- Milk: Softens the dough. Adds creaminess.
Optional Add-ins
These extras can elevate your loaf. Customize to your taste.
- Eggs: Adds richness. Enhances the color of the crust.
- Honey: Natural sweetness. Offers a subtle floral note.
- Herbs: Infuses flavor. Perfect for a savory twist.
- Nuts: Adds crunch. Provides a nutty contrast.
- Seeds: Healthy addition. Gives texture and flavor.
Choose your ingredients wisely for a delightful baking experience. Happy baking!
Equipment Needed
Ready to bake your own soft white loaf? Before you get started, it’s essential to have the right equipment. Having the proper tools can make the difference between a good loaf and an extraordinary one. Let’s dive into the equipment needed for this delicious baking adventure.
Basic Baking Tools
To start, you need some basic baking tools that you probably already have in your kitchen. A large mixing bowl is crucial. It gives you enough space to mix your ingredients without making a mess.
A sturdy wooden spoon is another must-have. It’s perfect for stirring your dough and ensuring everything is well-combined.
Measuring cups and spoons are essential for accuracy. Baking is a science, and precise measurements can make all the difference.
You’ll also need a kitchen scale. This might seem unnecessary, but it helps to measure your flour and other ingredients accurately, ensuring consistency in your loaves.
Finally, a bread knife is vital for slicing your freshly baked loaf. A serrated edge will give you clean cuts without squishing the bread.
Specialized Equipment
While basic tools are essential, a few specialized pieces can elevate your baking game. A stand mixer with a dough hook attachment is a game changer. It saves you time and effort when kneading the dough, especially if you plan to bake regularly.
A proofing basket, or banneton, helps the dough maintain its shape while rising. It also gives your loaf a beautiful texture and pattern.
An oven thermometer ensures your oven is at the correct temperature. Surprisingly, many ovens can be off by several degrees, which can affect your baking results.
Baking stones or steel can improve your bread’s crust. They provide even heat distribution, which is crucial for a perfect bake.
A dough scraper is handy for handling sticky dough and cleaning up your work surface. It’s a small tool with a big impact on your baking experience.
Do you have all these tools in your kitchen? If not, start with the basics and gradually add specialized equipment. Each tool enhances your baking and brings you closer to that perfect soft white loaf. Happy baking!
Preparing The Dough
Preparing the dough is a crucial step in making a soft white loaf. This stage sets the foundation for the bread’s texture and taste. Getting it right ensures a fluffy and delicious loaf. Let’s explore the key steps involved in preparing the dough.
Measuring Ingredients
Accurate measurements are essential for a perfect dough. Use a kitchen scale for precision. Measure flour, yeast, salt, and sugar carefully. This ensures a balanced blend. Proper measurements help achieve the desired dough consistency.
Mixing Techniques
Mixing the ingredients correctly makes a big difference. Start by combining dry ingredients in a large bowl. Gradually add water. Stir until a sticky dough forms. Kneading is crucial for gluten development. Use your hands or a mixer with a dough hook. Knead until the dough is smooth and elastic. This step takes about 10 minutes. Proper mixing leads to a soft and airy loaf.
Kneading The Dough
Kneading the dough is a key step in making a soft white loaf. It ensures the bread is light and fluffy. Gently work the dough until smooth and elastic.
Kneading the dough is a crucial step in making a soft white loaf. It helps develop the gluten, giving the bread its structure. Proper kneading ensures the loaf is airy and soft. There are different methods to knead dough. Let’s explore the two main techniques.Hand Kneading
Hand kneading connects you directly with the dough. Start by flouring your work surface. Place the dough on the floured area. Use the heel of your hand to push the dough away. Fold it back towards you, then rotate and repeat. This process should take about 10 minutes. You’ll know it’s ready when the dough is smooth and elastic. Hand kneading can be therapeutic. Feel the change in texture as you work.Using A Stand Mixer
A stand mixer offers a convenient option. Attach the dough hook to the mixer. Place the dough in the mixing bowl. Set the mixer to a low speed. Let it knead for around 8 minutes. The dough will become smooth and elastic. Stand mixers save time and effort. They are great for those with limited hand strength. Remember to watch the mixer closely. Dough can overheat if left too long. Choose your method based on preference and tools available. Both methods yield excellent results. Enjoy the process of kneading. It’s a key step in creating a delightful loaf.First Rise
The first rise is crucial in making a soft white loaf. It allows the dough to develop flavor and texture. During this stage, yeast ferments, causing the dough to expand. This process helps create a light and airy bread. Understanding the ideal conditions and timing can make a big difference.
Ideal Rising Conditions
The dough needs a warm environment for the first rise. A temperature between 75°F and 85°F is perfect. Yeast works best in a warm space, speeding up fermentation. Avoid drafts or cold spots which slow down the rise. Cover the bowl with a damp cloth or plastic wrap. This retains moisture and prevents a dry crust.
How Long To Rise
The first rise usually takes about one to two hours. Check the dough after an hour. It should have doubled in size. Gently press your finger into the dough. If the indentation remains, it’s ready. If not, let it rise for a bit longer. Patience is key for achieving the desired softness in your loaf.
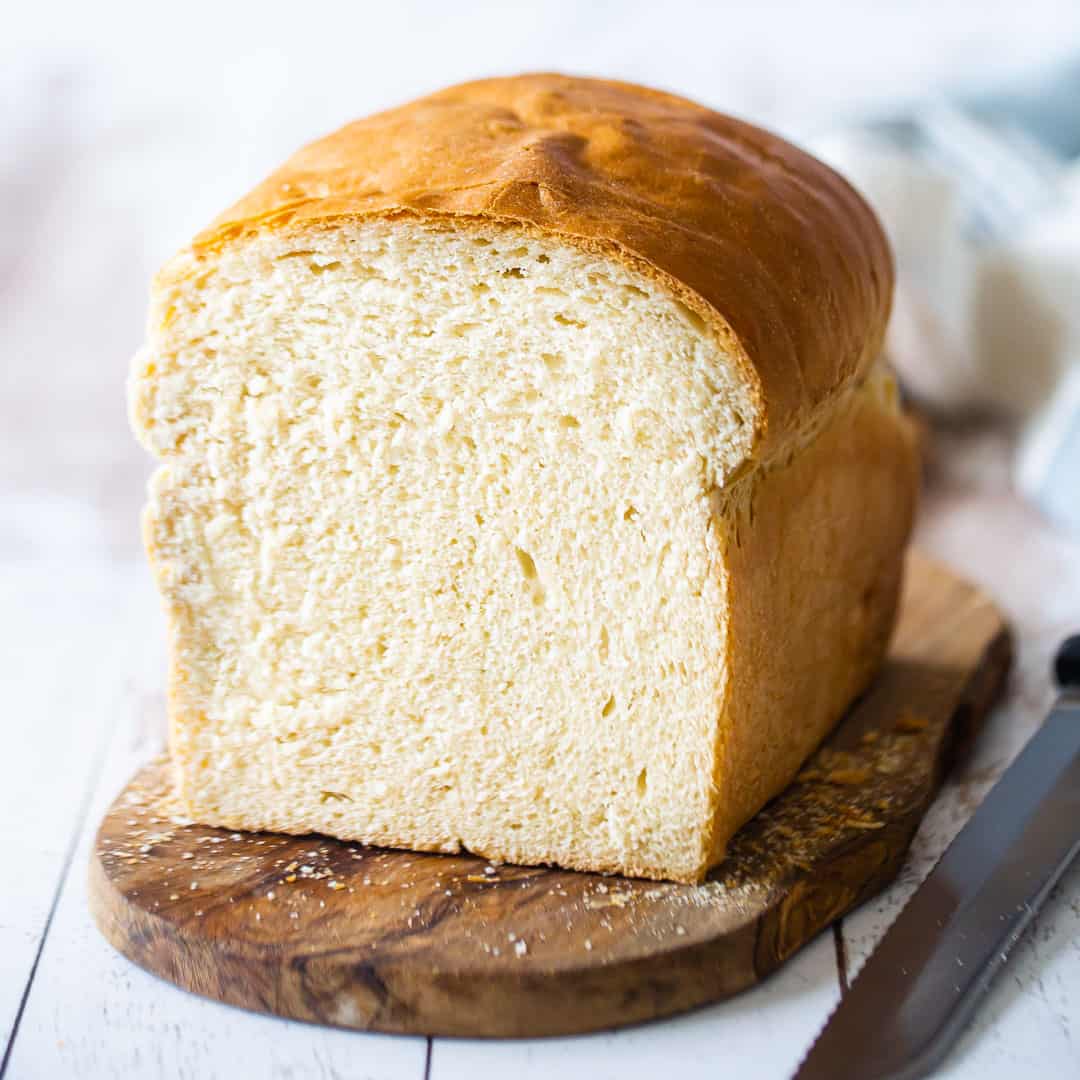
Credit: bakingamoment.com
Shaping The Loaf
Crafting the ideal soft white loaf begins with shaping the dough just right. Gently form it into a smooth, round shape before placing it in the baking tin. This step ensures even baking and a fluffy texture.
Shaping the loaf is where your creativity meets the art of baking. This step is crucial because it gives your bread its final form and influences its texture. A well-shaped loaf not only looks beautiful but ensures an even bake. Have you ever wondered why some loaves rise perfectly while others flatten? The secret often lies in the shaping process. Let’s dive into the specifics of forming the dough and placing it in the pan.Forming The Dough
Start by gently punching down the dough to release any excess air. This step is important to avoid large air pockets in your loaf. Next, turn the dough out onto a lightly floured surface. Flour helps prevent sticking, making it easier to work with the dough. Use your hands to shape the dough into a rough rectangle. This initial shape will guide the final form of your loaf. Imagine the satisfaction of a neatly shaped loaf. It’s like the difference between a well-wrapped gift and a haphazard package. Take your time to tuck in the edges and roll the dough tightly. A tighter roll ensures a smooth and uniform crumb. Think of it as rolling a yoga mat—firm and even.Placing In The Pan
Grease your loaf pan lightly to prevent sticking. You wouldn’t want your masterpiece to tear when you try to remove it. Place the shaped dough seam-side down into the pan. This helps the loaf hold its shape and rise evenly. Cover the pan with a damp cloth. A moist environment is your bread’s best friend for its final rise. Have you ever felt the anticipation as you watch the dough rise? It’s like waiting for a story to unfold. Allow the dough to rise until it’s just above the rim of the pan. This will give you that perfect dome shape on top. Remember, patience is key. Rushing this step can lead to a dense loaf. What tricks do you use to shape your loaf? Share your experiences in the comments below!Second Rise
Discover the perfect soft white loaf recipe for your next baking session. Enjoy the fluffy texture and delightful taste. Ideal for sandwiches or toast.
The second rise is a crucial step in baking a soft white loaf that often gets overlooked. This rise helps the dough develop its flavor and achieve that perfect airy texture. Skipping or shortening this step can lead to dense bread, which nobody wants.Importance Of Second Rise
The second rise allows the yeast to ferment further, enhancing the bread’s flavor. It also gives the dough time to relax, which makes it easier to shape without tearing. Think of it as giving your loaf a second chance to become the best version of itself. Have you ever rushed through this step and ended up with a flat loaf? It’s a common mistake, but taking the time ensures your bread is light and fluffy. Giving the dough enough time to rise again will reward you with better texture and taste.Tips For Perfect Rising
– Temperature Control: Ensure your kitchen is warm, but not too hot. A consistent temperature helps the dough rise evenly. – Cover Properly: Use a damp cloth or plastic wrap to cover your dough. This prevents the surface from drying out, allowing for a smooth rise. – Patience is Key: Set a timer and walk away. Resist the urge to check on the dough frequently. Interruptions can deflate the dough and affect the rise. Have you ever wondered why some loaves rise beautifully while others falter? Consider what you can tweak in your method to improve your results. By focusing on the second rise, you’re not just following a recipe; you’re crafting a loaf that tells a story with every bite. What adjustments will you make today to elevate your baking game?Baking The Bread
Once your dough has risen, it’s time to bake the bread. This step gives your loaf its golden crust and soft interior. Proper baking is crucial for the perfect soft white loaf.
Oven Settings
Preheat your oven to 350°F (175°C). Ensure the oven reaches the right temperature before placing the loaf inside. A preheated oven helps the bread rise evenly. Place the bread in the center of the oven. This position ensures even heat distribution. Use the middle rack for best results.
Checking Doneness
After 25 minutes, check the bread’s color. The crust should be golden brown. Tap the top of the loaf lightly. A hollow sound means it’s done. If not, bake for 5 more minutes. Use a thermometer for accuracy. The internal temperature should reach 190°F (88°C).
Cooling And Storing
Let the soft white loaf cool completely on a wire rack before storing. Keep it in an airtight container to maintain freshness.
When you bake a soft white loaf, the journey doesn’t end when it comes out of the oven. How you cool and store your bread can dramatically impact its taste and texture. Taking the right steps ensures your bread stays fresh and delicious for longer. Let’s dive into the best methods for cooling and storing your homemade loaf.Proper Cooling Methods
The cooling stage is crucial. Remove your loaf from the pan immediately to prevent a soggy bottom. Place it on a wire rack. This allows air to circulate around the bread, ensuring even cooling. Resist the temptation to cut into it right away. Letting it cool for at least an hour helps the interior set properly. Have you ever cut into bread too soon and found it gummy? Patience pays off here.Best Storage Practices
Once cooled, proper storage is key. Keep your loaf in a breadbox at room temperature. This preserves the crust’s texture. Avoid the fridge. It speeds up staling due to the cold environment. Instead, if you plan to keep it longer than a few days, freeze it. Wrap the loaf tightly in plastic wrap or foil, then place it in a freezer bag. This prevents freezer burn and maintains its freshness. If you need just a slice or two, pre-slice the loaf before freezing. That way, you can grab what you need without thawing the entire loaf. Do these steps sound simple enough to try? They ensure your soft white loaf remains as delightful as the day it was baked.Serving Suggestions
Enjoy soft white loaf with butter and jam for breakfast. Pair it with soup for a comforting meal. Try making sandwiches for a tasty lunch option.
When you bake a soft white loaf, the possibilities for serving it are almost endless. This versatile bread can elevate any meal and even transform leftovers into something exciting. Whether you’re serving it with dinner or using it creatively the next day, a soft white loaf is your kitchen’s best friend.Pairing With Meals
A soft white loaf pairs beautifully with a wide range of dishes. Imagine serving it alongside a hearty soup or stew, where the bread becomes the perfect tool to soak up flavorful broths. You can also use it for sandwiches, adding a soft texture to your favorite fillings like turkey and cheese or a classic BLT. For breakfast, try toasting slices and spreading them with butter and your favorite jam. This simple yet delightful combination can make your mornings a little brighter. If you love eggs, this loaf makes an excellent base for scrambled eggs or a poached egg on toast.Creative Uses For Leftovers
Leftover bread doesn’t have to be boring. Turn it into croutons by cutting it into cubes, tossing them with olive oil and herbs, and baking until crispy. These croutons can add crunch to salads or soups, enhancing your meals with minimal effort. You can also create a delicious bread pudding for dessert. Mix your leftover bread with eggs, milk, sugar, and spices, then bake until golden. This warm, comforting dish is perfect for using up bread and satisfying your sweet tooth. If you’re feeling adventurous, try making homemade breadcrumbs. Simply process the bread in a food processor and use them to coat chicken or fish. This not only utilizes leftovers but also adds a homemade touch to your dishes. How do you plan to serve your soft white loaf? Whether you’re pairing it with meals or getting creative with leftovers, there’s no shortage of ways to enjoy this staple. Let your taste buds guide you and have fun experimenting in the kitchen.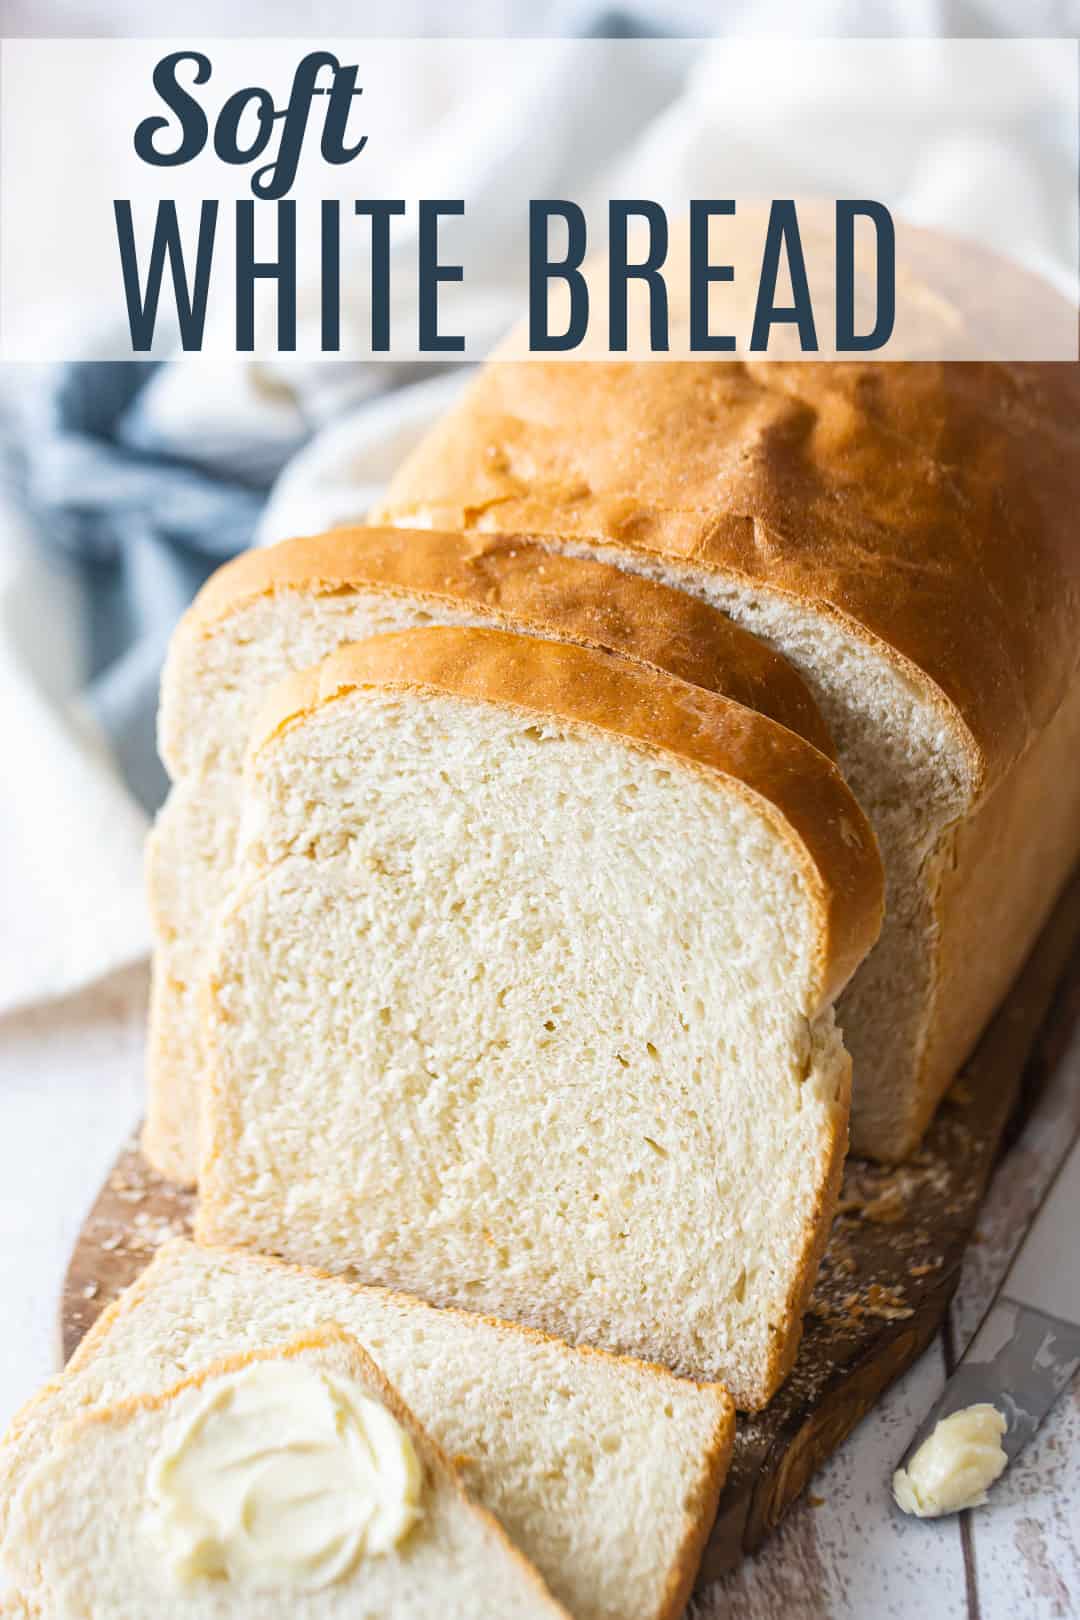
Credit: bakingamoment.com
Frequently Asked Questions
What Is The Secret To Softer Bread?
The secret to softer bread is using fats like butter or oil. They tenderize the dough. Adding milk enhances softness and moisture. Use a good kneading technique to develop gluten properly. Allow the dough to rise fully for a fluffy texture.
Does Oil Or Butter Make Softer Bread?
Oil typically makes bread softer than butter. It provides better moisture retention and a tender texture. Butter adds flavor but can make bread slightly firmer due to its fat content. For softer bread, use oil in your recipe. Experiment to find the desired softness and taste for your bread.
What Is The Difference Between Milk Loaf And White Bread?
Milk loaf contains milk or milk powder, making it softer and richer. White bread uses water, resulting in a lighter texture. Both are similar in appearance, but milk loaf has a slightly sweeter taste due to the milk content. Milk loaf is ideal for softer sandwiches and toast.
How To Make A Soft Crust Loaf?
To make a soft crust loaf, use milk and butter in your dough. Bake at a lower temperature. Brush the loaf with melted butter immediately after baking. Cover with a cloth while cooling to maintain moisture. Use a humid baking environment for best results.
Conclusion
Baking a soft white loaf at home is rewarding and fun. The aroma fills your kitchen, inviting warmth and comfort. Each slice offers a taste of tradition, simple yet delightful. This recipe suits beginners and seasoned bakers alike. Enjoy fresh bread with family meals or as a snack.
Customize it with seeds or herbs for a twist. Perfect for sandwiches or toast. Homemade bread connects us with simplicity and nourishment. Try this recipe and savor the joy of baking. Feel proud as you slice into your own creation.
Happy baking!