Last Updated on May 12, 2026
Are you tired of looking at dirty or damaged grout on your floor tiles? Removing grout might seem like a tough job, but with the right steps, you can do it yourself and make your floors look brand new.
Whether you want to fix cracks, change the color, or replace old grout, this guide will show you exactly how to remove grout safely and easily. Keep reading, and you’ll discover simple tips that save you time, effort, and money—transforming your floors faster than you thought possible.
Tools Needed
Removing grout from floor tiles needs specific tools for a smooth job. Having the right tools makes the task easier and faster. Some tools work by hand, while others use power. Safety gear is also important to protect yourself.
Manual Tools
Manual tools give you control and precision. A grout saw or grout removal tool helps scrape grout between tiles. A utility knife can help cut grout lines carefully. A small chisel can remove grout in tight spots. These tools cost less and work well for small areas.
Power Tools
Power tools speed up grout removal on bigger floors. An oscillating multi-tool with a grout removal blade is very useful. A rotary tool with a grout removal bit can reach narrow spaces. These tools cut grout faster but need careful handling. They save time on large projects.
Safety Equipment
Safety equipment protects you from dust and debris. Wear safety glasses to protect your eyes. Use a dust mask to avoid breathing grout dust. Gloves protect your hands from sharp tools. Knee pads help if you work on the floor for long.
Credit: myfuse.education
Preparing The Area
Preparing the area is the first step to remove grout from floor tiles safely and efficiently. A clean, organized space helps you work faster and prevents damage. Taking time to prepare also keeps your home clean and protects your belongings. Follow these simple steps to get started.
Clearing The Floor
Move all furniture and rugs away from the work area. Remove any objects that could get in the way. A clear floor gives you space to work freely. It also prevents dirt or dust from settling on your items. Sweep or vacuum the floor to remove loose dirt. This makes grout removal easier and cleaner.
Protecting Surroundings
Cover nearby walls and baseboards with painter’s tape. Use plastic sheets or drop cloths to shield furniture and fixtures. Grout dust and debris can spread quickly. Protecting surfaces saves you time cleaning later. Wear old clothes to avoid stains. Gloves protect your hands from harsh tools or chemicals.
Ventilation Tips
Open windows and doors to allow fresh air inside. Use fans to help move air through the space. Good ventilation reduces dust and fumes from grout removers. It keeps the air safe to breathe during the project. Avoid working in tight, closed rooms without airflow. Take breaks outside to stay comfortable and healthy.
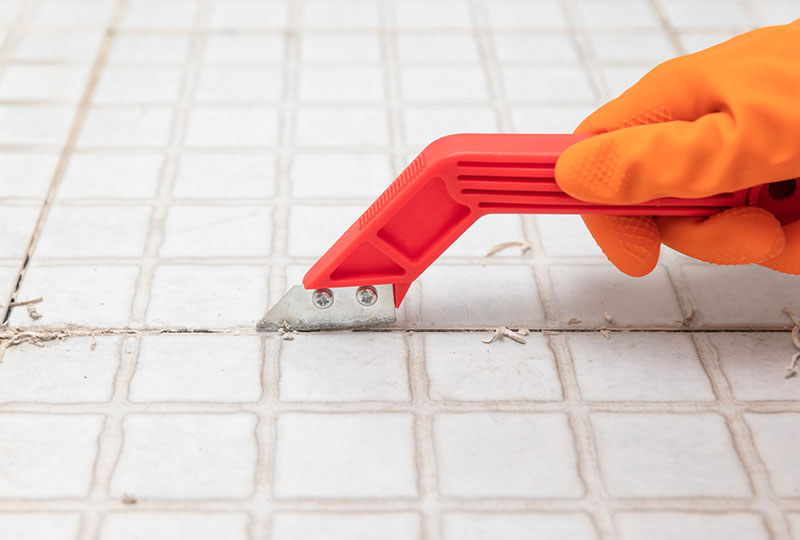
Manual Grout Removal Methods
Manual grout removal methods are a hands-on way to clean old grout from floor tiles. These methods need simple tools and some effort. They work best for small areas or detailed work. You can control the process carefully to avoid tile damage. Let’s explore three common manual tools used for grout removal.
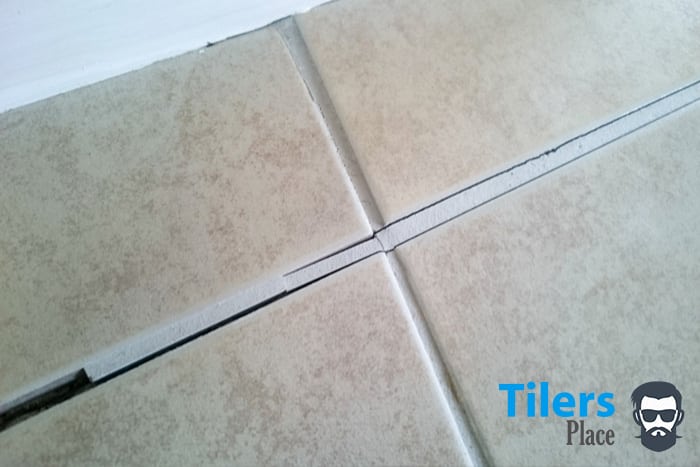
Using A Grout Saw
A grout saw is a small hand tool with a serrated blade. It cuts grout lines by scraping away the material. Hold the saw firmly and move it back and forth along the grout line. Work slowly to prevent scratching the tiles. This method removes grout in narrow spaces easily and is quiet compared to power tools.
Applying A Utility Knife
A utility knife can also help remove grout manually. Use a new, sharp blade for best results. Score along the grout line and then scrape out the loosened grout. Keep the blade angled to avoid damaging tiles. This method is cheap and effective for soft or crumbly grout. Replace blades often for clean cuts.
Scraping With A Putty Knife
A putty knife is a flat tool that scrapes grout from tiles. Use one with a thin, flexible blade. Slide the blade into grout lines and push gently to lift grout away. This method works well after softening grout with water or a grout remover. It also helps clean grout residue after cutting or scoring.
Credit: www.stonesuperstore.co.uk
Power Tool Techniques
Power tools make grout removal faster and easier. They reduce effort and save time. Using the right tool helps prevent tile damage. Power tool techniques suit both small and large areas. Safety is important; wear goggles and a mask.
Oscillating Multi-tool
The oscillating multi-tool is versatile and easy to handle. It has a grout removal blade that moves back and forth quickly. This tool cuts grout lines without scratching tiles. It works well in tight spaces and corners. Control speed to avoid overheating or tile damage.
Rotary Tool With Grout Removal Attachment
A rotary tool with a grout removal bit spins fast to grind grout away. It is ideal for detailed work on small tiles. The small size helps reach narrow grout lines. Use steady pressure and keep the tool moving. Wear a dust mask to avoid inhaling particles.
Using A Grout Removal Drill Bit
Grout removal drill bits fit most power drills. They are designed to scrape grout from between tiles. This method is quick but requires control to avoid tile chips. Start with low speed and increase carefully. Keep the drill steady and follow grout lines closely.
Chemical Grout Removal
Chemical grout removal is an effective method to clear old grout from floor tiles. It uses special chemicals to soften the grout, making it easier to scrape or wash away. This method saves time and effort compared to manual scraping. It is important to follow safety steps to protect your skin and eyes during the process.
Choosing The Right Grout Remover
Select a grout remover that suits your tile type and grout color. Some chemicals work better on cement-based grout, while others target epoxy grout. Read the product label carefully. Avoid harsh chemicals on delicate tiles like natural stone. Pick a remover that says it is safe for your floor. This helps prevent damage and discoloration.
Applying Chemicals Safely
Wear gloves and goggles before applying the grout remover. Work in a well-ventilated area to avoid breathing fumes. Apply the chemical evenly over the grout lines using a brush or sponge. Let it sit for the time recommended on the label. Do not leave the chemical longer than instructed. This can harm your tiles. Keep children and pets away during the process.
Neutralizing And Cleaning
After the chemical softens the grout, use a scraper to remove it gently. Rinse the floor with plenty of water to wash away residue. Some products require a neutralizing solution; check the instructions. Wipe the tiles with a clean cloth to dry them. Proper cleaning prevents damage and prepares the surface for new grout. Repeat the process if needed for stubborn grout.
Tips For Stubborn Grout
Stubborn grout can be tough to remove from floor tiles. It often sticks tightly and resists simple scraping or washing. These tips help break down hard grout, making removal easier. Use gentle methods first to avoid tile damage. Persistence and the right approach work best.
Soaking Techniques
Soak the grout area with warm water. Let the water sit for 10 to 15 minutes. This softens the grout and loosens its grip. You can also use a mild grout remover mixed with water. Avoid soaking too long to protect tiles.
Heat Application
Apply heat to the grout using a heat gun or hair dryer. Warm grout becomes softer and easier to scrape off. Keep the heat moving to avoid overheating tiles. Use moderate heat for a few minutes before scraping.
Repeated Removal Passes
Remove grout in small sections with a grout saw or scraper. Repeat the process several times on the same spot. Each pass removes more grout without damaging tiles. Take breaks to check progress and avoid overworking the surface.
Post-removal Cleanup
After removing grout from floor tiles, cleaning up is essential. Proper cleanup keeps the tiles safe and ready for new grout. It also prevents dust and debris from causing damage or stains. Follow these steps to make the floor spotless and prepared.
Vacuuming Debris
Start by vacuuming all loose debris from the tile surface. Use a vacuum with a brush attachment for best results. This removes dust and small grout pieces stuck in gaps. A clean surface helps avoid scratches during wiping.
Wiping And Washing Tiles
Next, wipe the tiles with a damp cloth or sponge. Use warm water mixed with mild soap for better cleaning. Avoid harsh chemicals that can damage tile finishes. Rinse with clean water to remove soap residue. Dry the tiles with a soft cloth to prevent water spots.
Preparing For New Grout
Ensure the tile joints are fully dry before applying new grout. Check for any remaining old grout and remove it carefully. Smooth out edges to help new grout stick evenly. Clean tiles create a strong bond for fresh grout.
:max_bytes(150000):strip_icc()/remove_tile_grout_in_a_few_simple_steps_1822630_01-b72988e0255c448fbdcdc3b03d3372e9.jpg)
Credit: www.thespruce.com
Frequently Asked Questions
How Do I Safely Remove Grout From Floor Tiles?
Use a grout removal tool or a grout saw carefully. Wear safety goggles and a mask to protect yourself from dust. Work slowly to avoid damaging the tiles. Clean the area frequently to remove grout debris.
What Tools Are Best For Removing Grout On Floors?
A manual grout saw, oscillating tool, or rotary tool with a grout removal attachment works best. Choose based on grout hardness and tile type. Hand tools offer precision, while power tools speed up the process.
Can Vinegar Help Dissolve Grout On Floor Tiles?
Vinegar can soften grout but is not very effective for removal. It works best on mild grout stains. Avoid using vinegar on natural stone tiles, as it can cause damage.
How Long Does It Take To Remove Grout From Floor Tiles?
Time varies based on grout thickness, tool choice, and tile size. Typically, small areas take 30 minutes to an hour. Larger jobs may require several hours or more. Patience and care ensure the best results.
Conclusion
Removing grout from floor tiles takes patience and the right tools. Use gentle scrapers or grout removal tools to protect your tiles. Work slowly to avoid damage. Clean the area well after scraping to remove dust and debris. Taking your time helps achieve a smooth, clean surface.
This process makes room for fresh grout or tile repairs. Keep safety in mind by wearing gloves and a mask. With care, your floors will look neat and refreshed. Simple steps lead to great results.