Last Updated on May 23, 2026
Dutch Oven Ribs are tender, juicy, and packed with flavor. They are perfect for a hearty, satisfying meal.
Dutch Oven Ribs are a fantastic choice for those seeking a delicious and easy-to-make dish. The Dutch oven’s even heat distribution ensures the ribs cook to perfection, keeping them moist and tender. Season the ribs with your favorite spices, sear them to lock in the flavors, and let them simmer in the Dutch oven.
This cooking method enhances the ribs’ natural taste and makes them incredibly succulent. Ideal for family dinners or gatherings, Dutch Oven Ribs are sure to impress. Enjoy the rich, savory goodness with minimal effort, making it a go-to recipe for any occasion.
Introduction To Dutch Oven Ribs
Cooking ribs in a Dutch oven creates a delicious, tender meal. This classic method combines slow cooking and robust flavors. Let’s explore why Dutch oven ribs are so special.
A Classic Cooking Method
The Dutch oven has been used for centuries. It is a versatile and durable piece of cookware. Dutch ovens can handle high heat and long cooking times. This makes them perfect for ribs. The heavy lid keeps moisture in. This ensures the meat stays juicy and tender.
People love Dutch ovens for their even heat distribution. The thick walls and base help maintain a steady temperature. This is crucial for cooking ribs. It helps break down the tough fibers in the meat. The result is fall-off-the-bone ribs every time.
Why Use A Dutch Oven?
Using a Dutch oven for ribs has many benefits. Here are some reasons to choose this method:
- Moisture retention: The heavy lid locks in steam and flavors.
- Even cooking: The thick walls provide consistent heat.
- Versatility: You can use it on the stovetop or in the oven.
- Durability: Dutch ovens are built to last for years.
Cooking ribs in a Dutch oven is simple. You can sear the meat first for extra flavor. Then, add your favorite seasonings and liquids. Cover and let it cook slowly. The result is mouth-watering, tender ribs.
Many people love the convenience of a Dutch oven. You can prepare your meal in one pot. Cleanup is easier, too. This makes Dutch oven ribs a popular choice for busy families.
| Feature | Benefit |
|---|---|
| Moisture retention | Keeps ribs juicy |
| Even cooking | Ensures tender meat |
| Versatility | Can be used on stove or oven |
| Durability | Lasts for years |
In summary, Dutch oven ribs offer a classic and effective cooking method. The combination of even heat, moisture retention, and durability makes it ideal for delicious ribs. Try it once, and it will become your favorite way to cook ribs!
Credit: cooking-outdoors.com
Choosing The Right Ribs
Creating mouth-watering Dutch Oven Ribs starts with choosing the right ribs. The quality and type of ribs directly impact the flavor and tenderness. Let’s explore how to make the best choice.
Types Of Ribs
There are several types of ribs to choose from, each with unique qualities:
- Baby Back Ribs: These are small, tender, and lean. They cook quickly and are great for beginners.
- Spareribs: These are larger, meatier, and have more fat. They take longer to cook but are very flavorful.
- St. Louis Style Ribs: These are spareribs with the breastbone removed. They are flatter and easier to brown.
- Country-Style Ribs: These are cut from the blade end of the loin. They are meaty and cook well in a Dutch oven.
Selecting Quality Meat
Choosing quality meat ensures your ribs are delicious and tender. Here are some tips:
- Check the Color: Look for ribs with a pinkish-red color. Avoid ribs that are pale or dark brown.
- Marbling: Good marbling means more fat, which adds flavor. Look for small streaks of fat throughout the meat.
- Freshness: Ensure the ribs have a fresh smell. They should not have a sour or off odor.
- Packaging: Choose ribs in vacuum-sealed packaging. This keeps the meat fresh and free from contamination.
Here’s a quick comparison of the types of ribs:
| Type of Ribs | Characteristics | Cooking Time |
|---|---|---|
| Baby Back Ribs | Small, tender, lean | Quick |
| Spareribs | Large, meaty, fatty | Long |
| St. Louis Style Ribs | Flat, easy to brown | Moderate |
| Country-Style Ribs | Meaty, blade end | Moderate |
By selecting the right ribs and ensuring quality meat, your Dutch Oven Ribs will be a hit. Choose wisely, and enjoy the delicious results!
Essential Ingredients
Creating mouth-watering Dutch Oven Ribs starts with the right ingredients. Each component adds a unique flavor. This section covers the essential ingredients for the perfect ribs. We will explore spices and seasonings, and marinades and sauces.
Spices And Seasonings
Spices and seasonings create the base flavor for your Dutch Oven Ribs. Here’s a list of essential spices:
- Salt – Enhances all other flavors.
- Pepper – Adds a mild heat and depth.
- Garlic Powder – Provides a savory taste.
- Onion Powder – Adds sweetness and umami.
- Smoked Paprika – Gives a smoky, rich flavor.
- Cayenne Pepper – Adds a bit of heat.
These spices create a perfect balance. Mix them well before rubbing onto the ribs.
Marinades And Sauces
Marinades and sauces give the ribs their juicy, rich flavor. Here are key ingredients:
| Marinade Ingredients | Sauce Ingredients |
|---|---|
|
|
Marinate your ribs overnight for the best results. Apply the sauce during the final cooking stages.

Credit: quichemygrits.com
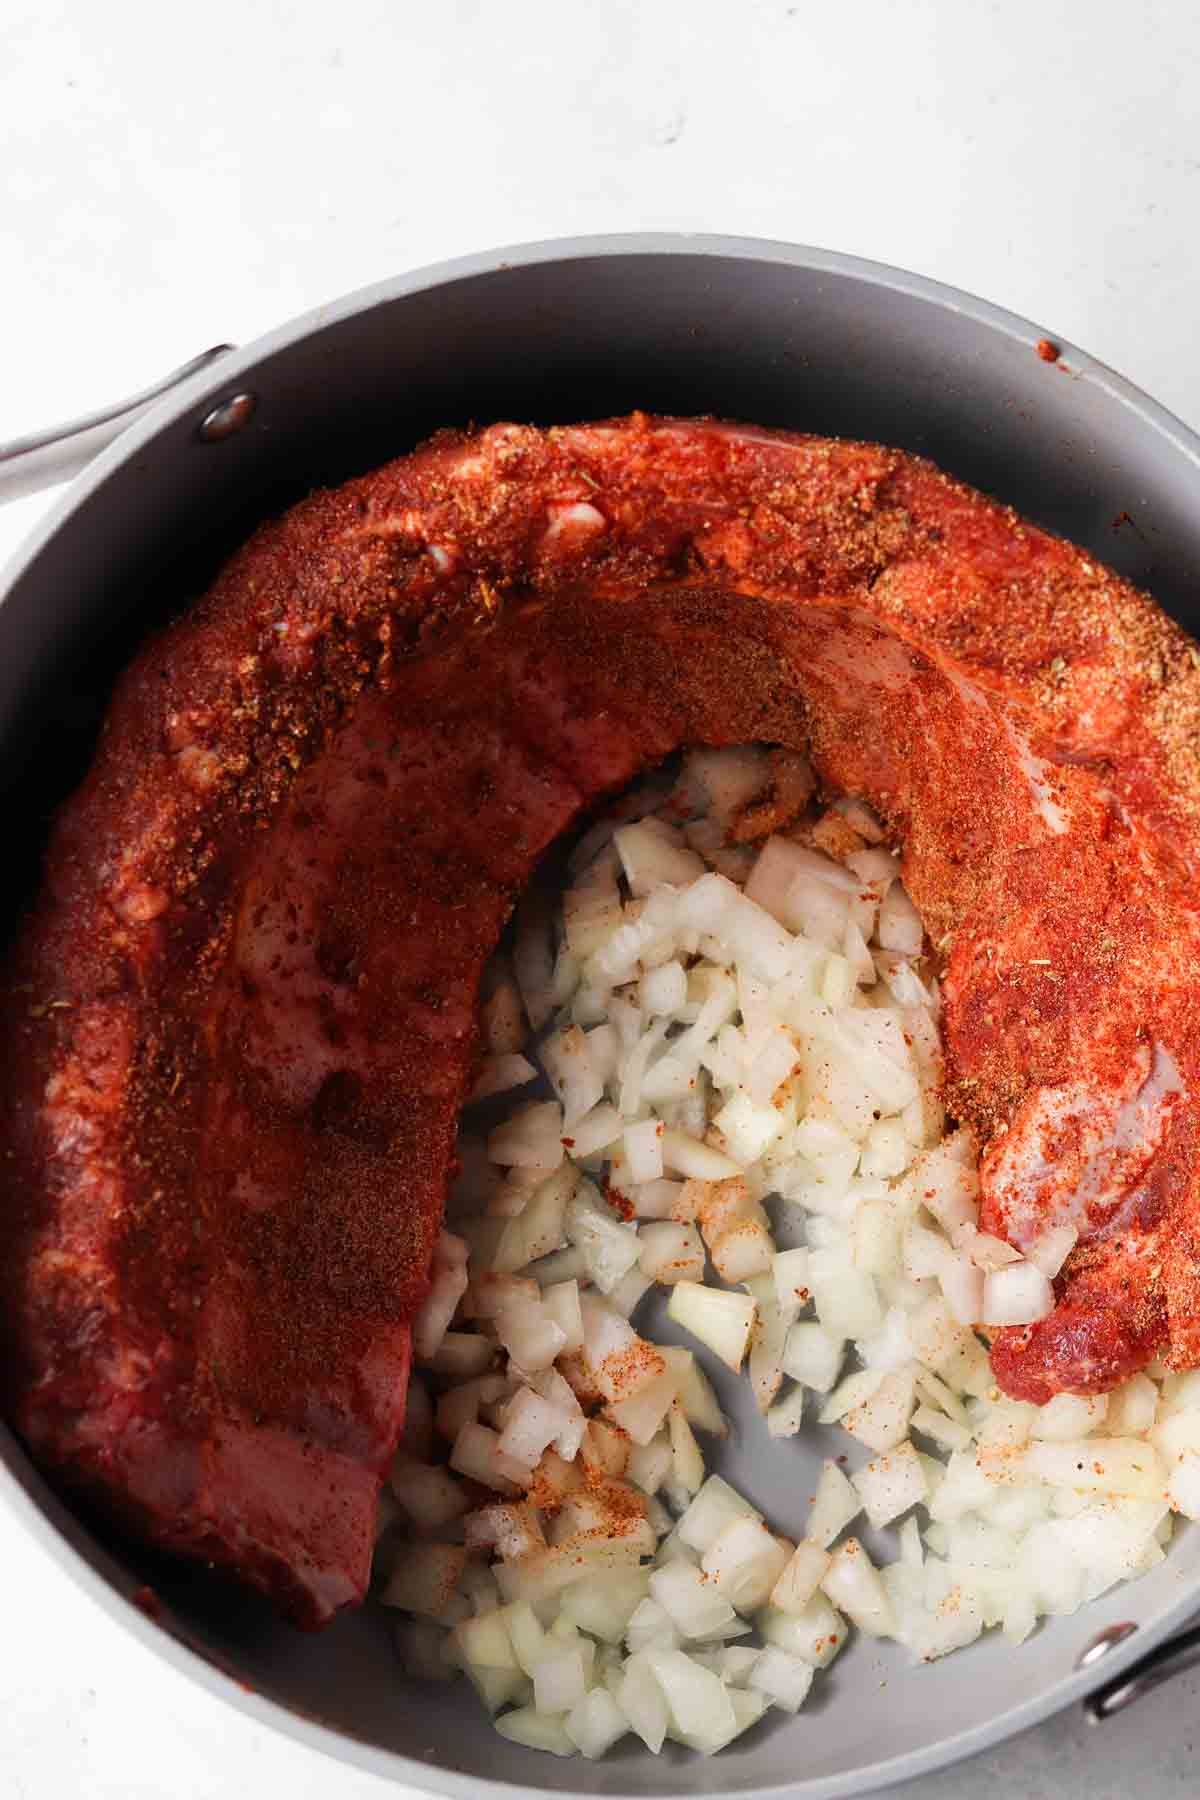
Preparing The Ribs
Before you can savor the deliciousness of Dutch Oven Ribs, you need to prepare them properly. This involves trimming, cleaning, and marinating the ribs to perfection. Let’s delve into these steps.
Trimming And Cleaning
Start by removing any excess fat from the ribs. This helps in even cooking. Use a sharp knife for precise cuts. Ensure you also remove the silver skin. This membrane can make the ribs chewy.
Next, rinse the ribs under cold water. This removes any bone fragments. Pat the ribs dry with paper towels. Dry ribs absorb marinade better.
Marinating Tips
Marinating adds flavor and tenderness to the ribs. Start with a base of olive oil, garlic, and salt. Add your favorite herbs and spices.
For a tangy kick, include some vinegar or lemon juice. Sweeten it up with a bit of honey or brown sugar.
Place the ribs in a zip-lock bag. Pour the marinade over the ribs. Seal the bag and refrigerate it.
Marinate the ribs for at least 4 hours. For best results, let them marinate overnight.
| Step | Description |
|---|---|
| Trimming | Remove excess fat and silver skin. |
| Cleaning | Rinse and pat dry the ribs. |
| Marinating | Season and refrigerate the ribs. |
Following these steps ensures your ribs are flavorful and tender. Enjoy preparing your Dutch Oven Ribs!
Cooking Techniques
Cooking ribs in a Dutch oven is an art. The techniques you use can make or break the dish. Let’s explore the best methods to cook juicy, tender ribs.
Browning The Ribs
Start by browning the ribs. This step adds flavor. Heat some oil in your Dutch oven. Place the ribs in the hot oil. Let them sear for 3-4 minutes on each side. This creates a tasty crust. Remember to brown all sides evenly. This step is crucial for a rich, deep flavor.
Slow Cooking In The Dutch Oven
After browning, it’s time to slow cook. Reduce the heat to low. Add your favorite broth or sauce. Make sure the ribs are mostly submerged. Cover the Dutch oven with its lid. Let the ribs cook for 2-3 hours. The slow cooking process makes the meat tender. Check occasionally to ensure they don’t dry out. You can add more liquid if needed.
For extra flavor, you can add some vegetables. Carrots, onions, and garlic work well. These will also absorb the juices from the ribs. You can serve them as a side dish.
Checking For Doneness
Knowing how to check for doneness in Dutch Oven Ribs is crucial. Properly cooked ribs are tender and juicy. This section helps you ensure your ribs are perfect every time.
Temperature Guide
Use a meat thermometer to check the internal temperature. Insert the thermometer into the thickest part of the ribs.
| Doneness Level | Temperature |
|---|---|
| Medium | 145°F (63°C) |
| Well-Done | 160°F (71°C) |
The USDA recommends cooking pork ribs to at least 145°F. For more tenderness, aim for 160°F.
Tenderness Test
Besides temperature, check for tenderness. Use a simple test to gauge this.
- Take a fork and insert it into the meat.
- Twist the fork gently.
- If the meat pulls apart easily, it’s tender.
Another way is the bend test. Pick up the ribs with tongs.
- If the ribs bend easily, they are done.
- If they break apart, they are very tender.
Using both temperature and tenderness tests ensures perfectly cooked Dutch Oven Ribs every time.
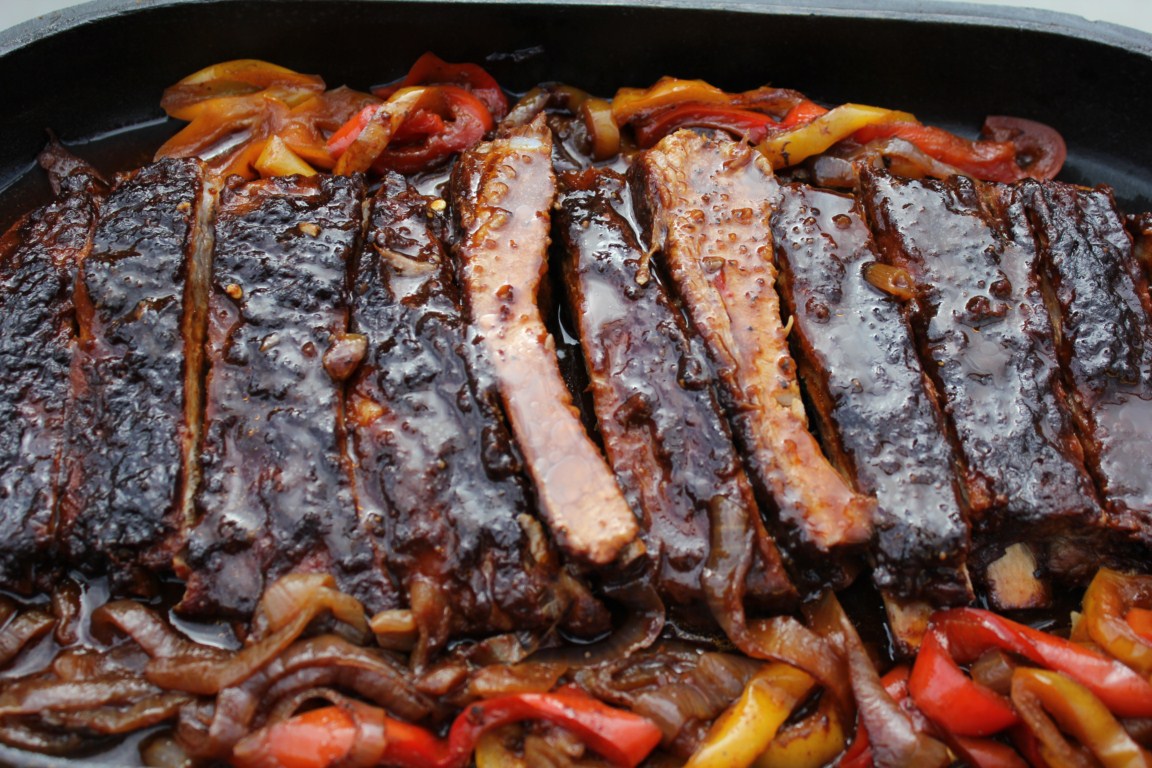
Serving Suggestions
Serving your Dutch Oven Ribs perfectly can elevate your meal experience. Let’s explore some delightful side dishes and presentation tips to make your ribs shine.
Side Dishes
Pair your Dutch Oven Ribs with complementary side dishes for a balanced meal.
- Mashed Potatoes: Creamy potatoes balance the rich flavor of ribs.
- Coleslaw: Crunchy coleslaw adds a refreshing contrast.
- Grilled Vegetables: Vegetables like zucchini and bell peppers enhance the meal.
- Cornbread: Sweet cornbread pairs well with savory ribs.
- Garlic Bread: Toasted garlic bread is always a hit.
Presentation Tips
Presentation is key to making your meal look as good as it tastes.
- Arrange Ribs Neatly: Place ribs in a row on a serving platter.
- Garnish with Herbs: Sprinkle fresh parsley or cilantro on top.
- Use Vibrant Plates: Bright plates make the food pop.
- Serve with Dipping Sauces: Offer BBQ and hot sauce on the side.
- Add Lemon Wedges: Lemon wedges add color and a zesty flavor.
A beautifully presented meal enhances the dining experience for everyone.
| Side Dish | Flavor Profile |
|---|---|
| Mashed Potatoes | Creamy and smooth |
| Coleslaw | Crunchy and tangy |
| Grilled Vegetables | Smoky and fresh |
| Cornbread | Sweet and moist |
| Garlic Bread | Buttery and crispy |
With these side dishes and presentation tips, your Dutch Oven Ribs will impress everyone at the table.
Troubleshooting Common Issues
Cooking ribs in a Dutch oven can be tricky. Sometimes, ribs come out dry or overcooked. Below, we explore how to solve these common issues.
Avoiding Dry Ribs
Dry ribs can ruin your meal. Here are some tips to keep them juicy:
- Marinate: Marinate the ribs for at least 4 hours. This helps to lock in moisture.
- Cooking Temperature: Keep the oven temperature low. Aim for 275°F (135°C).
- Liquid Base: Add a cup of broth or water to the Dutch oven. This keeps the ribs moist.
- Cover: Always cover the Dutch oven with a lid. This traps steam and moisture.
Fixing Overcooked Ribs
Overcooked ribs can be tough and chewy. Here’s how to fix them:
- Check Early: Start checking the ribs 30 minutes before the end time. Use a meat thermometer.
- Wrap in Foil: If they are overcooked, wrap them in foil. Add a little broth or BBQ sauce inside the foil.
- Low Heat: Place the wrapped ribs back in the oven at 200°F (93°C) for 20 minutes. This helps to tenderize them.
- Rest: Let the ribs rest for 10 minutes before serving. This allows the juices to redistribute.
Follow these tips to ensure your Dutch oven ribs are always perfect.
Credit: www.alliannaskitchen.com
Frequently Asked Questions
What Are Dutch Oven Ribs?
Dutch oven ribs are ribs cooked in a Dutch oven. This method ensures tender, flavorful meat.
How To Prepare Ribs In A Dutch Oven?
Season ribs, sear them, add liquid, and cook slowly. This method locks in flavor.
What Temperature For Cooking Dutch Oven Ribs?
Cook Dutch oven ribs at 275°F to 300°F. This ensures tender and juicy ribs.
How Long To Cook Ribs In A Dutch Oven?
Cook ribs in a Dutch oven for 2. 5 to 3 hours. Check for tenderness.
Conclusion
Mastering Dutch Oven Ribs can elevate your cooking game. This versatile method promises tender, flavorful results. Perfect for family dinners or special occasions, these ribs will impress every time. Try this recipe and enjoy a delicious, home-cooked meal that everyone will love.
Happy cooking!