Last Updated on December 9, 2025
Are you ready to make the perfect hot pop snack that everyone will love? Whether you’re craving a quick treat or planning a fun party snack, knowing the right hot pop instructions can make all the difference.
Imagine biting into warm, fluffy popcorn that’s just popped to perfection—crispy, flavorful, and impossible to resist. In this guide, you’ll discover simple steps and insider tips to create your ideal hot pop every time. Keep reading, and soon you’ll be the go-to expert for delicious, fresh popcorn that’s ready in minutes!

Credit: www.amazon.sa
Choosing Your Materials
Choosing the right materials makes your hot pop projects easier and better. Good materials help your creations last longer and look great. Taking time to pick the best supplies saves you from problems later.
Focus on quality and suitability. Materials must work well with hot glue and your design ideas. This section explains how to select glue sticks and craft supplies for your projects.
Selecting Hot Glue Sticks
Hot glue sticks come in different sizes and types. Choose the size that fits your glue gun. Small sticks work for detailed jobs. Larger sticks melt faster and cover big areas.
Consider the glue’s color and setting time. Clear glue is good for most crafts. Colored glue adds fun effects. Fast-setting glue helps if you work quickly. Slow-setting glue allows more time to adjust pieces.
Buy glue sticks that match your project needs. Check the glue’s melting temperature. Some sticks melt at low heat for delicate materials. High-temperature glue sticks are strong but can damage thin items.
Picking The Right Craft Supplies
Select craft supplies that fit your project’s style and purpose. Use materials that stick well with hot glue. Fabrics, paper, wood, and plastic often work. Test small pieces first to avoid damage.
Choose supplies that suit your skill level. Simple items help beginners create easily. Advanced crafters can try complex materials like metal or glass with care. Always prepare materials by cleaning or sanding surfaces for better glue hold.
Buy supplies from trusted sources to ensure quality. Cheap materials may cause glue to fail or look bad. Good supplies make your craft strong and neat.
Setting Up Your Workspace
Setting up your workspace is the first step for a smooth hot pop project. A clean and organized area helps you work safely and efficiently. It reduces mistakes and keeps everything within reach. Spend time preparing your space before starting.
A well-planned workspace makes the process more enjoyable. It also helps protect you from accidents or damage. Follow these tips to create the best environment for your hot pop tasks.
Preparing A Safe Area
Choose a flat surface with good lighting. Clear away any clutter or flammable items. Make sure the area is well ventilated to avoid fumes. Keep a fire extinguisher nearby as a safety precaution. Avoid working near children or pets to prevent distractions. Safety glasses and gloves are important to protect your eyes and hands. A tidy space lowers the risk of spills and burns.
Organizing Your Tools
Gather all tools needed for your hot pop project. Place them within easy reach to save time. Use containers or trays to keep small parts together. Label your tools if possible to avoid confusion. Check that your tools are clean and in good condition. Organizing tools helps maintain focus and speeds up your work. It also prevents losing or damaging important items.
Using The Hot Glue Gun
The hot glue gun is a helpful tool for many craft and repair projects. It melts glue sticks quickly, allowing you to join materials fast. Using it safely and correctly gives the best results. Understanding how to handle the gun and control the glue flow is important. This helps avoid mess and injury.
Here are key tips to help you use the hot glue gun well. Follow them to get smooth glue lines and strong bonds.
Heating And Handling Tips
Plug in the hot glue gun and wait for it to heat up. It usually takes about 5 minutes. Avoid touching the metal tip; it gets very hot. Hold the gun by its handle only. Place the gun on a stand or heat-proof surface when not in use. Unplug the gun after finishing your work. This keeps it safe and prevents accidents.
Controlling Glue Flow
Insert a glue stick into the back of the gun. Squeeze the trigger gently to push the glue out. Pressing too hard causes too much glue to flow. Release the trigger to stop glue flow quickly. Move the gun slowly over your project for even glue lines. Practice on scrap material to get a feel for the flow.
Basic Craft Techniques
Basic craft techniques form the heart of Hot Pop projects. These skills help you join materials and add fun designs. Learning these methods makes your crafts strong and beautiful. Each step is easy to follow and perfect for all ages.
Bonding Different Surfaces
Bonding means sticking two surfaces together. Hot Pop works well on paper, fabric, wood, and plastic. Use the right glue or tape for each material. Press surfaces firmly to ensure a good hold. Let the bond dry fully before moving the craft. This prevents parts from falling apart.
Creating Decorative Effects
Decorative effects make your craft stand out. Use paints, markers, or stickers to add color and patterns. Try layering materials for a 3D look. Cut shapes carefully to create neat edges. Small details bring charm and personality to your work. Experiment with textures to make it unique.
Common Mistakes To Avoid
Hot pop projects can be fun but tricky. Many beginners make simple mistakes that cause problems. Avoiding these errors will make your work safer and neater. This section covers common mistakes and how to prevent them.
Preventing Burns And Injuries
Hot glue guns get very hot and can burn skin easily. Never touch the metal tip or melted glue. Always hold the gun by its handle. Use a protective surface to avoid damage. Keep the glue gun away from children and pets. Let the glue cool before touching your project.
Avoiding Glue Stringing
Glue stringing happens when thin threads of glue stretch between surfaces. It makes your project look messy. To stop stringing, pull the glue gun away slowly after applying glue. Use the right temperature setting for your glue stick. Avoid moving the gun too fast or too slow. Clean the tip regularly to remove old glue buildup.
Credit: business.walmart.com
Cleaning And Maintenance
Keeping your hot glue gun clean and well-maintained helps it work better and last longer. Regular care stops clogs and keeps glue flowing smoothly. Simple steps make a big difference in your craft projects and repairs.
Removing Glue Residue
Glue residue can build up on the nozzle and body of the gun. Wait for the gun to cool down before cleaning. Use a soft cloth or paper towel to wipe off glue spots. For stubborn glue, gently scrape it with a wooden stick. Avoid metal tools to prevent damage. Clean the nozzle carefully to avoid blocking glue flow.
Storing Your Hot Glue Gun
Store your glue gun in a dry, cool place. Keep it upright to stop glue from leaking. Use a stand or holder if available. Always unplug the gun before storing it. Make sure the glue stick is removed or fully inside the gun. This prevents the glue from hardening inside the machine.
Creative Project Ideas
Creative projects with Hot Pop offer fun and unique ways to express yourself. You can make beautiful items for your home or gifts for loved ones. These ideas are simple and enjoyable for all ages. Use Hot Pop to add color and style to everyday objects.
Experiment with shapes, colors, and textures to make each project special. Hot Pop instructions guide you through easy steps. Let’s explore some creative project ideas to inspire your next craft.
Home Decor Crafts
Create eye-catching decorations using Hot Pop materials. Design colorful wall art that brightens any room. Make custom coasters with fun patterns and shapes. Decorate photo frames with vibrant Hot Pop pieces. These crafts add a personal touch to your living space. They are quick to make and look great on shelves or tables.
Personalized Gifts
Use Hot Pop to make gifts that feel special and thoughtful. Craft keychains with names or initials in bold colors. Design unique bookmarks for book lovers. Create custom jewelry like bracelets or earrings. These gifts show you care and add a handmade touch. Personalized items made with Hot Pop bring smiles and lasting memories.

Credit: www.shutterstock.com
Frequently Asked Questions
What Are The Basic Hot Pop Instructions?
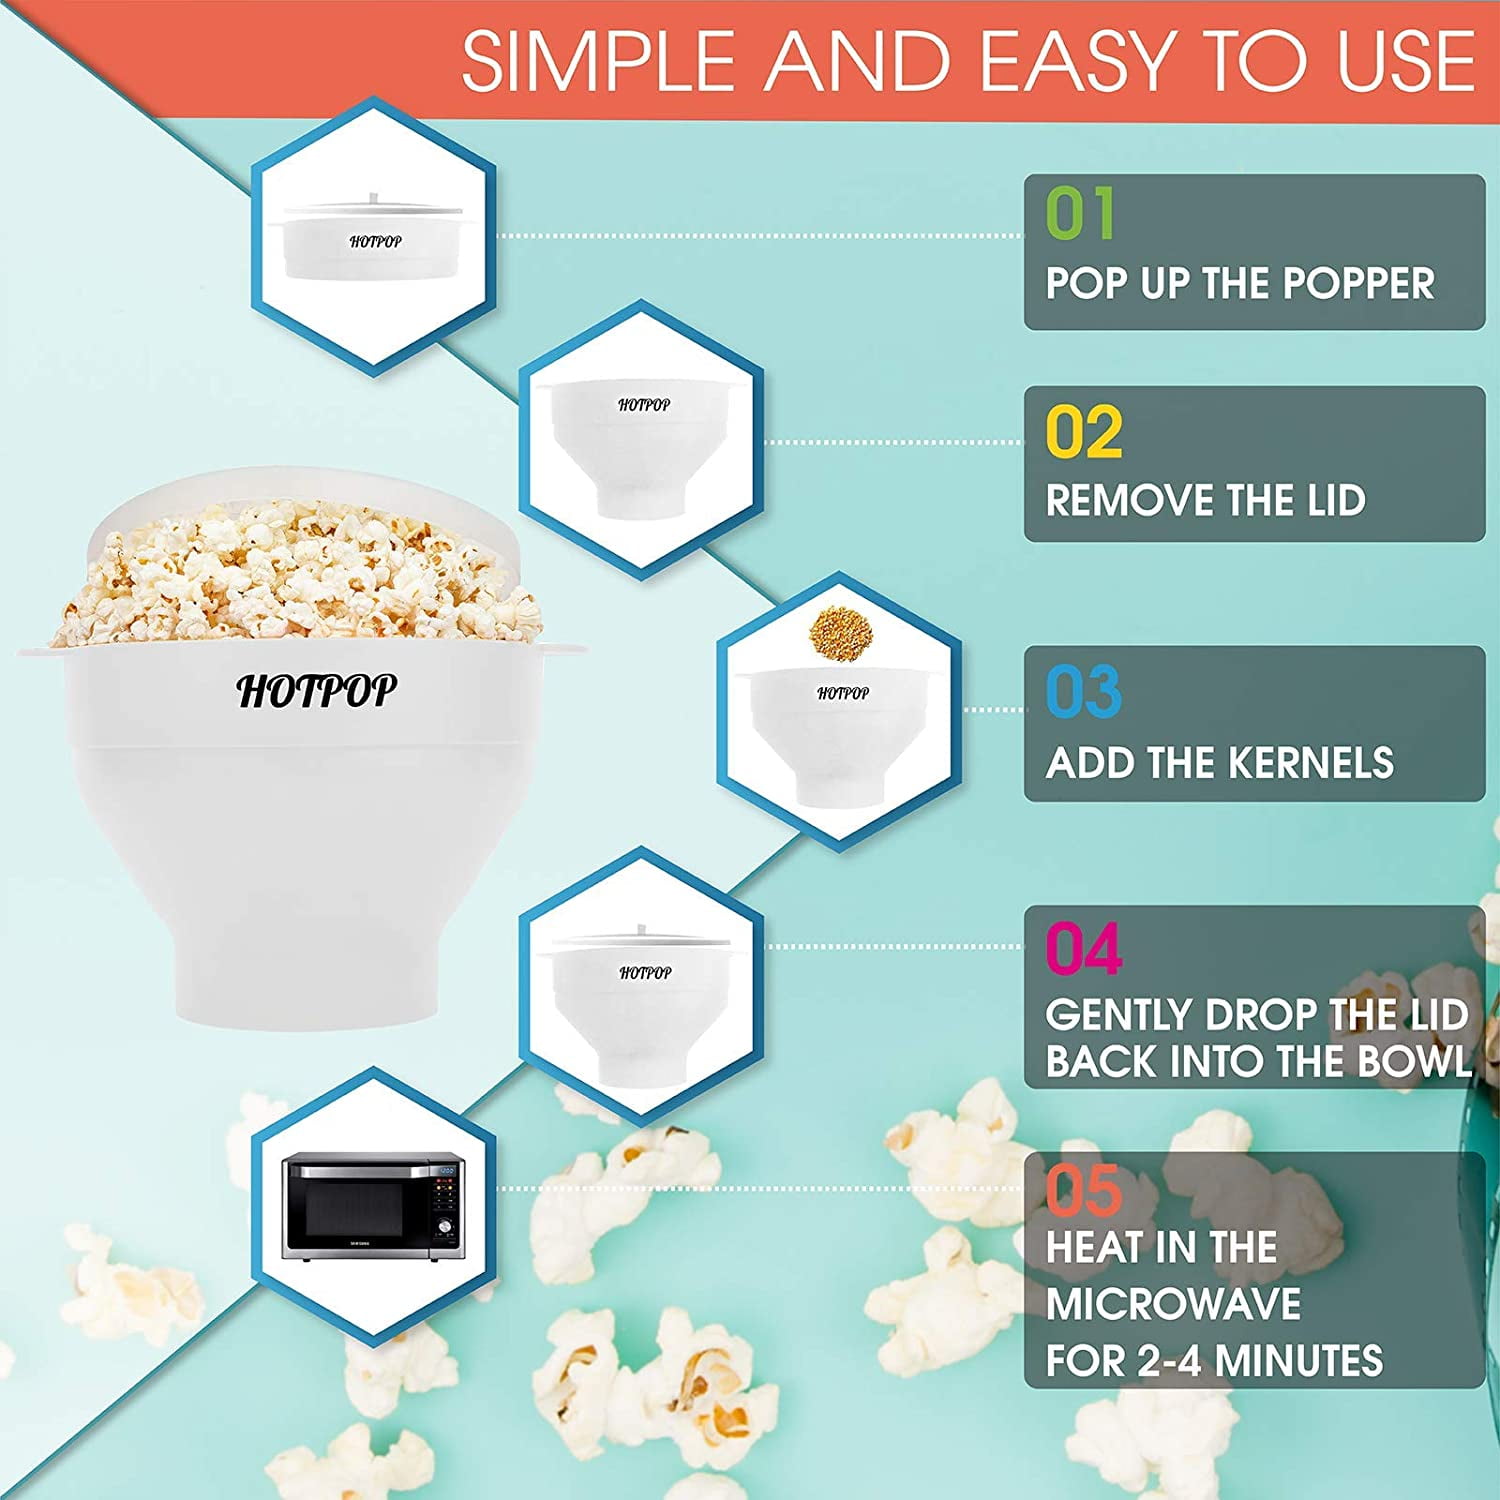
Hot Pop instructions involve heating the popcorn kernels until they burst. Use a microwave or stovetop. Add oil or butter for flavor. Follow specific time and temperature guidelines for best results.
How Long Does It Take To Pop Hot Pop Popcorn?
Typically, Hot Pop popcorn takes 2-4 minutes in a microwave. On the stovetop, it requires about 3-5 minutes. Listen for popping to slow for perfect timing.
Can Hot Pop Instructions Vary By Popcorn Brand?
Yes, different brands may have unique instructions. Always read the package for exact times and temperatures. Adjust based on your appliance’s power and heat settings.
What Is The Best Oil For Hot Pop Popcorn?
Use oils with high smoke points like coconut, canola, or vegetable oil. These oils help achieve even popping and add a delicious taste to your popcorn.
Conclusion
Following the Hot Pop instructions makes the process easy and fun. You can enjoy tasty popcorn anytime. Just remember to follow the steps carefully. This helps avoid burning or undercooking. Keep your popcorn fresh and crunchy every time. Enjoy the simple pleasure of homemade popcorn.
Try different seasonings for new flavors. Sharing popcorn brings smiles and good moments. Hot Pop is a quick snack everyone loves. Give it a try and enjoy!