Last Updated on January 13, 2026
Filling a pastry bag can be tricky. The right technique matters.
It helps avoid mess and ensures smooth piping. Pastry bags are essential tools for bakers. They make decorating cakes and pastries easier and more precise. Knowing how to fill them properly saves time and effort. It also keeps your workspace clean.
Many struggle with this task, leading to spills and frustration. But with the right steps, filling a pastry bag becomes simple. It gives you control over the amount and flow of your icing or batter. This skill is useful for both beginners and experienced bakers. A well-filled pastry bag means better results. In this guide, you’ll learn tips to make this process easy. Transform your baking experience with a neatly filled pastry bag. Let’s dive into the details.
:max_bytes(150000):strip_icc()/__opt__aboutcom__coeus__resources__content_migration__serious_eats__seriouseats.com__images__2017__01__20160429-how-to-fill-piping-bag-vicky-wasik-9-997ecb5150dd41a58d9e2bf2a497d408.jpg)
Credit: www.seriouseats.com
Choosing The Right Pastry Bag
Filling a pastry bag requires choosing the right one for your needs. Select a sturdy bag that fits your nozzle. Cut the tip carefully for a perfect fit, ensuring a smooth flow of icing or batter.
Choosing the right pastry bag can make or break your baking experience. With the perfect bag, you’ll have more control, precision, and ease while decorating your cakes and pastries. But how do you pick the right one? Let’s dive into some crucial aspects you should consider.Material Types
Pastry bags come in various materials, each offering distinct benefits. Plastic bags are disposable and convenient, perfect for quick projects or when you don’t want to clean up afterward. Canvas bags are reusable and durable, ideal for those who love baking regularly. They provide a good grip even when your hands are greasy. Have you ever tried using a silicone bag? It’s flexible, reusable, and easy to clean, making it a favorite for many bakers.Size Considerations
Size matters when choosing a pastry bag. A small bag (10-12 inches) is great for delicate tasks like decorating cupcakes or adding details to cookies. For larger cakes, you might need a medium (14-16 inches) or large bag (18 inches and above). Bigger bags hold more icing, which means fewer refills and a smoother decorating process. Have you ever found yourself struggling with a too-small bag and icing spilling everywhere? Selecting the right size can prevent such mishaps and save time. Choosing a pastry bag doesn’t have to be daunting. By considering material and size, you can find the perfect fit for your baking needs. What kind of pastry bag do you currently use, and how does it impact your baking?Selecting The Correct Tip
Filling a pastry bag properly begins with selecting the correct tip. The tip determines the shape and design of your icing or dough. Choosing the right one can elevate your baking to new levels.
Tip Shapes And Uses
Different tip shapes create different effects. Round tips are great for writing or simple dots. Star tips make beautiful borders and rosettes. Leaf tips create realistic leaves for floral designs. Petal tips are perfect for flowers like roses or daisies. Each shape serves a unique purpose in decorating.
Compatibility With Bag
Not all tips fit every pastry bag. Ensure your tip fits snugly with the coupler. The coupler holds the tip in place, allowing easy swaps. Check the bag’s opening size before selecting tips. Larger tips need larger openings. Using the correct size prevents spills and ensures smooth piping.
Preparing Your Filling
Before using a pastry bag, ensure your filling is ready. The right filling can make or break your dessert. The filling’s texture and taste are crucial for a delightful experience.
Proper preparation saves time and effort during piping. Let’s explore how to get your filling just right.
Consistency Matters
The consistency of your filling is very important. A too-thick filling will clog your pastry bag. A too-thin filling will not hold its shape. Aim for a smooth, pipeable consistency.
Test your filling before placing it in the bag. Use a spoon to check its flow. It should hold its form and not drip. Adjust by adding liquid or thickening agents as needed. Always ensure a lump-free mixture for smooth piping.
Flavor Enhancements
Enhancing the flavor of your filling adds depth to your desserts. Consider incorporating extracts like vanilla or almond. Citrus zest can add a refreshing twist.
Spices such as cinnamon or nutmeg can create warmth. For a richer taste, include melted chocolate or cocoa powder. Remember, balance is key. Avoid overpowering the main flavor of your dessert.
Experiment with different combinations to find your favorite. A well-flavored filling can elevate any baked creation.
Setting Up The Pastry Bag
Filling a pastry bag involves inserting a nozzle and folding the top over your hand. Scoop icing with a spatula, then gently squeeze to remove air bubbles for smooth piping.
Setting up a pastry bag is a key step in the process of decorating cakes, cookies, and pastries with finesse. Whether you’re a beginner or a seasoned baker, mastering this skill can make your decorating experience smoother and more enjoyable. A well-set pastry bag ensures precision and ease, allowing you to focus on creativity rather than cleanup. So, how do you set up a pastry bag correctly? Let’s break it down into simple steps.Attaching The Tip
First, choose the right tip for the job. Different tips create different designs, so knowing what you want to achieve is crucial. To attach the tip, start by cutting the end of your pastry bag to fit the tip snugly. You don’t want it too loose, or the icing might escape from the sides. Slide the tip into the bag until it fits tightly. This ensures that your icing flows smoothly through the tip without any hiccups. Have you ever had icing come out in clumps? A secure tip attachment can prevent that.Positioning The Coupler
A coupler is your secret weapon for versatility. It allows you to switch tips without emptying the bag. Insert the larger part of the coupler inside the bag, pushing it towards the tip. Cut the bag’s end to fit the coupler tightly, similar to the tip fitting. Next, place your chosen tip over the coupler’s threaded edge and secure it with the coupler ring. This keeps everything in place while you work your magic. Have you ever considered how much time this can save during complex decorating tasks? Setting up your pastry bag might seem like a small step, but it can significantly impact your decorating results. With a properly fitted tip and a well-positioned coupler, you’re ready to pipe like a pro. What’s your favorite pastry bag tip for decorating? Share in the comments!Filling The Pastry Bag
Start by folding the pastry bag’s top edge outward. Hold it open with one hand and spoon frosting inside. Twist the bag’s top to secure the filling, ensuring no air bubbles.
Filling a pastry bag may seem like a simple task, but mastering this skill can elevate your baking game. A well-filled pastry bag ensures smooth piping, whether you’re decorating a cake or crafting delicate pastries. It’s not just about getting your icing or filling into the bag; it’s about doing it efficiently and effectively. Ever struggled with messy icing or unevenly piped cookies? The key often lies in how you fill your pastry bag. Let’s dive into the best practices for achieving a perfect fill every time.Using A Spatula
Using a spatula is your secret weapon for filling a pastry bag neatly. The flat, wide surface helps you scoop up your frosting or filling without making a mess. Place your pastry bag in a tall glass or jar to keep it stable. This simple trick frees your hands and prevents spills. Scoop a generous amount of icing with your spatula and gently slide it into the bag. Take care not to smear it against the edges, as this can cause unwanted air pockets.Avoiding Air Bubbles
Air bubbles can be your worst enemy when filling a pastry bag. They cause uneven piping and can ruin intricate designs. To minimize air bubbles, press the icing or filling tightly against the sides of the bag. This forces out trapped air and smooths the consistency. Gently massage the filled bag before you start piping. This helps to push any remaining air bubbles towards the nozzle, ensuring a steady flow when you start decorating. Have you ever had a perfectly mixed icing only to find it disrupted by air? By paying attention to these small details, you can ensure your creations come out flawlessly. Remember, the way you fill your pastry bag is just as crucial as the ingredients you use. What’s your biggest frustration with pastry bags? Share your thoughts in the comments!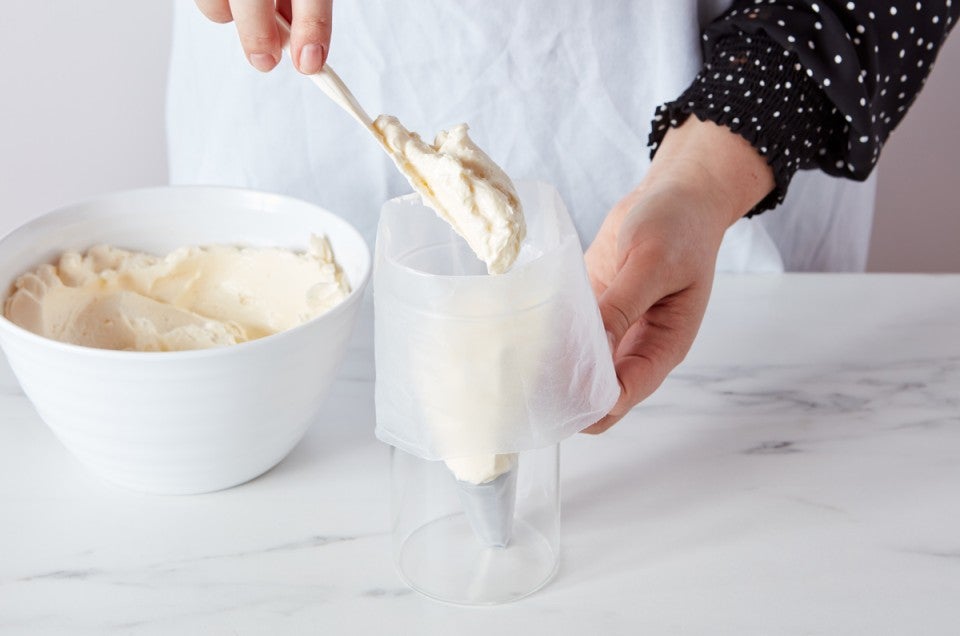
Credit: www.kingarthurbaking.com
Securing The Bag
Filling a pastry bag correctly ensures smooth and precise decorating. Start by selecting the right nozzle for your design. Fold the upper edge of the bag, creating a cuff, then spoon your mixture inside, avoiding air pockets.
Securing the bag is a crucial step in achieving the perfect frosting or filling on your baked goods. Whether you’re a seasoned baker or trying your hand at decorating for the first time, knowing how to properly secure your pastry bag can make all the difference. A well-secured bag not only prevents messes but also helps you maintain control over your designs. Let’s delve into the specifics of securing your pastry bag, with tips that ensure smooth and even piping every time.Twisting The Top
After filling your pastry bag, the first step in securing it is to twist the top. This prevents the icing from oozing out the top while you’re working. Hold the bag with one hand, and with the other, twist the top until you feel a snug fit. Twisting creates a barrier that keeps your frosting in place. This is especially helpful when working with a large amount of icing. Have you ever had the icing suddenly spill out the top? Twisting is your first defense against such mishaps.Maintaining Pressure
Pressure is your best friend when it comes to piping. With your dominant hand, apply steady pressure from the top of the bag. This ensures the icing flows smoothly through the tip. Think of it as a gentle squeeze; too much pressure can cause the icing to burst out uncontrollably, while too little might not give you a consistent flow. Practice makes perfect, so don’t be afraid to experiment with different amounts of pressure. Maintaining pressure is like holding a pencil—how you hold it affects your writing. Similarly, proper pressure affects your piping precision. Securing your pastry bag effectively not only enhances your decorating skills but also boosts your confidence. Next time you grab a pastry bag, remember these techniques and ask yourself: How can I make this process smoother?Practicing Piping Techniques
Practicing piping techniques is essential for any budding pastry artist. Whether you’re decorating a cake or crafting delicate cookies, mastery in this area elevates your creations. Regular practice helps in developing a steady hand and gaining confidence. Each technique adds a unique touch to your baked goods. Let’s explore some essential aspects of piping techniques.
Control And Precision
Controlling the pastry bag ensures clean and professional results. Hold the bag at a 45-degree angle for smooth lines. Apply even pressure for consistent thickness. A steady hand comes with time and patience. Practice by piping straight lines and circles. Gradually move to more complex shapes.
Creating Patterns
Creating patterns with a pastry bag requires creativity and practice. Start with simple patterns like dots and stars. Use different piping tips for varied designs. Experiment with zigzags and waves. Try combining patterns for unique effects. Remember, each pattern tells a story on your dessert.
Cleaning And Storing The Bag
Proper cleaning keeps your pastry bag ready for the next use. Rinse with warm water to remove residue. Hang or lay flat to dry completely before storing in a cool, dry place.
Filling a pastry bag can be a delightful experience, transforming simple ingredients into stunning creations. Yet, the aftermath—cleaning and storing the bag—often gets overlooked. Neglecting this step can lead to frustrating moments when your pastry bag fails to perform as expected. So, how do you ensure your pastry bag remains in top condition for the next baking adventure? Let’s dive into the essentials of cleaning and storing your pastry bag.Proper Washing Methods
Start by rinsing the bag immediately after use. This prevents the leftover icing or dough from hardening and becoming stubborn to remove. Use warm soapy water and a soft brush to clean the inside. This ensures you remove all residues without damaging the material. Turn the bag inside out for a thorough wash. Pay special attention to the tip area, where food particles often get stuck. Consider hand washing instead of using a dishwasher. Some bags might not withstand the heat and detergent in dishwashers.Storage Tips
Once clean, dry the bag completely before storing. Moisture can lead to mold, which is the last thing you want in your baking supplies. Store the bag in a cool, dry place away from direct sunlight. This prevents the material from deteriorating. Roll the bag loosely or hang it. This helps maintain its shape and ensures it’s ready for your next baking session. Keep your pastry tips organized. Use a small box or container to prevent them from getting lost or damaged. Reflect on the last time you reached for your pastry bag, only to find it in a less than ideal state. Did you wish you had taken a moment to clean it properly? By following these simple steps, you can avoid that frustration and keep your baking supplies in top-notch condition. How will you change your cleaning routine?
Credit: www.youtube.com
Frequently Asked Questions
What Are The Steps For Filling A Pastry Bag?
To fill a pastry bag, first, choose the right nozzle. Fold the top edges over your hand. Spoon in the mixture, avoiding air pockets. Push contents down, twist the top, and squeeze gently. Ensure the mixture is near the nozzle for even application.
How To Fill A Piping Bag Without Mess?
Use a tall glass to hold the piping bag. Fold the top over the glass rim. Spoon the filling inside, ensuring no air pockets. Unfold the bag and gently squeeze the contents towards the tip. Secure the top with a twist and clip.
Enjoy mess-free piping with precision!
How To Fill A Piping Bag With Batter?
Hold the piping bag open in one hand. Use a spatula to scoop batter into the bag. Fill only halfway to avoid overflow. Twist the top to seal and remove air bubbles. Squeeze gently to release batter when piping.
What Do You Do With A Pastry Bag?
A pastry bag is used for piping and decorating baked goods. Fill it with icing, cream, or dough. Squeeze gently to create designs on cakes, cupcakes, or pastries. It offers precision and control, perfect for intricate detailing. Ideal for bakers aiming for professional-looking desserts.
Conclusion
Filling a pastry bag can be simple with practice. Start with the right bag and nozzle. Use a spatula to scoop your filling. Keep the bag upright for less mess. Twist the top to secure the contents. Squeeze gently to control the flow.
These steps help you fill the bag neatly. Practice makes perfect. Soon, you’ll fill pastry bags like a pro. Enjoy decorating your baked creations with ease. Happy baking!