Last Updated on December 14, 2025
If you love cooking and want to add a personal touch to your kitchen, making your own end grain cutting board is a rewarding project you’ll enjoy. Imagine having a sturdy, beautiful board that not only looks great but also protects your knives better than ordinary boards.
You might think it’s complicated, but with the right steps, you can create a professional-quality cutting board right at home. Keep reading, and you’ll discover simple tips and clear instructions that make this craft easier than you ever expected. By the end, you’ll have the skills to build a board that lasts for years and impresses everyone who sees it.
Choosing The Wood
Choosing the right wood is key to making a strong end grain cutting board. The wood must be safe, durable, and easy to work with. The type of wood affects how the board looks and how long it lasts. Picking good wood helps create a cutting board that is both useful and beautiful.
Best Wood Types
Hardwoods are the best choice for cutting boards. Maple is a popular option because it is hard and has a fine grain. Walnut is darker and adds a rich color. Cherry wood offers a warm tone and smooth surface. These woods resist cuts and do not dull knives quickly. Avoid softwoods like pine because they can scratch easily and absorb moisture.
Wood Quality Tips
Choose wood that is dry and free of cracks. Look for tight grain patterns for better strength. Avoid wood with knots or holes, as they weaken the board. Make sure the wood is untreated and free from chemicals. Using kiln-dried wood helps prevent warping. Always pick wood that feels smooth and solid to the touch.

Credit: www.youtube.com
Tools And Materials
Creating an end grain cutting board needs specific tools and materials. These items help you cut, shape, and finish the wood properly. You must have the right equipment to make a strong and beautiful board. The list below covers everything needed for this project.
Essential Tools
A table saw is key for cutting wood pieces accurately. A planer or jointer smooths the wood surfaces. You need a drill and clamps to hold parts tightly. Sandpaper or an electric sander polishes the board perfectly. A wood glue helps join all parts securely. These tools form the base of your workshop.
Additional Supplies
Choose hardwoods like maple, walnut, or cherry for durability. Mineral oil protects the wood and keeps it looking fresh. Beeswax adds a nice finish and water resistance. Use a measuring tape and pencil for precise cuts. Gloves and safety glasses keep you safe during work. These supplies improve the quality and safety of your cutting board.
Preparing The Wood
Preparing the wood is the first important step in making an end grain cutting board. This step sets the foundation for a strong and beautiful board. You need clean, smooth, and properly sized wood pieces to start.
Cutting To Size
Start by cutting your wood into strips. Use a saw that gives you straight cuts. Measure each piece carefully for equal width and length. Uniform pieces make the assembly easier and the final board neater. Cut slightly larger than the final size to allow for sanding.
Planing And Jointing
Next, plane each wood strip to make surfaces smooth and flat. Use a planer to remove any roughness and uneven spots. Then, joint the edges to create perfect, straight lines. Straight edges help the pieces fit tightly together. This step prevents gaps in your cutting board.
Arranging The Blocks
Arranging the blocks is a key step in making an end grain cutting board. It shapes the board’s look and strength. Careful planning helps create a beautiful and durable surface. Each block fits like a puzzle piece. The right pattern makes the board stand out. Understanding glue-up techniques is also important to keep blocks tightly joined.
Design Patterns
Selecting a design pattern defines the board’s style. Common patterns include checkerboards, stripes, and random layouts. You can mix wood types for color contrast. Use a ruler to align blocks evenly. Think about the board’s final size and shape. A balanced pattern improves both function and appearance. Test your layout on a flat surface first. Adjust blocks to avoid gaps and uneven edges.
Glue-up Techniques
Glue-up holds the blocks firmly together. Use wood glue designed for cutting boards. Spread glue evenly on each block edge. Press blocks tightly to remove air pockets. Apply clamps to keep pressure during drying. Clamps ensure a flat, strong bond. Wipe off excess glue before it dries. Let glue cure fully before sanding or finishing. Proper glue-up prevents cracks and loose blocks later.
Clamping And Drying
Clamping and drying are key steps in making an end grain cutting board. These steps hold the wood pieces tightly and let glue dry well. Without proper clamping and drying, the board may not be strong or smooth. Take time here to get the best results.
Proper Clamping
Use strong clamps to press wood blocks firmly. Place clamps evenly around the board to avoid gaps. Check that all edges line up before tightening clamps. Tighten clamps slowly to prevent wood from moving. Use cauls or scrap wood to spread clamp pressure. This prevents dents on the wood surface. Keep clamps on until glue feels set and firm.
Drying Time
Let the glued board dry for at least 24 hours. Drying longer makes the bond stronger. Keep the board in a dry, warm place. Avoid moving or pressing the board during drying. Check if glue is fully hardened before removing clamps. Patience here prevents weak joints and warping.
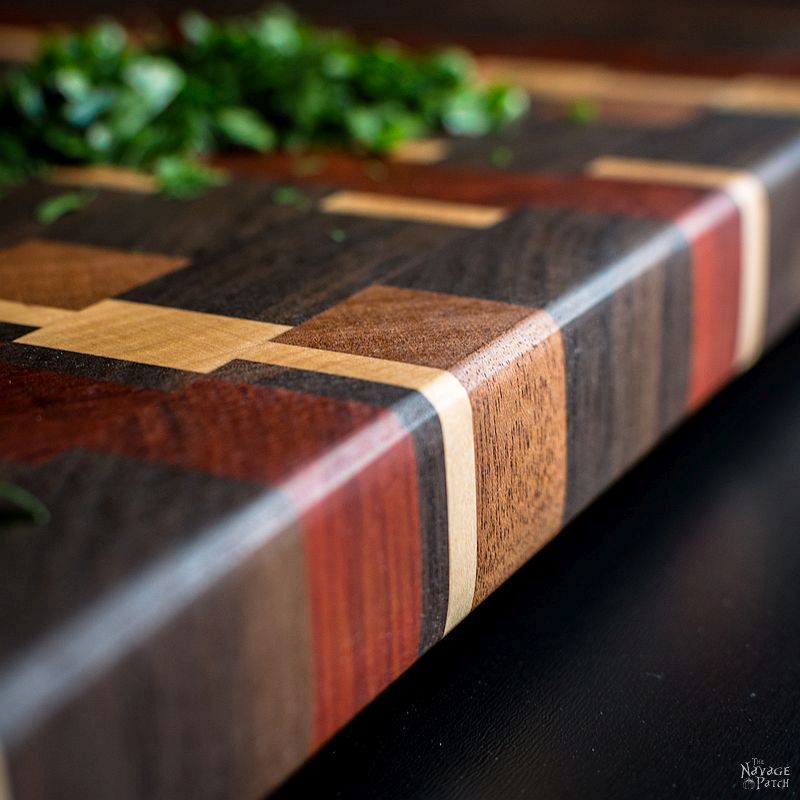
Credit: www.thenavagepatch.com
Shaping The Board
Shaping the end grain cutting board is an important step. It gives the board a clean, smooth look. You also make it more useful and safe to handle. This part is about trimming the edges and adding juice grooves. These small details make a big difference in the board’s function and style.
Trimming Edges
Start by trimming the edges to get a neat shape. Use a saw or a router for this task. Cut the sides straight and even. Remove any rough spots or uneven parts. Smooth the edges with sandpaper. Rounded edges feel better in your hands and look nice. Take your time to get smooth, clean edges.
Adding Juice Grooves
Juice grooves catch liquids from fruits or meat. They stop spills from reaching your countertop. Use a router with a round bit to carve the groove. The groove should run near the board’s edges. Make it about 1/4 inch deep and wide. This groove adds function without hurting the board’s strength. It helps keep your kitchen cleaner during food prep.
Sanding Process
The sanding process is a key step in making an end grain cutting board. It smooths the surface and removes rough spots. Sanding helps to reveal the wood’s natural beauty. It also prepares the board for finishing. Proper sanding makes the board safe to use and pleasant to touch.
Start sanding with coarser grit and move to finer grit papers. This method ensures even sanding and a polished look. Take your time and sand every corner well. The goal is a smooth, flat surface without scratches.
Sanding Grit Progression
Begin with 80-grit sandpaper to remove glue and uneven areas. Next, use 120-grit to smooth the surface further. Follow with 220-grit for a fine finish. For an ultra-smooth feel, finish with 320-grit sandpaper. Always sand along the grain lines for best results. Change sandpaper regularly to avoid clogging.
Sanding Tips
Use a sanding block or orbital sander to keep pressure even. Sand lightly around edges to avoid rounding them too much. Check the surface often by running your hand over it. Clean dust between sanding steps with a damp cloth. Wear a dust mask to protect your lungs. Patience during sanding leads to a beautiful cutting board finish.
Finishing Touches
Finishing touches give your end grain cutting board its final look and protection. These steps help keep the board safe and beautiful for years. Proper finishing also stops moisture and stains from damaging the wood. Let’s explore how to apply safe finishes and care tips for your board.
Food-safe Finishes
Choose finishes that are safe for food contact. Mineral oil is a popular choice. It soaks into the wood and protects it from drying out. Beeswax adds a nice shine and extra moisture barrier. Mix beeswax with mineral oil for a smooth finish. Avoid finishes with chemicals or solvents. They can be harmful and ruin your board’s surface. Apply oil with a soft cloth. Let it soak for a few hours. Wipe off any extra oil. Repeat this process several times until the wood is fully saturated.
Maintenance Advice
Keep your board dry and clean. Wash with warm water and mild soap after use. Avoid soaking or putting it in the dishwasher. Dry it immediately with a towel. Reapply mineral oil monthly or when the wood looks dry. Regular oiling keeps the board strong and smooth. Sand lightly if the surface feels rough or has cuts. Then, reapply oil to restore the finish. Proper care extends your cutting board’s life and keeps it safe for food.

Credit: www.instructables.com
Frequently Asked Questions
What Materials Are Best For Making End Grain Cutting Boards?
Hardwoods like maple, walnut, and cherry are ideal. They resist knife marks and last longer. Avoid softwoods as they dent easily and harbor bacteria.
How Do You Glue Wood Pieces For End Grain Boards?
Use waterproof, food-safe wood glue. Apply evenly on edges, then clamp tightly. Let it cure for 24 hours for a strong bond.
Why Is End Grain Cutting Board Better Than Edge Grain?
End grain boards show wood fibers vertically, absorbing knife impact. They stay sharper longer and reduce blade wear, unlike edge grain boards.
How Do You Finish An End Grain Cutting Board?
Use food-safe mineral oil or beeswax. Apply evenly and let it soak in. This protects wood and enhances its natural beauty.
Conclusion
Making an end grain cutting board takes patience and care. You cut and glue wood pieces carefully. Sanding smooth makes the board safe and nice. Oil the board to protect and shine it. Using your own board feels special in the kitchen.
Try this project to enjoy a useful, handmade item. Keep practicing to improve your woodworking skills. A well-made cutting board lasts many years. Simple steps create a strong and beautiful kitchen tool.